
The Magic of the Wind
For Italian, Dutch and Danish translation, click on the flags.


For this tutorial you will need the materials in the zip file below.

Unzip the materials into a working folder you have created on your desktop named The Magic of the Wind. Please duplicate and close originals. Export the Smoke 3 and Smoke 5 brushes into your PSP/Brushes folder. Place the Mask in your PSP/Masks folder. Place the Wind.pfp Preset in your andromeda-serie portable/Perspective-Presets/02Full Canvas/23Freeform Folder and the Pink and Black frame into your PSP/Picture Frames folder. I have used the plugins Xenofex 1.0/Fluffy Little Clouds and Andromeda/Perspective in this tutorial. It is assumed you have a working knowledge of PSP to follow these directions. I have used PSPX6 for this tutorial but other versions may be used.
Thanks go to Roby2765 for the beautiful lady tube used in this tutorial.
Use the bookmark below to mark your place along the way.

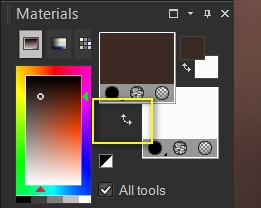
1. In Materials Palette, set Foreground to #fbfbfb, Background to #3c2a24.
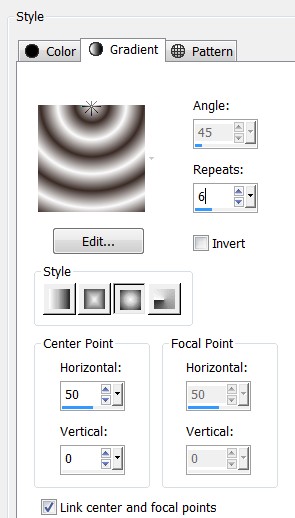
2. In Materials Palette, set to Gradient, Style Sunburst, Repeats 6, Invert unchecked. Center point: Horizontal 50/Vertical 0. Link center and focal points checked.
3. New/New Image 800px by 400px. Flood fill with Gradient.
4. Adjust/Blur/Gaussian Blur, Radius set to 50.
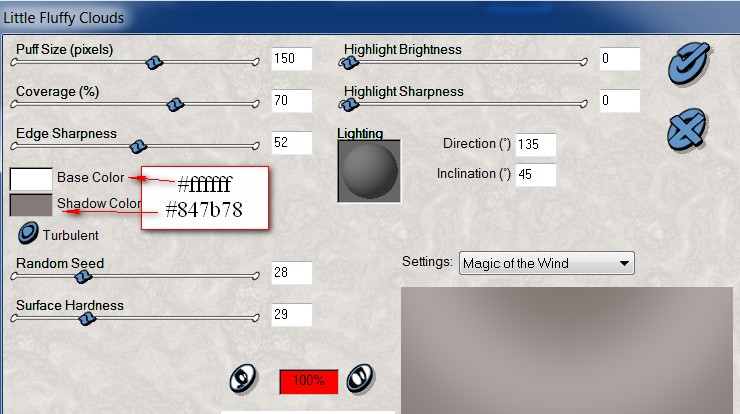
5. Effects/Xenofex 1.0/Little Fluffy Clouds.
6. Adjust/Backlighting.
7. Effects/Edge Effects/Enhance.
8. Layers/New Raster Layer. Flood fill with Background color #3c2a24.
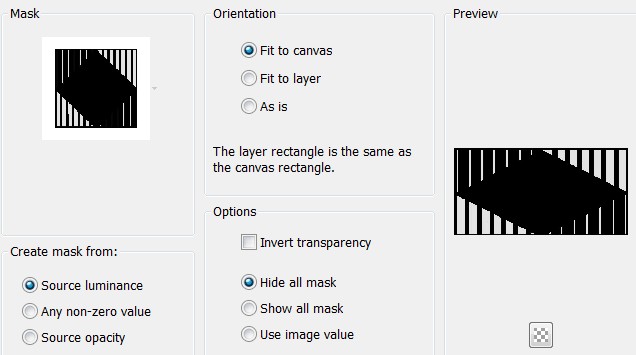
9. Layers/Load/Save Mask. Load Mask from Disk. Select Mask kkmmask134.msk. Load.
10. Merge/Merge Group.
11. Effects/3D Effects/Drop Shadow. Vertical 0, Horizontal 7, Opacity 60, Blur 15, color #000000.
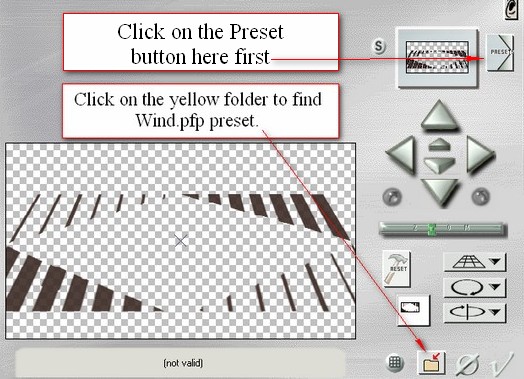
12. Effects/Andromeda/Perspective. Click the Preset button in Andromeda/Perspective in upper right corner. Select the Preset Wind.pfp from the yellow folder at the bottom of Andromeda/Perspective.
13. Open 13-2014 woman by Roby2765.pspimage. Copy/Paste as New Layer.
14. Effects/3D Effects/Drop Shadow. Vertical 0, Horizontal 21, Opacity 60, Blur 24, color #000000.
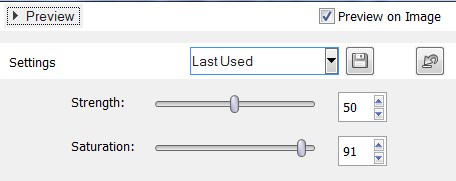
15. Adjust/Sharpness/Sharpen.
16. Change the Foreground Gradient to color #fbfbfb.
17. Layers/New Raster Layer.
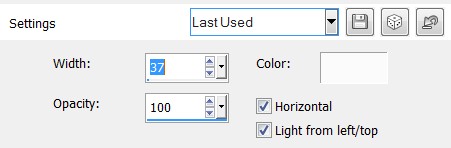
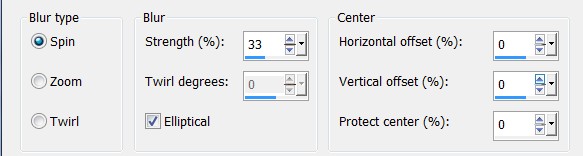
18. From Tool bar, Select the Paint Brush tool. Use settings as shown below, stamp Brush Smoke 3 on tip of her nose with Foreground color so smoke goes through her hands horizontally.

19. Drop Opacity down to 60.
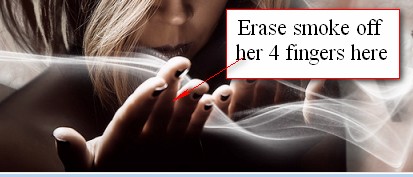
20. Using Eraser tool, set to size 16, all other settings at default, erase smoke from in front of her hand on the left.
21. Merge/Merge Visible. Minimize for now; we will use it later.
22. New/New Image 840px by 740px. Flood fill with Background color #3c2a24.
23. Effects/Texture Effects/Blinds.
24. Adjust/Blur/Radial Blur.
25. Effects/Edge Effects/Enhance.
26. Maximize the 800px by 400px image. Copy/Paste as New Layer.
27. Effects/3D Effects/Drop Shadow. Vertical 12, Horizontal 12, Opacity 60, Blur 15, color #000000.
28. Effects/3D Effects/Drop Shadow. Vertical -12, Horizontal -12, Opacity 60, Blur 15, color #000000.
29. Adjust/Sharpness/High Pass Sharpen.
30. Layers/New Raster Layer.
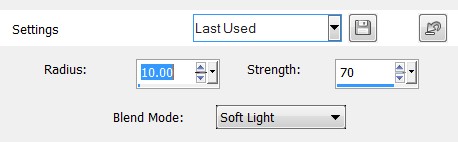
31. Select the Paint Brush tool, choose Smoke 5, change to Size 850, color #fbfbfb with settings as seen below. Stamp once at the top center of the woman layer.

32. Image/Mirror.
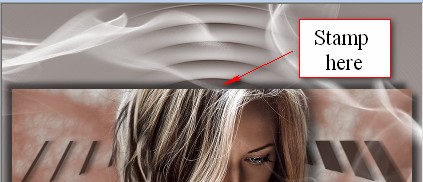
33. Stamp again at the bottom of the working image at the center point using settings in Step 31.
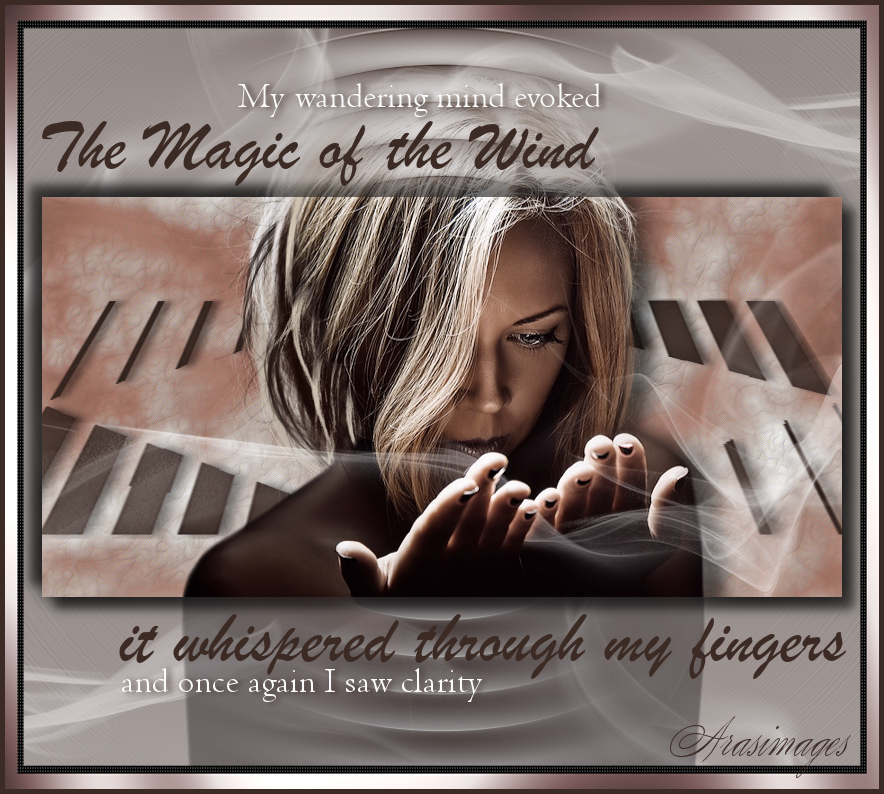
34. Lower Opacity to 50. Pull Raster 3 layer below Raster 2 layer. Go back to top layer, highlight and continue.
35. Open 13-2014 woman by Roby2765 .pspimage. Copy/Paste as New Layer.
36. Lower Opacity of woman to 35.
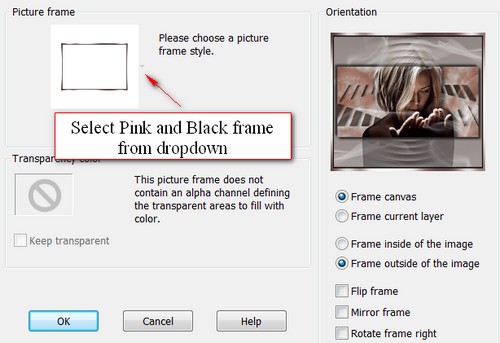
37. Image/Picture Frame. From drop down box, choose Frame Pink and Black.
38. From Tool bar, select Text tool. Select the Font Brush Script MT, Size 72.

39. In the top portion of the working image, type out the words "The Magic of the Wind". Convert to Raster Layer. Place the words to the left above the inner image as I have mine.
40. In the bottom portion of the working image, type out the words "it whispered through my fingers". Convert to Raster Layer. Place the words to the right under inner image as I have done.
41. In Materials Palette, switch Foreground with Background by clicking on double arrows.
42. From Tool bar, select the Font Centaur, Size 36, color #fbfbfb, other settings as seen below.

43. In the top of the working image, type out the words "My wandering mind evoked". Convert to Raster Layer.
44. Move words to set to right above "The Magic of the Wind" text.
45. Effects/3D Effects/Drop Shadow. Vertical 1, Horizontal 4, Opacity 100, Blur 9, color #3c2a24.
46. In the bottom of the working image, type out the words "and once again I saw clarity", using same settings as in Step 42. Convert to Raster Layer.
47. Move words to set below and left of the words "it whispered through my fingers".
48. Effects/3D Effects/Drop Shadow. Vertical 1, Horizontal 4, Opacity 100, Blur 9, color #3c2a24.
49. Image/Add Borders/Add 5px border, Symmetric checked, color #3c2a24.
50. Sign your name or leave your watermark if you wish. Merge/Merge Visible if necessary. Save as .png or .jpg file.
This tutorial was tested by PamelaD and Evatexas. Thanks ladies!
If you are going to use this tutorial for stationery, cards or place the tutorial/tag on another site, I would appreciate you contacting me for permission, giving Arasimages credit for the original tutorial and if possible, a link back to my site. Thank you.
Copyright © Arasimages All Rights Reserved