

Land of Make Believe
For Italian, French, Dutch and Danish translation, click on the flags.


For this tutorial you will need the materials in the zip file below.

Unzip the materials into a working folder you have created on your desktop named Land of Make Believe. Duplicate and close originals. Place the Selection in your PSP/Selections folder and Mask in your PSP/Mask folder. I have used the plugin Xero/Porcelain for this tutorial. It is assumed you have a working knowledge of PSP to follow these directions. I have used PSPX6 but you may use other versions.
Thanks go to the unknown tubers for the beautiful scrap tubes used in this tutorial.
Use the bookmark below to mark your place along the way.

1. In Materials Palette, set Foreground to #fae7b3, Background to #919c4d.
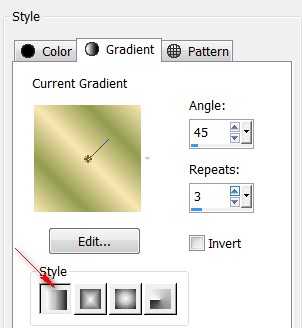
2. In Materials Palette, set to Style Linear, Angle 45, Repeats 3, Invert unchecked, Center Point and Focal Point grayed out.
3. New/New Image 750px by 600px. Flood fill with Gradient.
4. Effects/Texture Effects/Soft Plastic.

5. Effects/Edge Effects/Enhance.
6. Layers/New Raster Layer.
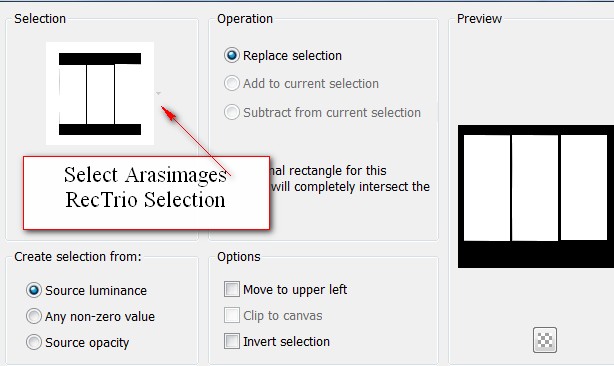
7. Selections/Load/Save Selection/Load Selection from Disk. Choose ArasimagesRecTrio from drop down. Load.
8. Open 372607415.jpg image. Copy/Paste into Selection.
9. Drop Opacity of Selection to 70.
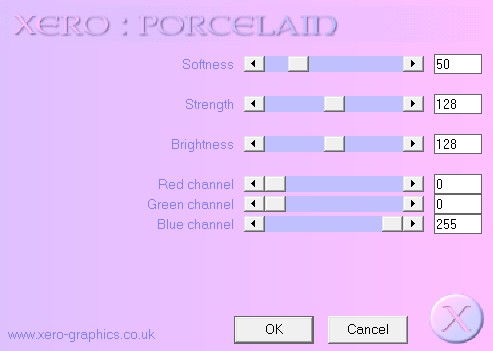
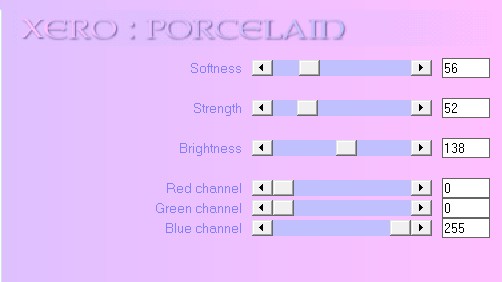
10. Effects/Xero/Porcelain.
11. Open dragon-stone.jpg image.
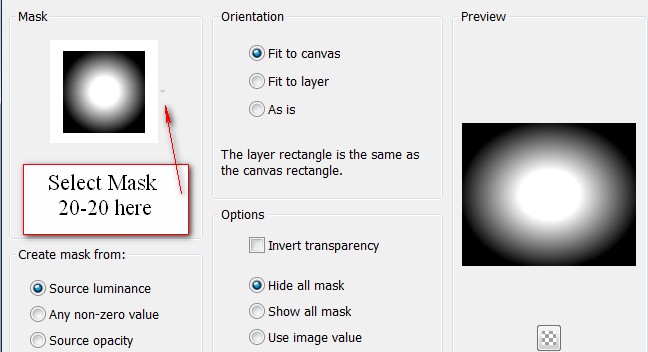
12. Working on dragon-stone image, Layers/Load/Save Mask/Load Mask From Disk. Select 20-20 Mask. Load.
13. Merge/Merge Group. Copy. Put aside.
14. Layers/New Raster Layer.
15. Flood fill selection with color #32351f.
16. Selections/Modify/Contract by 3px. Press delete.
17. Layers/New Raster Layer.
18. Flood fill selection with color #95b7b9.
19. Selections/Modify/Contract by 5px. Press delete.
20. Layers/New Raster Layer.
21. Flood fill selection with color #32351f.
22. Selections/Modify/Contract by 3px. Press delete.
23. Selections/Select None.
24. Highlight Raster 2. Paste modified dragon-stone as New Layer.
25. Layers/Blend Mode/Luminance (L).
26. Drop Opacity down to 70.
27. Image/Resize/Resize by 45%/Resize all layers unchecked.
28. Move dragon over to middle of image and toward the bottom a little.
29. Adjust/Sharpness/Sharpen.
30. Go to top layer and highlight to continue.
31. Open 0_b7a4f_424072e2_L.png. Copy/Paste as New Layer.
32. Move little dragon into bottom left corner.
33. Effects/3D Effects/Drop Shadow. Vertical 14, Horizontal 10, Opacity 93, Blur 25, color #2c2f1b.
34. Effects/3D Effects/Drop Shadow. Vertical -14, Horizontal -10, Opacity 93, Blur 25, color #2c2f1b.
35. Open 0_b7a4f_424072e2_L.png image of little dragon. We are going to "tube" the egg shell for our use in the tutorial.
36. Scroll the image to 300% to make it easier to draw around.
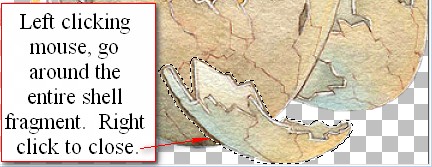
37. From the tool bar, choose the Selection tool. Select Freehand Selection/Point to point. Mode set to Add (Shift), Feather 1 Anti-alias checked. All other settings set to default.

38. Using your left click of the mouse, carefully select around the outer edge of the egg shell at the bottom of little dragon image. You will click lots of times to achieve the contour of the egg shell.
39. Copy. On work space, paste as New Image.
40. Effects/Image Effects/Seamless Tiling. Apply 2X. Save as Tubed Shell.png and set aside. We will be using this for a border pattern later.
41. Go back to your main working image. Paste as New Layer.
42. Image/Resize/Resize by 63%/Resize all layers unchecked.
43. Adjust/Sharpness/Sharpen.
44. Effects/3D Effects/Drop Shadow. Vertical 14, Horizontal -10, Opacity 93, Blur 25, color #2c2f1b.
45. Place resized egg shell in bottom right corner, over bottom border of right rectangle.
46. Paste as New Layer again. Image/Mirror.
47. Effects/3D Effects/Drop Shadow. Vertical -14, Horizontal -10, Opacity 93, Blur 25, color #2c2f1b.
48. Effects/3D Effects/Drop Shadow. Vertical 14, Horizontal 10, Opacity 93, Blur 25, color #2c2f1b.
49. Place egg shell over the resized egg shell in bottom right corner.
50. Image/Add Borders/Add 2px border, Symmetric checked, color #32351f.
51. Image/Add Borders/Add 5px border, Symmetric checked, color #95b7b9.
52. Image/Add Borders/Add 1px border, Symmetric checked, color #32351f.
53. Image/Add Borders/Add 40px border, Symmetric checked, color #fae7b3.
54. Select the 40px border with the Magic Wand to activate it.
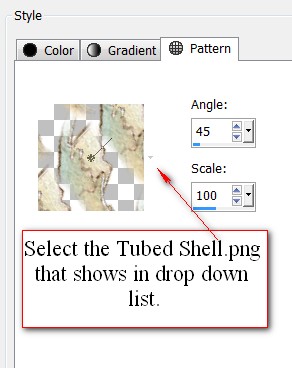
55. From the Material's Palette, select Pattern. Choose the Tubed Shell.png that shows in the dropdown list. (Have the Tubed Shell.png open on your work space.)
56. Flood fill the 40px border with the egg shell pattern.
57. Adjust/Blur/Gaussian blur, Radius of 9. Selections/Select None.
58. Image/Add Borders/Add 1px border, Symmetric checked, color #32351f.
59. Open 0_8e593_167345c4_L.png. Copy/Paste as New Layer.
60. Effects/3D Effects/Drop Shadow. Vertical 6, Horizontal 6, Opacity 93, Blur 6, color #32351f.
61. Place flowers in upper left corner.
62. Adjust/Sharpness/Sharpen.
63. Paste the flowers again as New Layer. Image/Flip. Image/Mirror.
64. Effects/3D Effects/Drop Shadow. Vertical -6, Horizontal -6, Opacity 93, Blur 6, color #32351f.
65. Adjust/Sharpness/Sharpen.
66. Move into bottom right corner.
67. In Materials Palette set the Background color to #fae7b3.
68. From Tool bar, select the Text tool, font Cheddar Salad BTN, Size 26, Line style solid, all other settings as seen below.

69. Using above settings, type out the poem I have written below.
70. "In the land of make believe (enter) where Dragons freely roam (double enter), A mother's love is realized (enter) and the forest now their home (double enter). Her waiting time is over (enter), her baby's cry is sweet (double enter), And love shall roam the forest floor (enter), when Mother-Baby meet". Convert to Raster Layer.
71. Place poem to the right of baby dragon.
72. Effects/3D Effects/Drop Shadow. Vertical 1, Horizontal 1, Opacity 75, Blur 1, color #32351f.
73. Duplicate. Merge/Merge Down. Copy and Paste as New Image and save as .png file for safe keeping. (We will use it later). Close off poem layer.
74. Image/Add Border/Add 1px border, Symmetric checked, color #32351f.
75. Image/Add Border/Add 5px border, Symmetric checked, color #95b7b9.
76. Image/Add Border/Add 1px border, Symmetric checked, color #32351f.
77. Effects/Xero/Porcelain.
78. Copy Poem/Paste as New Layer.
79. Objects/Align/Vertical Center, repeat with Horizontal Center.
80. Use right arrow key to move poem to the right as I have done mine.
81. Adjust/Sharpness/Sharpen.
82. Sign your name or leave your watermark if you wish. Layers/Merge/Merge Visible and save as .png or .jpg file.
This tutorial was tested by PamelaD and Evatexas. Thanks ladies!
If you are going to use this tutorial for stationery, cards or place the tutorial/tag on another site, I would appreciate you contacting me for permission, giving Arasimages credit for the original tutorial and if possible, a link back to my site. Thank you.
Copyright © Arasimages All Rights Reserved