
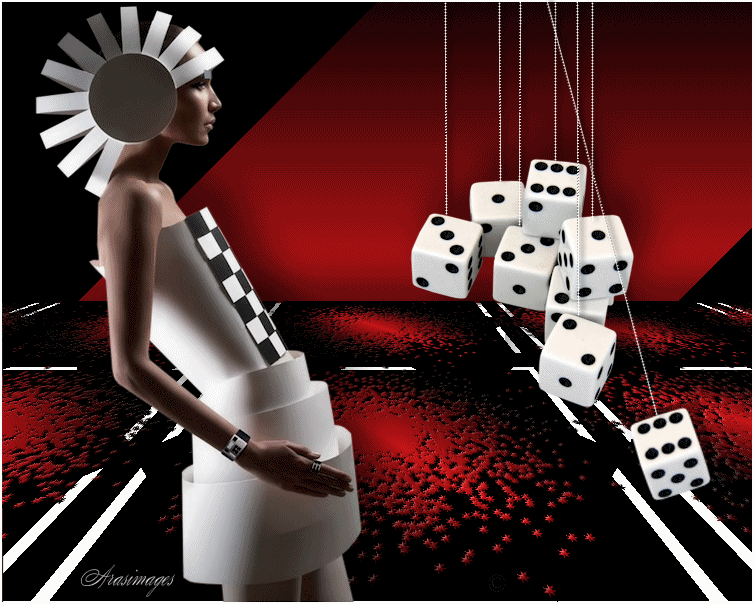
A Dicey Situation
For Italian, Dutch, Danish and French translation, click on the flags.


For this tutorial you will need the materials in the zip file below.

Unzip the materials into a working folder you have created on your desktop named A Dicey Situation. Duplicate and close originals. Place the Selection in your PSP/Selections folder. Place the Style Line in your PSP/Styled Lines folder. I have used the plugins MuraMeister/Perspective and Copies, AAA Frames/Texture Frames and Filter Attacks for this tutorial. (Information on Attacks is included in materials; where to find it for your computer and how to install it). It is assumed you have a working knowledge of PSP to follow these directions. I have used PSPX6 but you may use other versions.
Thanks go to JHanna to Alejandra Rosales for the great tubes used in this tutorial. A special thanks goes to Evatexas for her work on the animated die used in this tutorial.
Use the bookmark below to mark your place along the way.

1. In Materials Palette, set Foreground to #c41417, Background to #000000.
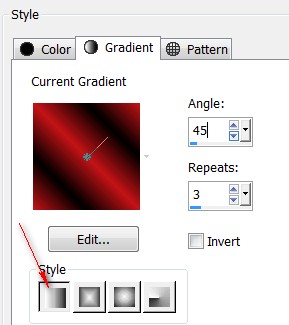
2. In Materials Palette, Gradient set to Style Linear, Angle 45, Repeats 3, Invert unchecked, Center Point and Focal Point grayed out.
3. New/New Image 750px by 600px. Flood fill with Gradient.
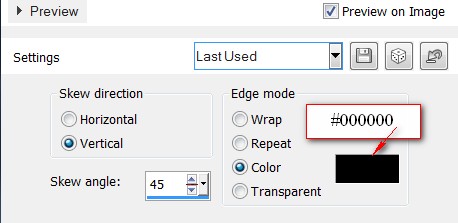
4. Effects/Geometric Effects/Skew.
5. Using Selection tool set to Rectangle, Feather 1, Mode Add (Shift), draw a rectangle from 300px on left side to 750px right bottom corner.

6. Layers/New Raster Layer.
7. Flood fill with #ffffff.
8. Effects/3D Effects/Drop Shadow. Vertical -26, Horizontal 0, Opacity 50, Blur 50, color #000000.
9. Selections/Select None.
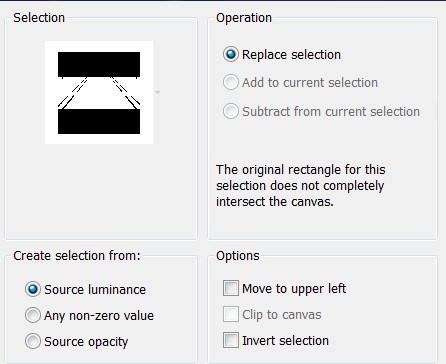
10. Selections/Load/Save Selection/Load Selection from Disk.
11. From the drop down, choose ArasimagesPerspectiveLines. Load.
12. Layers/New Raster Layer. Flood fill Selection with #000000.
13. Adjust so white lines meet horizon if necessary. Selections/Select None.
14. Layers/New Raster Layer. Flood fill with Gradient.
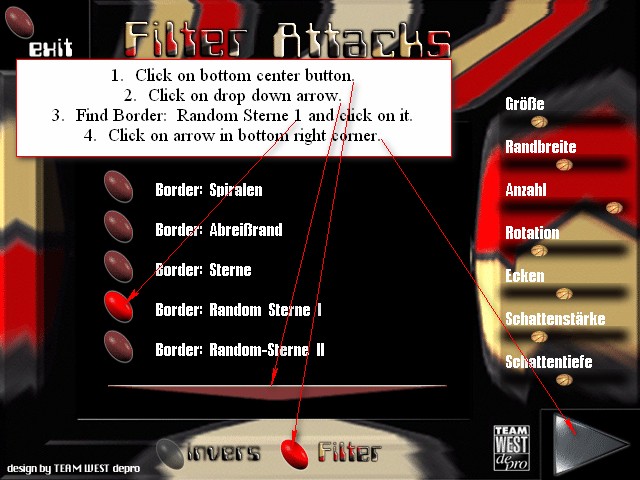
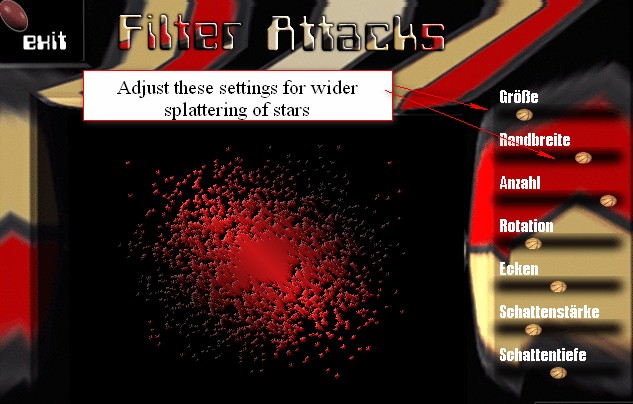
15. Effects/Filter Attacks. Click on bottom center button, then on drop down arrow to find Border: Random Sterne 1. Click on Random Sterne 1 button to select the settings. Click on bottom right arrow to apply.
NOTE: This step may be omitted and use Attacks_Premade_Layer.pspimage instead.
16. Effects/Mura'sMeister/Perspective Tiling.

17. Open 3080-dados@Alejandra RosalesUT-21-12-07.pspimage. Copy/Paste as New Layer.
18. Image/Resize/Resize by 44%/Resize all layers unchecked.
19. Effects/3D Effects/Drop Shadow. Vertical -29, Horizontal 17, Opacity 50, Blur 50, color #000000.
20. Move to the right a bit.
21. Using Selections tool set to rectangle, Feather 0, select around the bottom left die. Delete from cluster of dice.
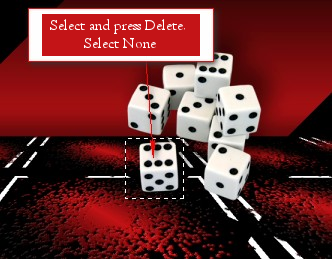
22. Selections/Select None.
23. Layers/New Raster Layer.
24. Change Gradient in Materials Palette to Color #ffffff.
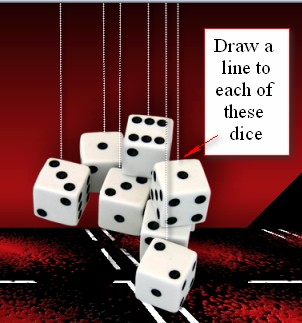
25. From Tool bar, select the Pen Tool. Set it to settings below using Line Style krisbigdot.


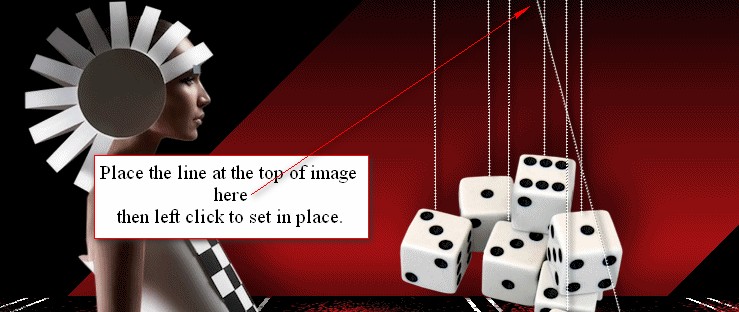
26. Draw a line from top of image to top of each die as I have done. Right click/Apply after each line.
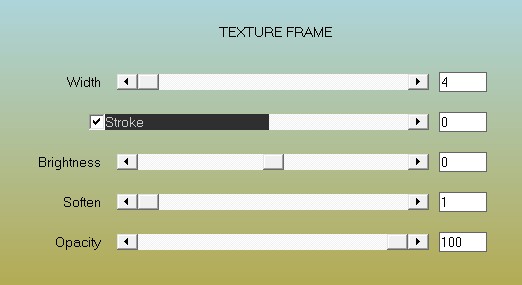
27. Effects/3D Effects/Drop Shadow. Vertical 0, Horizontal 4, Opacity 100, Blur 8, color #000000.
28. Effects/Edge Effects/Enhance. Effects/Edge Effects/Enhance More.
29. Open JHanna_737 tube.pspimage. Copy/Paste as New Layer.
30. Image/Resize/Resize by 79%/Resize all layers unchecked. Move to left side of image.
31. Effects/3D Effects/Drop Shadow. Vertical -29, Horizontal 17, Opacity 50, Blur 50, color #000000.
32. Image/Add Borders/Add 1px border, Symmetric checked, color #ffffff.
33. Effects/AAA Frames/Texture Frames.
34. Sign your name or leave your watermark if you wish. Layers/Merge/Merge Visible if needed and save as .png or .jpg file named A Dicey Situation in your working folder.
35. We will start the animation by opening the saved A Dicey Situation file in Animation Shop.
36. Duplicate the file 10 times having 11 frames in all.
37. Open the ArasimagesDieAnimation.psp file. Edit/Select All.
38. Right click on top of file and Copy.
39. Go back to main image. Edit/Select All.
40. Within the first frame, right click/Paste/Into Selected Frame.
41. Left click to set in place once you have placed the die animation in its correct position.
42. Animation/Frame Properties. Set speed from 10 to 13.
43. Click on the Animation button in the tool bar at top of AS and check to make sure your animated image is as you like. If not, redo and check again.
44. To Save: File/Save As. When the box comes up, by default it will save as a .gif file. Give the file the name A Dicey Situation. Click Save.
45. As the boxes come up, keep clicking on Next three times, then Finish.
46. Your creation is now complete! Thank you for working my tutorial.
This tutorial was tested by PamelaD and Evatexas. Thanks ladies!
If you are going to use this tutorial for stationery, cards or place the tutorial/tag on another site, I would appreciate you contacting me for permission, giving Arasimages credit for the original tutorial and if possible, a link back to my site. Thank you.
Copyright © Arasimages All Rights Reserved