
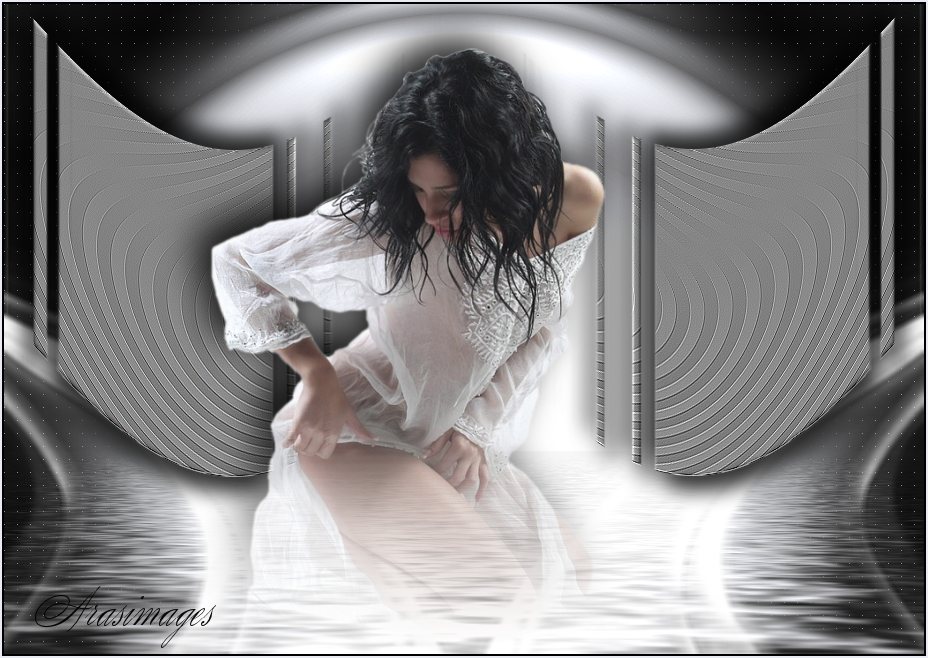
Rising Waters
For Italian, Dutch, Danish and German translation, click on the flags.


For this tutorial you will need the materials in the zip file below.

Unzip the materials into a working folder you have created on your desktop named Rising Waters. Duplicate and close originals. Place the Masks in your PSP/Mask folder. Click on the ArasimagesRisingWaters.f1s file and it automatically will show up in Eye Candy 5/Impact/Motion Trail. I have used the plugins Eye Candy5/Impact, FM Tile Tools/Blend Emboss, Filter Forge 2/Misc/Simple Emboss, Mura'sMeister/Perspective Tiling, Filter Factory A/Spotlight, Flaming Pear/Flood and Penta/Color Dot for this tutorial. It is assumed you have a working knowledge of PSP to follow these directions. I have used PSPX6 but you may use other versions.
Thanks go to Janaly for the beautiful woman tubed used in this tutorial.
Use the bookmark below to mark your place along the way.

1. In Materials Palette, set Foreground to #ffffff, Background to #000000.
2. New/New Image 920px by 650px. Flood fill with Background.
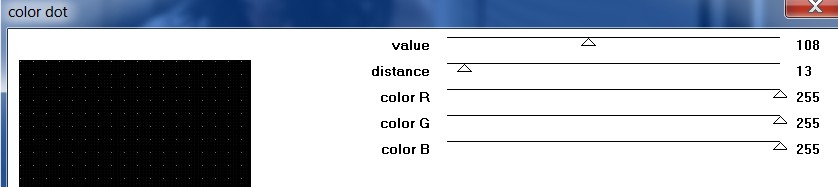
3. Effects/Penta/color dot.
4. Adjust/Brightness and Contrast/Brightness/Contrast. Brightness at 155, Contrast at 50, Linear Mode unchecked. (Older versions of PSP will not have the Linear Mode).
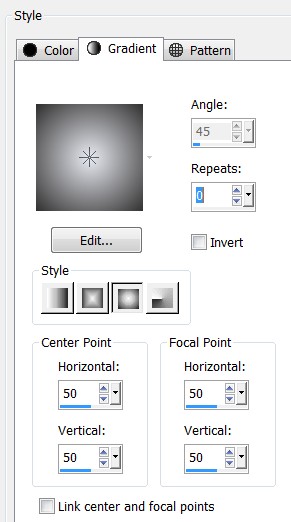
5. In Materials Palette, create a Gradient using Foreground color #e8ebf2/Background color #312f2f. Style Sunburst, Repeats set to 0, (Angle grayed out), Center and Focal Points at 50, Invert unchecked.
6. Layers/New Raster Layer. Flood fill with Gradient.
7. Using Pick Tool's bottom node, pull Gradient up to 300px. Use Default settings, Mode Scale so nodes will show.
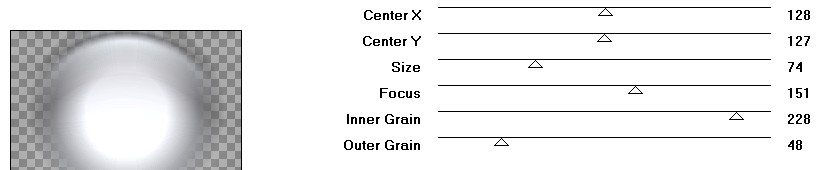
8. Effects/Eye Candy 5/Impact/Motion Trail. Apply ArasimagesRisingWaters.

9. Image/Flip.
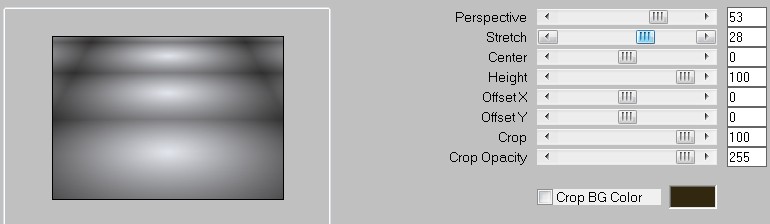
10. Effects/Mura'sMeister/Perspective Tiling.
11. Effects/Distortion/Warp.

12. Effects/FilterFactoryA/Spotlight.
13. Adjust/Sharpness/Sharpen.
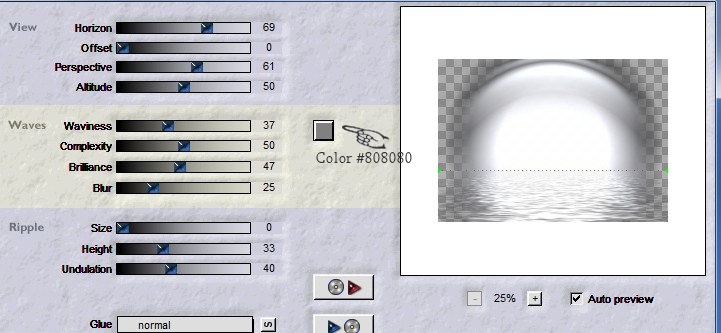
14. Effects/Flaming Pear/Flood, color #808080.
15. Layers/New Raster Layer. Flood fill with #ffffff.
16. Layers/Load/Save Mask/Load Mask from Disk. Select Narah_Mask_0424 from drop down. Load.

17. Merge/Merge Group.
18. Adjust/Blur/Average. Filter aperture 7.
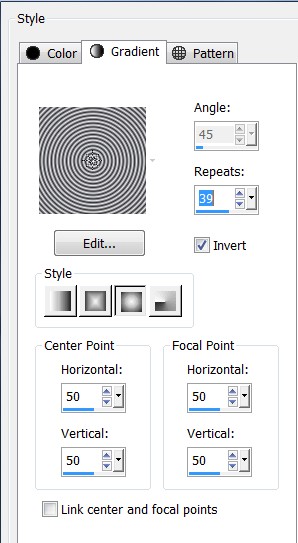
19. In Materials Palette/Gradient, set to Style Sunburst, (Angle grayed out), Repeats 39, Invert checked, Center Points and Focal Points all set to 50.
20. Layers/New Raster Layer. Flood fill with gradient.
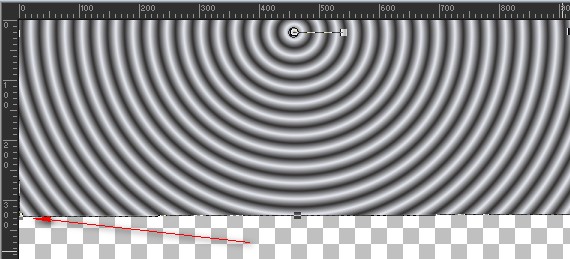
21. Using Pick Tool's bottom node, pull the gradient upwards to 325px.
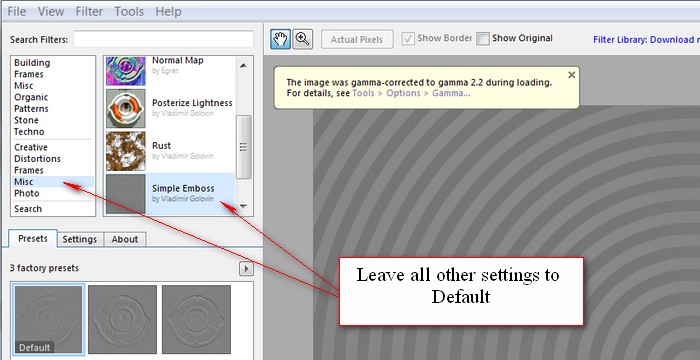
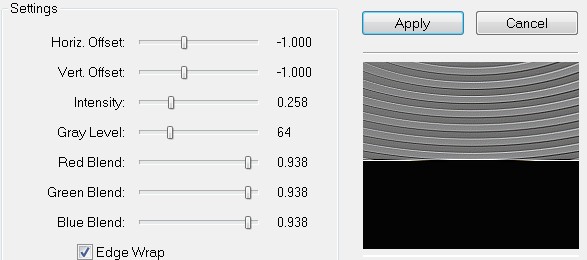
22. Effects/Filter Forge 2. Select Misc/Simple Emboss. Apply.
23. Effects/Edge Effects/Enhance.
24. Effects/FM Tile Tools/Blend Emboss.
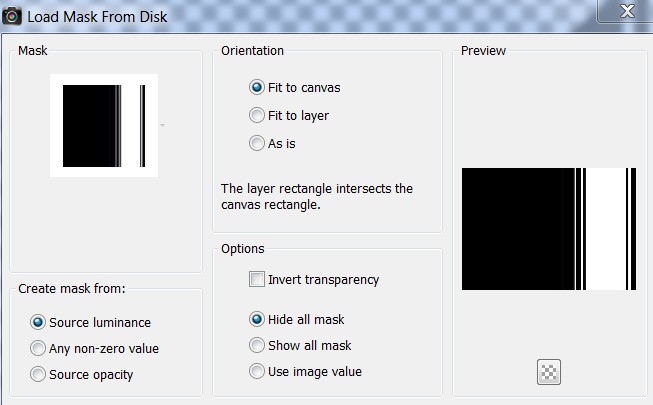
25. Layers/Load/Save Mask/Load Mask from Disk. Choose MD_Wild-Mask from drop down. Load.
26. Merge/Merge Group.
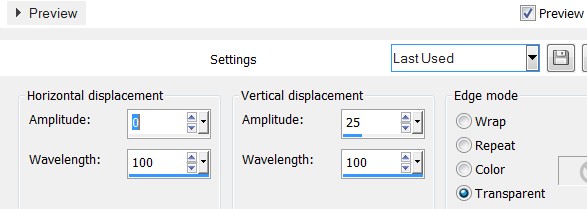
27. Effects/Distortion Effects/Wave.
28. Adjust/Sharpness/Sharpen.
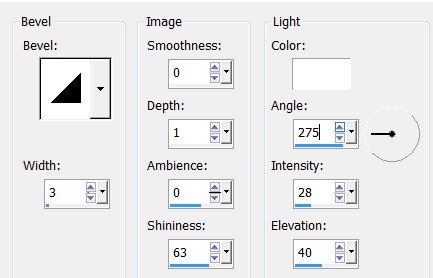
29. Effects/3D Effects/Inner Bevel.
30. Effects/3D Effects/Drop Shadow. Vertical -15, Horizontal -9, Opacity 80, Blur 30, color #000000.
31. Effects/3D Effects/Drop Shadow. Vertical 15, Horizontal 0, Opacity 80, Blur 30, color #000000.
32. Duplicate. Image/Mirror.
33. Merge/Merge Down. Move side panels upwards toward image top.
34. Open Janaly060309.pspimage. Copy/Paste as New Layer.
35. Effects/3D Effects/Drop Shadow. Vertical -15, Horizontal -15, Opacity 85, Blur 55, color #000000.
36. Move lady to left and down a little.
37. Layers/Load/Save Mask/Load Mask from Disk. Choose MasqueGradw from drop down. Load.

38. Merge/Merge Group.
39. Image/Add Borders/Add 2px border, Symmetric checked, color #000000.
40. Image/Add Borders/Add 2px border, Symmetric checked, color #e8ebf2.41. Sign your name or leave your watermark if you wish. Save as .png or .jpg file.
This tutorial was tested by PamelaD and Evatexas. Thanks ladies!
If you are going to use this tutorial for stationery, cards or place the tutorial/tag on another site, I would appreciate you contacting me for permission, giving Arasimages credit for the original tutorial and if possible, a link back to my site. Thank you.
Copyright © Arasimages All Rights Reserved