
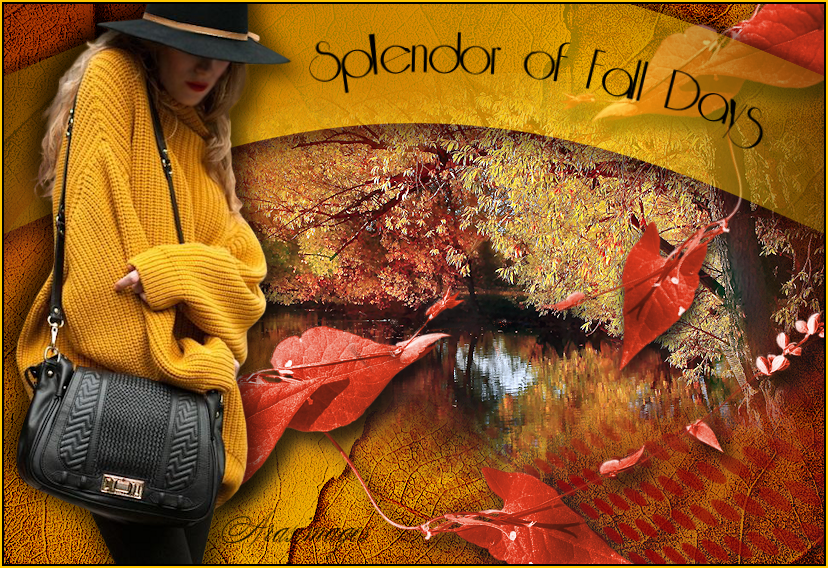
Splendor of Fall Days
For Italian, Dutch, Danish and Russian translation, click on the flags.


For this tutorial you will need the materials in the zip file below.

Unzip the materials into a working folder you have created on your desktop named Splendor of Fall Days. Please duplicate and close original tubes and use duplicates for your work. Place the ArasimagesFallSplendor.PspSelection in your PSP Files/Selections folder. I have used the plugins Caroline & Sensibility/CS_Reflection in this tutorial. It is assumed you have a working knowledge of PSP to follow these directions. PSPX6 was used for this tutorial but other versions may be used.
Thanks go to Maryse, toSilvie, and to the unknown tubers for the great tubes used in this tutorial.
Use the bookmark below to mark your place along the way.

1. In Materials Palette, set Foreground to #fec600, Background to #8b0004.
2. In Materials Palette, set to Gradient, Style Radial, Angle 15, Repeats 5, Center Point: Horizontal 72, Vertical 72, Invert unchecked.

3. New/New Image 820px by 560px. Flood fill with Gradient.
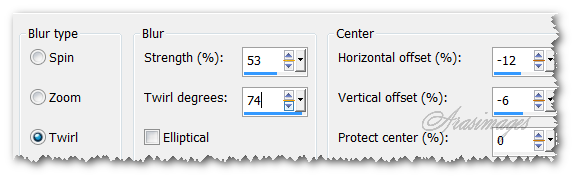
4. Adjust/Blur/Radial Blur.
5. Layers/New Raster Layer. Selections/Select All.
6. Open GoldenLeaves.png. Copy/Paste into Selection. Selections/Select None.
7. Set GoldenLeaves layer to Multiply.
8. Effects/Edge Effects/Enhance.
9. Layers/New Raster Layer. Flood fill with Background color #8b0004.
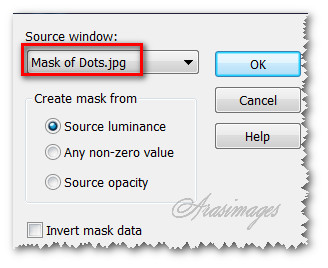
10. Open Mask of Dots.jpg in your working space. Highlight your working image. Layers/New Mask Layer/From Image. Select from the Source window Mask of Dots. Click OK.
11. Merge/Merge Group.
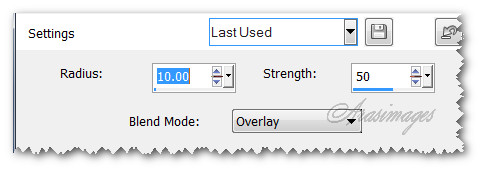
12. Adjust/Sharpenss/High Pass Sharpen.
13. Open Autumn1_30.30.2014.pspimage. Copy/Paste as New Layer.
14. Image/Mirror. Image/Resize/Resize by 80%/Resize all layers unchecked.
15. Move up and to right side a little.
16. Adjust/Sharpness/Sharpen.
17. Open Twining Leaves.png file. Copy/Paste as New Layer.
18. Effects/3D Effects/Drop Shadow. Vertical 12, Horizontal 12, Opacity 65, Blur 20, color #000000.
19. Adjust/Hue and Saturation/Colorize. Set Hue to 7, Saturation to 198.
20. Move into place at bottom of image.
21. Adjust/Sharpen/High Pass Sharpen as in Step #12.
22. Duplicate. Image/Free Rotate/Right/45 Degrees.
23. Image/Mirror. Image/Resize/Resize by 85%/Resize all layers unchecked.
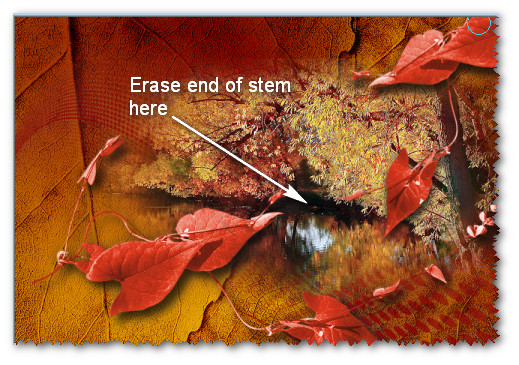
24. Pull into upper right corner. Using Eraser tool set to Size 30, erase the end of the leaf stem as seen below.
25. Layers/New Raster Layer.
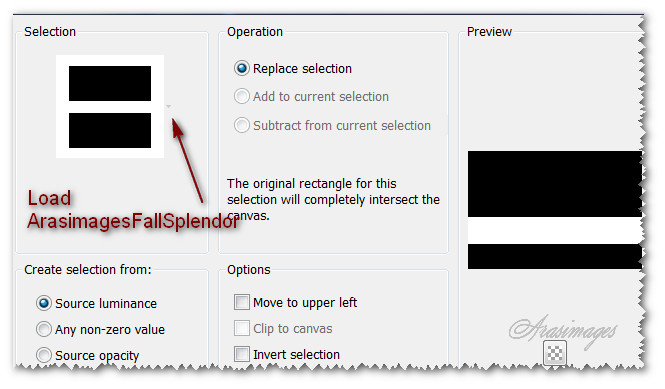
26. Selections/Load/Save Selections/Load Selections from Disk. From the Selection drop down, choose ArasimagesFallSplendor selection. Load.
27. Flood fill with Foreground color #fec600. Selections/Select None.
28. Effects/3D Effects/Drop Shadow. Vertical 12, Horizontal 12, Opacity 65, Blur 20, color #000000.
29. Effects/3D Effects/Drop Shadow. Vertical -12, Horizontal -12, Opacity 65, Blur 20, color #000000.
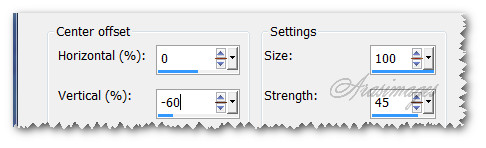
30. Effects/Distortion Effects/Warp. Use settings below.
31. Effects/Carolaine and Sensibility/CS_Reflection.
32. Drop Opacity to 61. Image/Flip. Move up beyond top border a little.
33. Open MR_Autumn Street Style.pspimage. Copy/Paste as New Layer.
34. Select around the tuber's name and delete. Selections/Select None.
35. Image/Resize/Resize by 85%/Resize all layers unchecked.
36. Effects/3D Effects/Drop Shadow. Vertical 12, Horizontal 12, Opacity 65, Blur 30, color #000000.
37. Effects/3D Effects/Drop Shadow. Vertical -12, Horizontal -12, Opacity 65, Blur 30, color #000000.
38. Move lady to left side of image.
39. In Materials Palette, close off Background. Change Foreground color to #000000.
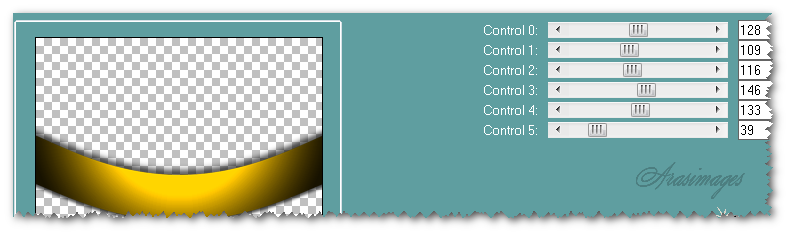
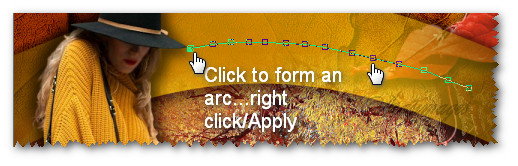
40. From Tool bar, select the Pen Tool. Use settings as seen below. Line Style Solid/Stroke 1. Left click dot to dot following the curve of the selection. Adjust nodes so line is curved nicely. Right click/Apply.

41. In Materials Palette, change Background to color #000000.
42. Layers/New Raster Layer.
43. From Tool bar, Select Text tool. Use settings as seen below, Style line Solid . Hover the cursor over the line until you see a curved line under the T. Begin to type the words "Splendor of Fall Days". Adjust if necessary. Convert to Raster Layer.

44. Drop down to Vector 1 layer with the curved line (below the text layer) and delete the line layer. Highlight the top layer to continue.
45. Image/Add Borders/Add 2px border, Symmetric checked, color #000000.
Sign your name if you wish and save your image as a .jpg or .png image with the name Splendor of Fall Days.
This tutorial was tested by PamelaD and Evatexas. Thanks ladies!
If you are going to use this tutorial for stationery, cards or place the tutorial/tag on another site, I would appreciate you contacting me for permission, giving Arasimages credit for the original tutorial and if possible, a link back to my site. Thank you.
Copyright © Arasimages All Rights Reserved