
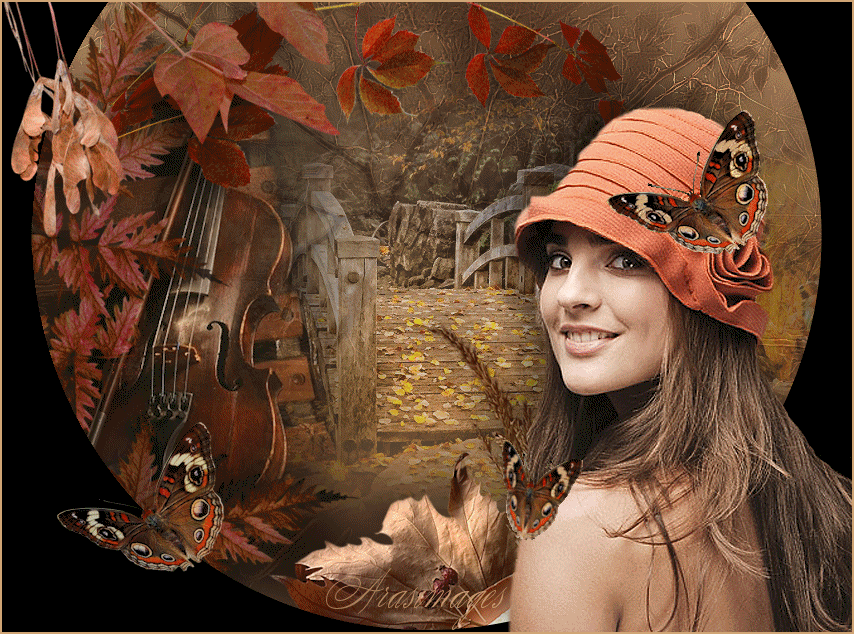
Ode to Fall
For Italian, Dutch and Danish translation, click on the flags.


For this tutorial you will need the materials in the zip file below.

Unzip the materials into a working folder you have created on your desktop named Ode to Fall. Please duplicate and close originals. Open Brush file and export it into your PSP Files/Brushes. I have used the plugin Nik Software/Color Efex Pro 3.0 Complete for this tutorial. It is assumed you have a working knowledge of PSP to follow these directions. I have used PSPX6 for this tutorial.
Thanks go to Silvie, to PamelaD from Arasimages for the tubed butterfly and to the unknown tubers for the beautiful tubes used in this tutorial.
Use the bookmark below to mark your place along the way.

1. In Materials Palette, set Foreground to #d1a575, Background to #543725.
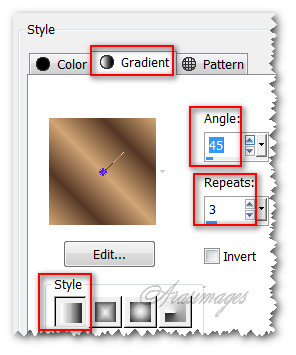
2. In Materials Palette, set to Gradient, Style Linear, Angle 45, Repeats 3, Invert unchecked, all other settings not applicable.
3. New/New Image 850px by 630px. Flood fill with Gradient.
4. Adjust/Blur/Gaussian Blur, Radius set to 28.
5. Layers/New Raster Layer.
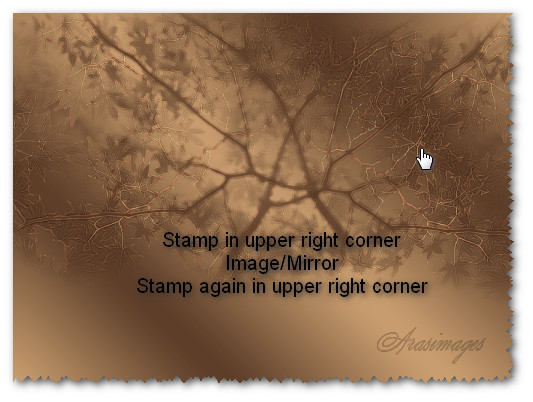
6. From Tool bar, select Paint Brush/Brush Leaves_and_trees_8. Stamp with right click using color #543725 on upper right area. Image/Mirror. Repeat stamp.

7. Effects/Edge Effects/Enhance More.
8. Open Autumn1_04.11.2012.pspimage. Copy/Paste as New Layer.
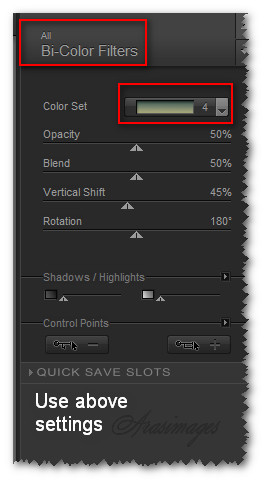
9. Effects/Nik Software/Color Efex Pro.3.0 Complete. Use Bi-Color Filters with Color Set to Cool/Warm 4.
10. Move a little to the right in image. Drop Opacity to 67.
11. Open ViolinMisted.pspimage. Copy/Paste as New Layer.
12. Move to left side of image. Drop Opacity to 87.
13. Open LargeFern.pspimage. Copy/Paste as New Layer.
14. Image/Resize/Resize by 70%/Resize all layers unchecked.
15. Drop Opacity to 87.
16. Move to left side of image over violin.
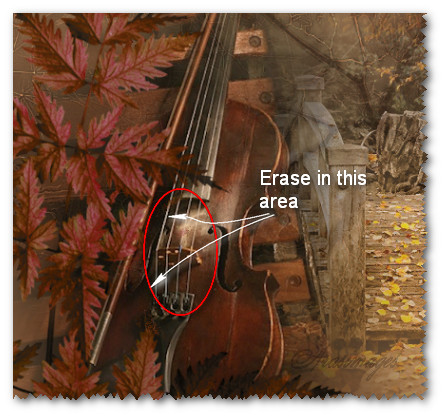
17. Using Eraser found in Tool bar, Size 30, all other settings at Default, erase some of the fern's fronds.
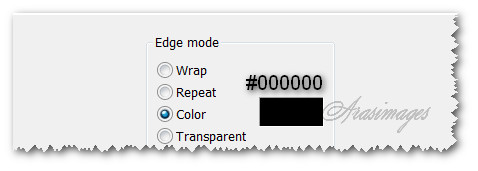
18. Effects/3D Effects/Drop Shadow. Vertical 18, Horizontal 18, Opacity 50, Blur 56, color #000000.
19. Open Leaf_Seashell.pspimage. Copy/Paste as New Layer.
20. Image/Resize/Resize by 56%/Resize all layers unchecked.
21. Move to center bottom of image.
22. Effects/3D Effects/Drop Shadow. Vertical -18, Horizontal -18, Opacity 50, Blur 56, color #000000.
23. Open ReddishBrownLeaves.pspimage. Copy/Paste as New Layer.
24. Image/Resize/Resize by 71%/Resize all layers unchecked.
25. Move to the top, touching left side and top.
26. Effects/3D Effects/Drop Shadow. Vertical 18, Horizontal -18, Opacity 50, Blur 56, color #000000.
27. Effects/Geometric Effects/Circle.
28. Open LeavesSeeds.pspimage. Copy/Paste as New Layer.
29. Image/Resize/Resize by 71%/Resize all layers unchecked.
30. Effects/3D Effects/Drop Shadow. Vertical 18, Horizontal -18, Opacity 50, Blur 56, color #000000.
31. Move to top of image on left side.
32. Open LadyInTangerineHat.pspimage. Copy/Paste as New Layer.
33. Image/Mirror.
34. Effects/3D Effects/Drop Shadow. Vertical -18, Horizontal -18, Opacity 50, Blur 56, color #000000.
35. Adjust/Sharpness/Sharpen. Move into bottom right corner.
36. Open Butterfly17.pspimage. Copy/Paste as New Layer.
37. Image/Resize/Resize by 48%/Resize all layers unchecked.
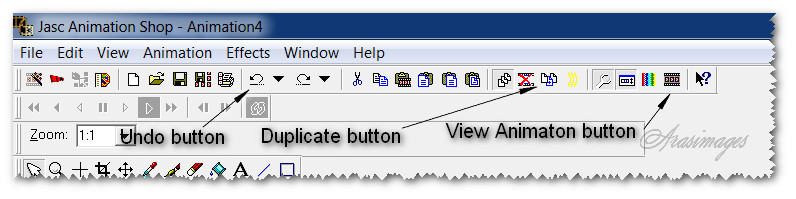
38. Effects/3D Effects/Drop Shadow. Vertical -18, Horizontal -18, Opacity 50, Blur 56, color #000000.
39. Place along circle in bottom left corner. Drop Opacity to 74.
40. Image/Add Border, Add 2px border, Symmetric checked, color #d1a575.
41. Sign your name or leave your watermark if you wish. Save as .png or .jpg file named Ode to Fall. COPY.
42. Open Animation Shop. In empty space Paste as New Animation.
43. Edit/Duplicate Selected or use the tool bar Duplicate button. Duplicate the new image 19 times, having 20 frames in all.
44. File/Open/ArasimagesSmallShoulderButterfly.gif. Click in first frame. Edit/Select All. Right click on blue bar at the top of .gif image/Copy.
45. On the main image named Ode to Fall, left click within the first frame to highlight it. Edit/Select All.
46. Right click INSIDE first frame/select Paste/Into Selected Frame. Place the little butterfly on the lady's shoulder, left click to set in place.
47. File/Open/ArasimagesFlutteringbutterfly.gif. Click in first frame to highlight it. Edit/Select All. Right click on blue bar at the top of .gif image/COPY.
48. Go back to Main image named Ode to Fall. Right click inside the first frame/select Paste/Into Selected Frame.
49. Hover over the image and set the butterfly on her hat. Left click to set it in place.
50. At the top of Animation Shop, click on the View Animation button to watch your animation work. If it is pleasing to you, then we will now save it. (If your butterflies are not placed properly, you can use the undo arrow and retry).
51. File/Save As. When the box comes up, browse to where you want the animated tag saved, under File name type in Ode to Fall. Save as type/ leave set to default (*gif). Click Save.
52. As the boxes come up, click Next, Next, Next then Finish.
53. You are now finished! I hope you enjoyed working this tutorial.
This tutorial was tested by PamelaD and Evatexas. Thanks ladies!
If you are going to use this tutorial for stationery, cards or place the tutorial/tag on another site, I would appreciate you contacting me for permission, giving Arasimages credit for the original tutorial and if possible, a link back to my site. Thank you.
Copyright © Arasimages All Rights Reserved