

Feathers of Fall
For Italian, Dutch and Danish translation, click on the flags.


For this tutorial you will need the materials in the zip file below.

Unzip the materials into a working folder you have created on your desktop named Feathers of Fall. Please duplicate and close original tubes and use duplicates for your work. I have used the plugins VM Instant Art/Three Cuts, Andromeda/Perspective, Filter Attacks and Mystic Nights/Frosted Glass in this tutorial. Place the annesska-a1 gradient in your PSP/Gradients folder. Place the ArasimagesFeathers of Fall.pfp in the following file path: My PSP Files/Plugins/Andromeda-serie portable/Perspective-Presets/andromeda/02Full Canvas/23Freeform folder. It is assumed you have a working knowledge of PSP to follow these directions. PSPX6 was used for this tutorial but other versions may be used.
Thanks go toSilvie and to the unknown tubers for the great tubes used in this tutorial.
Use the bookmark below to mark your place along the way.

1. In Materials Palette, set Foreground to #19120c, Background to Gradient annesska-a1.
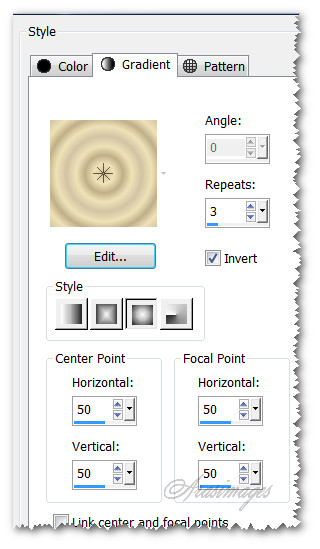
2. Click on Gradient tab in Materials Palette, using drop down to select annesska-a1, Style Sunburst, Angle 0, Repeats 3, Center Point/Focal Point all set to 50, Invert checked.
3. New/New Image 860px by 650px. Flood fill with Gradient.
4. Layers/New Raster Layer.
5. Effects/VM Instant Art/Three Cuts.

6. Set Blend Mode to Luminance (Legacy).
7. Effects/Mystic Nights/Frosted Glass. Radius set to 41.
8. Open Autumn3_26_10.12012.pspimage. Copy Tube layer/Paste as New Layer. Place in bottom right corner.
9. Duplicate/Image/Flip. Move duplicated layer to top center.
10. Layers/New Raster Layer. Flood fill with Foreground #19120c.
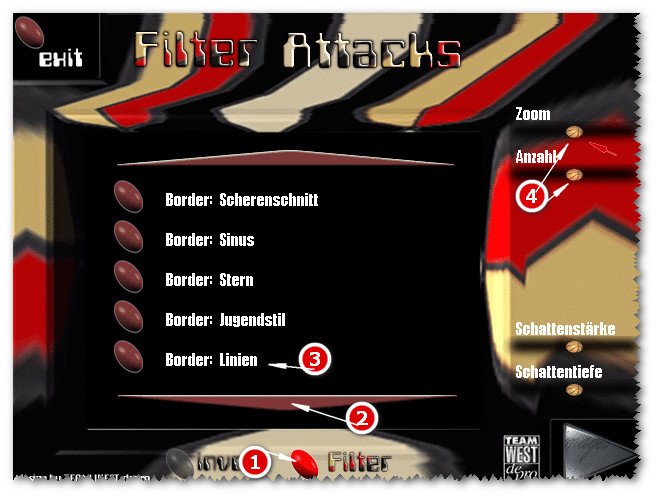
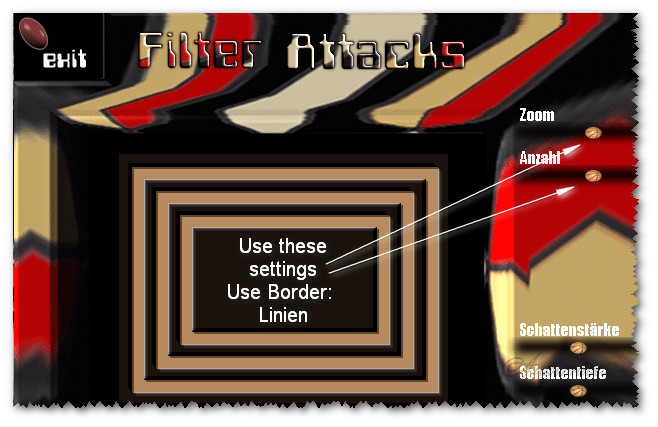
11. Effects/Filter Attacks/Border/Linien. Click on bottom button first, then on narrow down arrow until you find Border: Linien. Click on it to adjust settings.
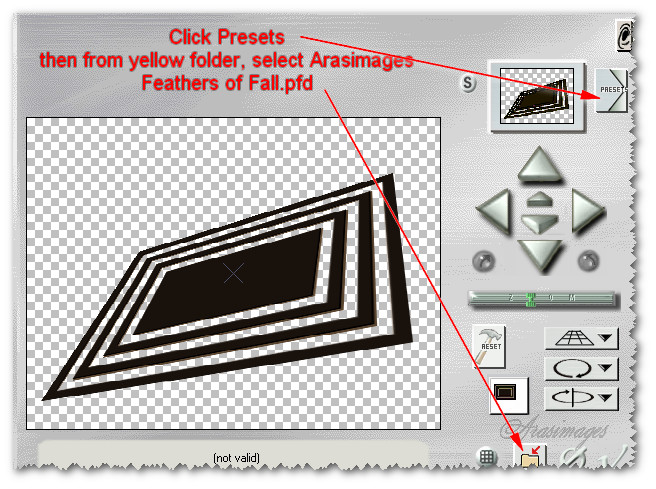
12. Effects/Andromeda/Perspective. Select from the Presets/ArasimagesFeathers Of Fall/( Full Canvas/Freeform/ff 02 Chair).
13. Effects/3D Effects/Drop Shadow/Vertical 6, Horizontal 12, Opacity 67, Blur 15, color #000000.
14. Image/Resize/Resize by 90%/Resize all layers unchecked. Pull down a little toward bottom.
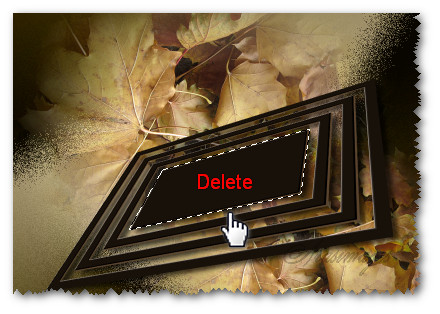
15. Using Selections tool set to Freehand Selection, Point to Point/Add (Shift) /Feather 0, draw around inside of center.
16. Press Delete key. Selections/Select None.
17. Open Chain.png file. Copy/Paste as New Layer. Place on the left bottom of rectangles so hook is below the bottom.
18. Using Eraser tool set to Size 9, erase chain off of the bottom rectangle.

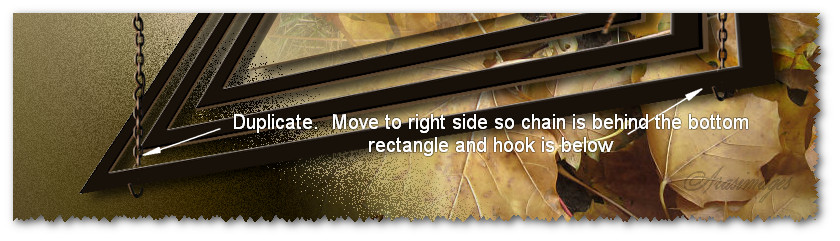
19. Duplicate chain. Move to right bottom rectangle so chain is behind and the hook is below the bottom. Merge/Merge Down.
20. Paste chain once more for top left chain. Erase the hook.
21. Image/Resize/Resize by 85%/Resize all layers unchecked. Set chain in place at top left on rectangle.
22. Duplicate for top right side chain. Move into place on right top. Merge/Merge Down.
23. Merge/Merge Down once more so all chains are on one layer. Adjust/Sharpness/Sharpen.
24. Effects/3D Effects/Drop Shadow/Vertical 6, Horizontal 12, Opacity 67, Blur 15, color #000000.
25. Open BrownBranch.png. Copy/Paste as New Layer.
26. Effects/3D Effects/Drop Shadow/Vertical 6, Horizontal 12, Opacity 67, Blur 15, color #000000.
27. Image/Free Rotate/Rotate Left by 60 degrees, all layers unchecked. Place in upper right corner over rectangles.
28. Copy BrownBranch again/Paste as New Layer. Image/Mirror.
29. Image/Free Rotate/Rotate Right by 60 degrees, all layers unchecked.
30. Image/Resize/Resize by 80%/Resize all layers unchecked. Place in bottom left corner.
31. Repeat Drop Shadow as in Step #24.
32. Open Birds_13.10.2013.pspimage. Copy/Paste as New Layer.
33. Image/Resize/Resize by 80%/Resize all layers unchecked.
34. Place birds as though they were sitting on center bar of rectangles.
35. Effects/3D Effects/Drop Shadow/Vertical 6, Horizontal 12, Opacity 67, Blur 15, color #000000.
36. Effects/3D Effects/Drop Shadow/Vertical -6, Horizontal 12, Opacity 67, Blur 33. Repeat.
37. Adjust/Sharpness/Sharpen.
38. Open BirdCage.png. Copy/Paste as New Layer.
39. Image/Resize/Resize by 74%/Resize all layers unchecked.
40. Effects/3D Effects/ Drop Shadow. Vertical 6, Horizontal 9, Opacity 50, Blur 10, color #000000.
41. Move BirdCage to upper left corner.
42. Adjust/Sharpness/Sharpen.
43. Images/Add Borders/Add 2px border, Symmetric checked, color #ffffc0.
44. Images/Add Borders/Add 12px border, Symmetric checked, color #19120c.
45. Images/Add Borders/Add 2px border, Symmetric checked, color #ffffc0.
Sign your name if you wish and save your image as a .jpg or .png image with the name Feathers of Fall.
This tutorial was tested by PamelaD and Evatexas. Thanks ladies!
If you are going to use this tutorial for stationery, cards or place the tutorial/tag on another site, I would appreciate you contacting me for permission, giving Arasimages credit for the original tutorial and if possible, a link back to my site. Thank you.
Copyright © Arasimages All Rights Reserved