
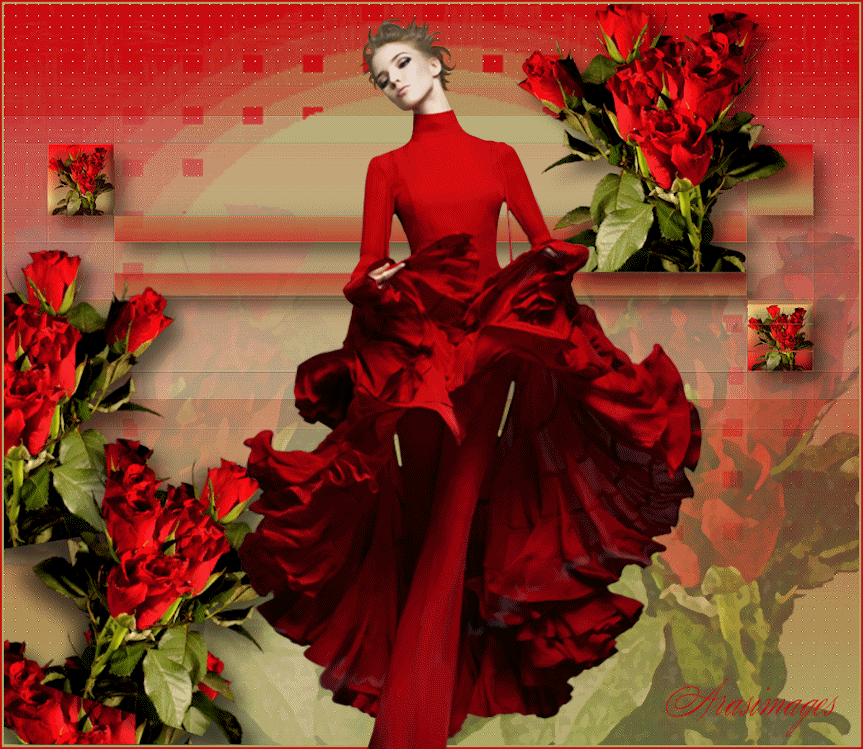
Ruffles and Roses
For Italian, Dutch, Spanish, Danish and French translation, click on the flags.


For this tutorial you will need the materials in the zip file below.

Unzip the materials into a working folder you have created on your desktop named Ruffles and Roses. Please duplicate and close original tubes. Place the Selection in your PSP/Selections folder and the Mask in your PSP/Masks folder. I have used the plugins Nik Software/Color Efex 3.0 Complete, Artistiques/Eponge, Filters Unlimited/Toadies/What are you?/Overdose (which I have included in my materials in case you do not have it in Filters Unlimited) and the Plugin Toadies/What are You?/(dose X 20 and Y 20), Penta/Color Dot and Mura'sMeister/Copies in this tutorial. It is assumed you have a working knowledge of PSP to follow these directions. I have used PSPX6 for this tutorial but other versions may be used.
Thanks go to Cibi to PamelaD for the tubed Roses and to Evatexas from Arasimages for the animation used in this tutorial. Thanks ladies!
Use the bookmark below to mark your place along the way.

1. In Materials Palette, set Foreground to #adaa67, Background to #ca020c.
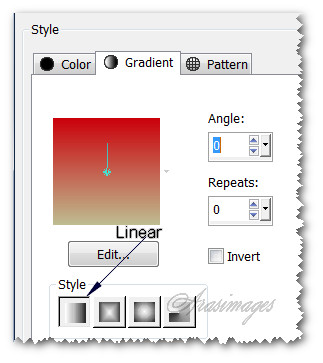
2. In Materials Palette, set to Gradient, Style Linear, Repeats 0, Angle 0, Invert unchecked.
3. New/New Image 900px by 780px. Flood fill with Gradient.
4. Effects/Penta/ColorDot.
5. Adjust/Sharpness/Sharpen. Repeat.
6. Layers/New Raster Layer. Flood fill with Foreground color #adaa67.
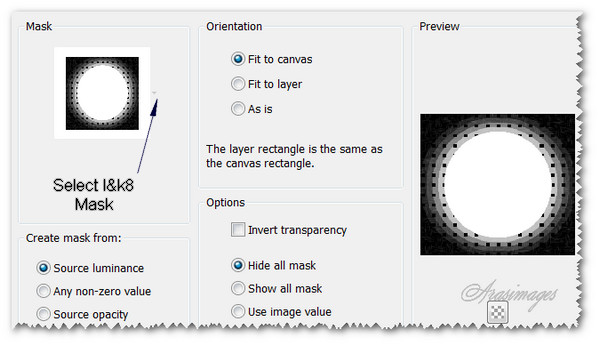
7. Layers/Load/Save Mask/Load Mask From Disk. From the drop down, select Mask l&k8. Apply.
8. Merge/Merge Group.
9. Adjust/Sharpness/Sharpen.
10. Open Roses.pspimages. Copy/Paste as New Layer.
11. Effects/Artistiques/Eponge (or Artistic/Sponge using same settings).
12. Move bouquet of roses into bottom right corner. Lower Opacity to 41.
13. Duplicate. Image/Mirror to left side of image.
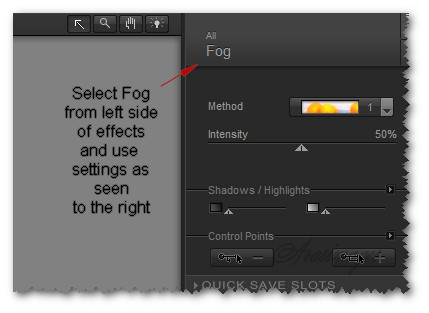
14. Effects/Nik Software/ColorEfexPro3.0 Complete/select Fog from effects on the left side.
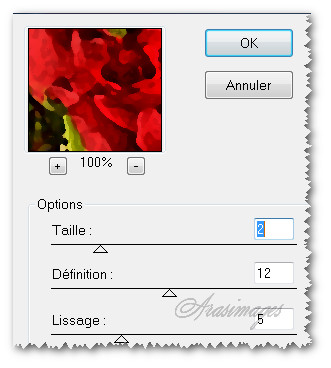
15. Layers/New Raster Layer.
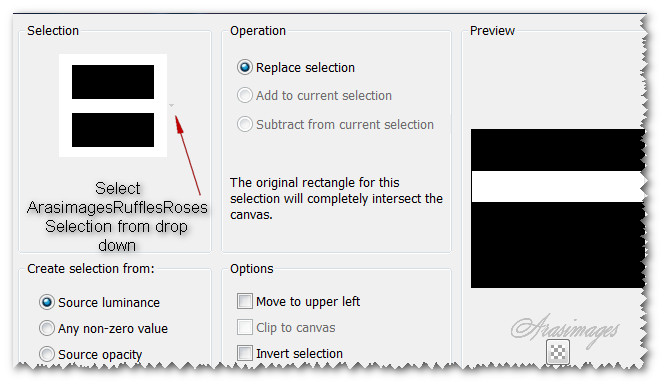
16. Selections/Load/Save Selection/Load Selection from Disk. Choose ArasimagesRufflesRosesOne. Apply.
17. Flood fill with Gradient.
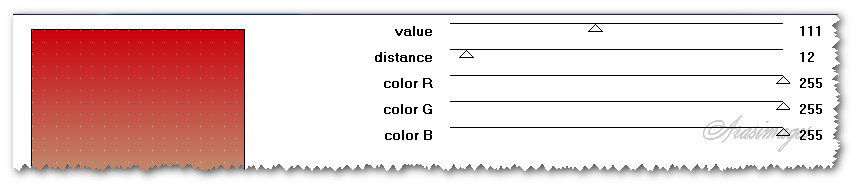
18. Effects/3D Effects/ Drop Shadow of Vertical 12, Horizontal 12, Opacity 50, Blur 24, color #000000. Repeat with V at -12, H at -12, all others the same.
19. Selections/Select None.
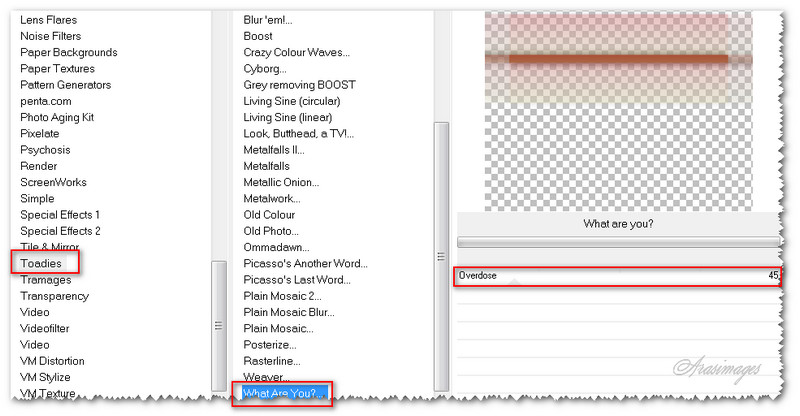
20. Effects/Filters Unlimited 2.0/Toadies/What Are You? Set Overdose to 45 (default). NOTE: This Toadies is different than the Toadies in our Effects/Toadies in next step.
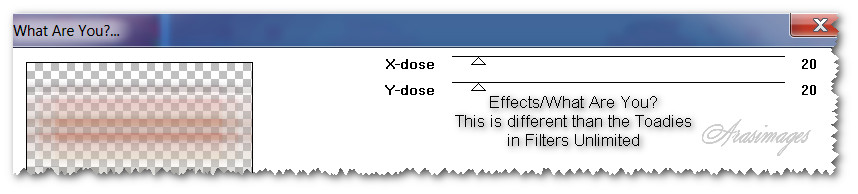
21. Effects/Toadies. Default of X-dose at 20, Y-dose at 20.
22. Effects/Edge Effects/Enhance. Repeat.
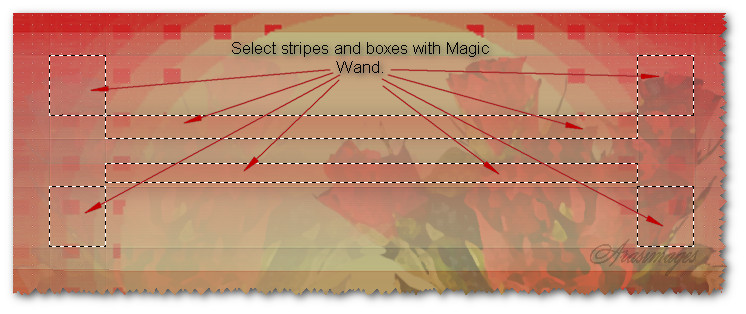
23. Using Magic Wand, Tolerance set to 14, select two center stripes and four squares. Change Gradient to Repeats of 3, Invert checked. Flood fill with Gradient.

24. Effects/3D Effects/Drop Shadow. Vertical 12, Horizontal 12, Opacity 50, Blur 24, color #000000.
25. Selections/Select None.
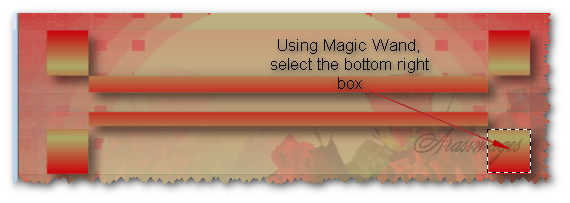
26. Using Magic Wand, Mode: Add (Shift), Match mode: Opacity, Tolerance set to 14, Feather 0, select the bottom right box seen below .
27. Open Roses.pspimage. Copy/Paste into Selection.
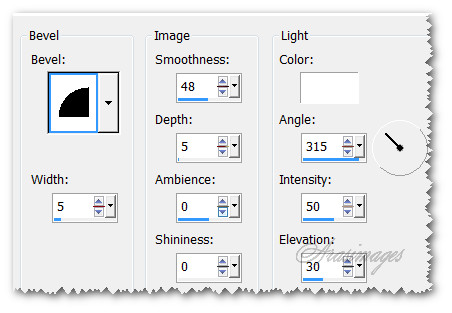
28. Effects/3D Effects/Inner Bevel as seen below. Selections/Select None.
29. Using Magic Wand, Match Mode set to Opacity, Tolerance set to 14, , select the top left box. Repeat/Paste Roses into Selection.
30. Effects/3D Effects/Inner Bevel as in Step #28. Selections/Select None.
31. Adjust/Sharpness/Sharpen. Drop Opacity to 82.
32. Open Roses.pspimage. Copy/Paste as New Layer.
33. Image/Resize/Resize by 50%/Resize all layers unchecked.
34. Move roses into place on top and end of bottom red line.
35. Effects/3D Effects/Drop Shadow. Vertical -12, Horizontal -12, Opacity 50, Blur 24, color #000000.
36. Duplicate Roses. Image/Mirror and place in bottom left corner.
37. Effects/MuRa'sMeister/Copies.
38. Effects/3D Effects/Drop Shadow. Vertical 12, Horizontal 12, Opacity 50, Blur 24, color #000000.
39. Image/Add Borders/Add 2px border, Symmetric checked, color #adaa67.
40. Image/Add Borders/Add 2px border, Symmetric checked, color #ca020c.
41. Image/Resize/Resize by 95%/Resize all layers checked.
42. Sign your name or leave your watermark if you wish and save as a .jpg file called Ruffles and Roses. COPY.
43. Open Animation Shop. In blank work space, right click/Paste as New Animation.
44. Duplicate 9 times so you have 10 frames in all.
45. File/Open Ruffles and Roses by Evatexas.psp file. Highlight first frame. Edit/Select All. On top blue bar, right click/Copy.
46. Highlight the first frame of the main image. Edit/Select All.
47. Right click, Paste/Into Selected Frame. Left click to set into place.
48. Animation/Frame Properties. Set the frame rate to 15.
49. Click on the Animation button at the top to animate your image. If all appears correct, then it is time to save.
50. File/Save As. When the box comes up, choose where you will save it, give your work a name and let it save as a .gif file.
51. As the boxes change, continue to click Next, Next, Next and Finish. Your image has been saved.
This tutorial was tested by PamelaD and Evatexas. Thanks ladies!
If you are going to use this tutorial for stationery, cards or place the tutorial/tag on another site, I would appreciate you contacting me for permission, giving Arasimages credit for the original tutorial and if possible, a link back to my site. Thank you.
Copyright © Arasimages All Rights Reserved