

Frosty Breakfast
For Italian, Dutch, Danish and French translation, click on the flags.


For this tutorial you will need the materials in the zip file below.

Unzip the materials into a working folder you have created on your desktop named Frosty Breakfast. Please duplicate and close original tubes. I have used the plugins AlienSkin Xenofex/Constellation, FFormula/Honeycomb and the free program Animation Shop in this tutorial. It is assumed you have a working knowledge of PSP to follow these directions. I have used PSPX6 for this tutorial but other versions may be used. The animated sparkle effect is optional.
Thanks go to Sorensen_Designs, to Gerry, to Nikita and to the unknown tubers for images used in this tutorial. Thanks ladies!
Use the bookmark below to mark your place along the way.
1. In Materials Palette, set Foreground to #ffffff, Background to #8285a4.
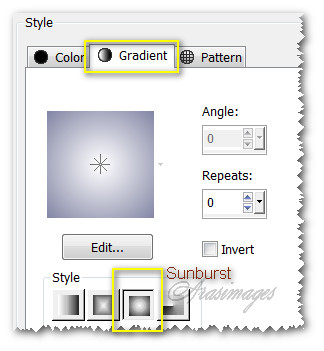
2. In Materials Palette, set to Gradient, Style Sunburst, Repeats 0, Angle 0, Invert unchecked. Center and Focal Points all set to 50.
3. New/New Image 800px by 650px. Flood fill with Gradient.
4. Effects/FFormulaHoneycomb. Size set to 10.

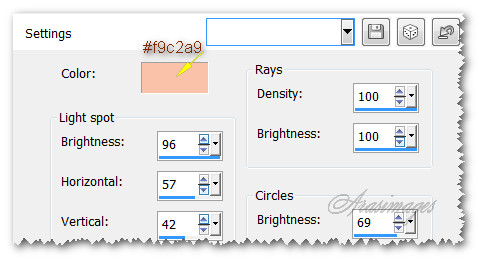
5. Effects/Illumination Effects/Sunburst.
6. Effects/Edge Effects/Enhance.
7. Layers/New Raster Layer. Selections/Select All.
8. Open Sorensen_Designs Tube Jan 213-10.pspimage. Copy/Paste into Selection.
9. Selections/Select None. Lower Opacity to 67.
10. Effects/Edge Effects/Enhance.
11. Layers/New Raster Layer. Selections/Select All.
12. Open 1293040230_paysages_nikita.pspimages. Copy/Pase into Selection.
13. Selections/Select None. Effects/Edge Effects/Enhance.
14. Blend Mode set to Luminance (Legacy).
15. Open Gerry_Dieren32-19 april 2008.pspimage. Copy/Paste as New Layer.
16. Move upward so branch touches top border.
17. Adjust/Sharpness/Sharpen.
18. Effects/3D Effects/Drop Shadow. Vertical 8, Horizontal 4, Opacity 50, Blur 17, color #000000.
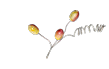
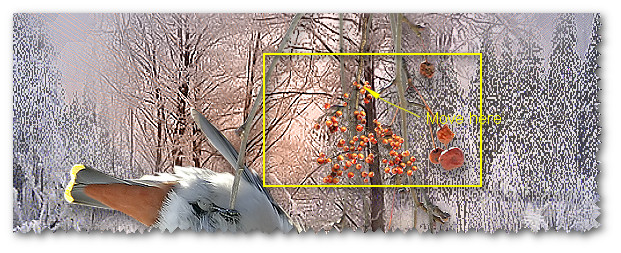
19. Open 0_854d8_a808d97b_XL.png file of berries. Copy/Paste as New Layer.
20. Image/Resize/Resize by 20%/Resize all layers unchecked.
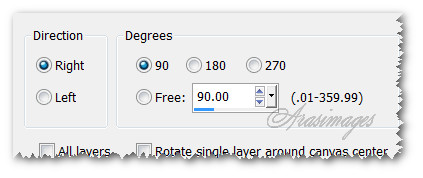
21. Image/Free Rotate/Rotate right by 90 degrees.
22. Adjust/Sharpness/Sharpen. Move into branch to upper right of bird as I have done.
23. Copy berries again and Paste as New Layer.
24. Image/Resize/Resize by 60%/Resize all layers unchecked.
25. Effects/3D Effects/Drop Shadow. Vertical 8, Horizontal 4, Opacity 50, Blur 17, color #000000.
26. Adjust/Sharpeness/Sharpen. Place berries cluster in bottom left corner.
27. Image/Add Borders/Add 2px border, Symmetric checked, color #300f03.
28. Image/Add Borders/Add 3px border, Symmetric checked, color #ef9a55.
29. Image/Add Borders/Add 2px border, Symmetric checked, color #300f03.
30. Layers/New Image 850px by 700px. Selections/Select All.
31. Open 0_9d6a9_2750756c_XXL.pspimage of background. Copy/Paste into Selection.
32. Selections/Select None.
33. Duplicate. Image/flip. Image/Mirror. Lower Opacity to 87.
34. Set Blend Mode to Multiply. Merge/Merge Down.
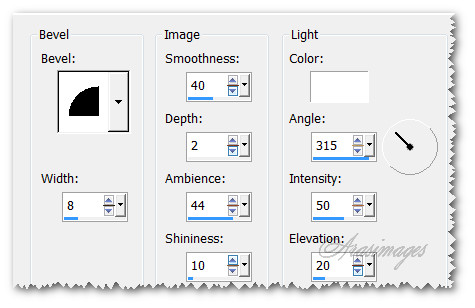
35. Effects/3D Effects/Inner Bevel.
36. Go back to the working image of the winter scene and bird. Copy. Go back to the background and Paste as New Layer.
37. Repeat Inner Bevel as in Step #35.
38. Image/Add Borders/Add 2px border, Symmetric checked, color #300f03.
39. Image/Add Borders/Add 3px border, Symmetric checked, color #ef9a55.
40. Image/Add Borders/Add 2px border, Symmetric checked, color #300f03.
41. Add your name or watermark if you wish. Merge/Merge Visible if necessary to end with one layer.
42. Duplicate layer twice, having three layers in all.
43. Close off bottom and middle layer. Highlight top layer having eye open.
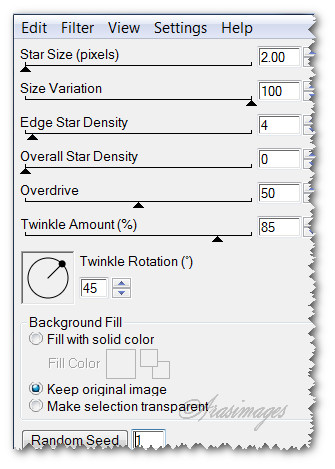
44. Effects/AlienSkinXenofex 2/Constellation. Set Random Seed to 1. Click OK.
45. Close off top layer. Move to middle layer, open eye and highlight the layer.
46. Effects/AlienSkinXenofex 2/Constellation. Click on Random Seed. Click OK.
47. Close off middle layer. Move to bottom layer, open eye and highlight the layer.
48. Effects/AlienSkinXenofex 2/Constellation. Click on Random Seed. Click OK. Open all layers.
49. File/Save As. Save the layers as PSP Animation Shop (*psp) image, file name Frosty Breakfast. Save in your working folder.
50. Open Animation Shop. File/Open. Open the Frosty Breakfast image you just saved.
51. Having first frame highlighted, click on Edit/Select All.
52. Animation/Frame Properties. Set the Display time speed to 18.
53. At the top of Animation Shop, click on View Animation button to check your sparkles. If they appear as you would like, then we will save the work.
54. File/Save As. When the box comes up, choose where you will save it, give your work a name and let it save as a .gif file.
55. As the boxes change, continue to click Next, Next, Next and Finish. Your image has been saved.
This tutorial was tested by PamelaD and Evatexas. Thanks ladies!
If you are going to use this tutorial for stationery, cards or place the tutorial/tag on another site, I would appreciate you contacting me for permission, giving Arasimages credit for the original tutorial and if possible, a link back to my site. Thank you.
Copyright © Arasimages All Rights Reserved