
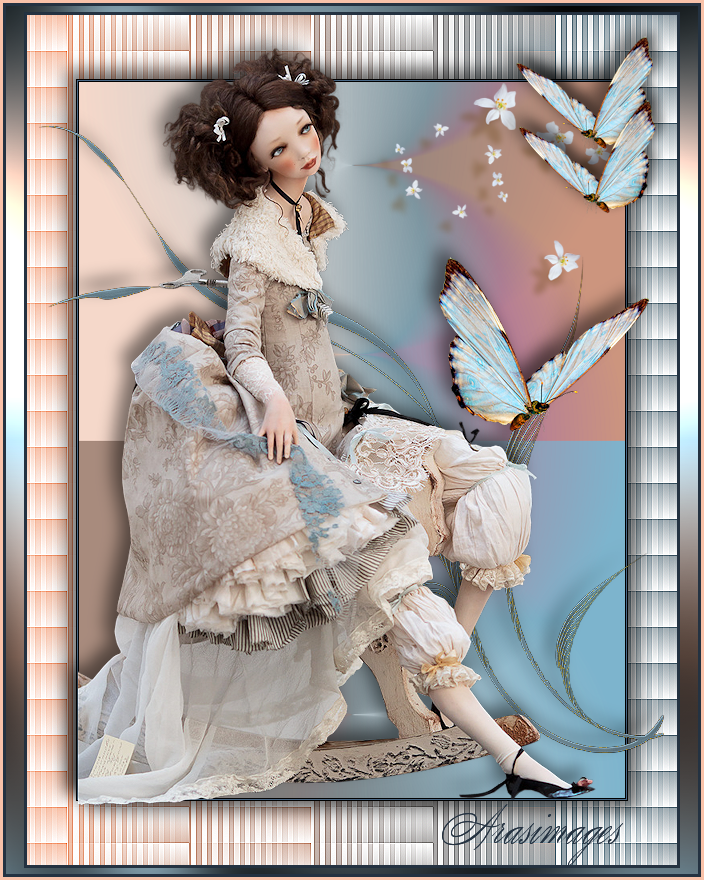
Softly they Flutter
For an Italian, Dutch, Danish and German translation, click on the flags.


For this tutorial you will need the materials in the zip file below.

Unzip the materials into a working folder you have created on your desktop named Softly they Flutter. Please duplicate and close original tubes. I have used the plugins Graphics Plus/Cross Shadow, MuraMeister/Copies, AAA Frames/Frame Works, AP 01 [Innovations]/Mirror-Both Sides, Toadies/Weaver and VM Extravaganza/White Lines in this tutorial. It is assumed you have a working knowledge of PSP to follow these directions. I have used PSPX6 for this tutorial but other versions may be used.
Thanks go to Maryse for the beautiful wind up doll and to the unknown tubers for their work used in this tutorial.
Use the bookmark below to mark your place along the way.
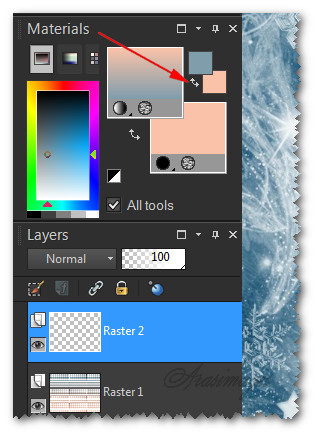
1. In Materials Palette, set Foreground to #f9c2a9, Background to #809dab.
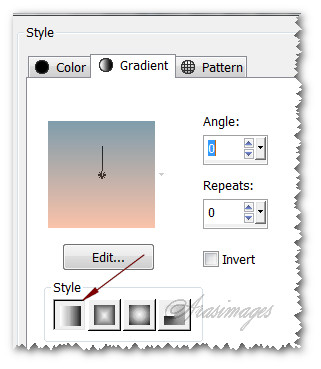
2. In Materials Palette, set to Gradient, Style Linear, Repeats 0, Angle 0, Invert unchecked. Center and Focal Points not relavent.
3. New/New Image 850px by 650px. Flood fill with Gradient.
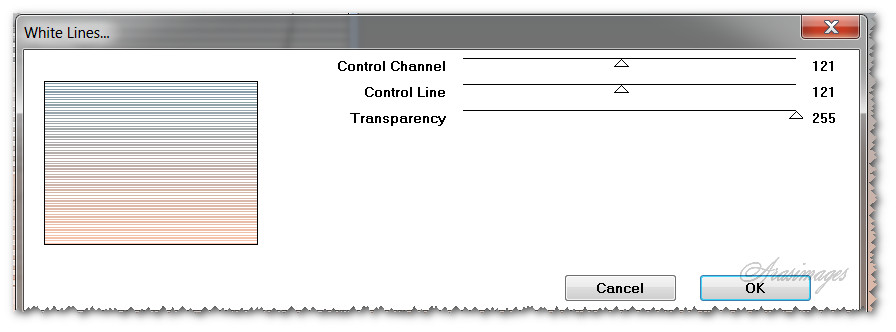
4. Effects/VM Extravaganza/White Lines.
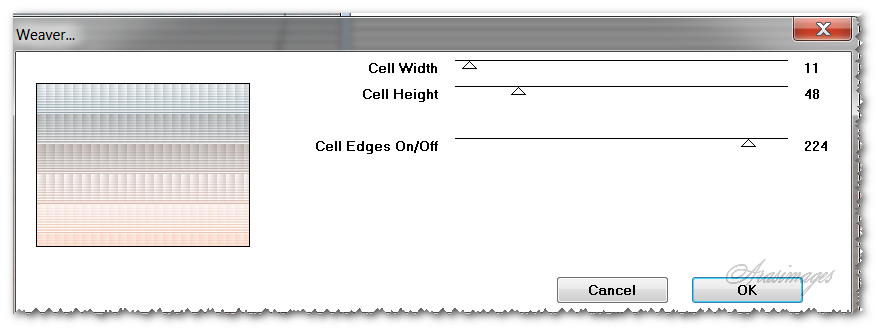
5. Effects/Toadies/Weaver.
6. Effects/Edge Effects/Enhance
7. Layers/New Raster Layer.
8. In Materals Palette, swap small boxes of fore/background colors in upper right corner by clicking on double arrows.
9. Flood fill New Layer with Gradient.
10. Effects/Geometric Effects/Circle. Repeat checked.
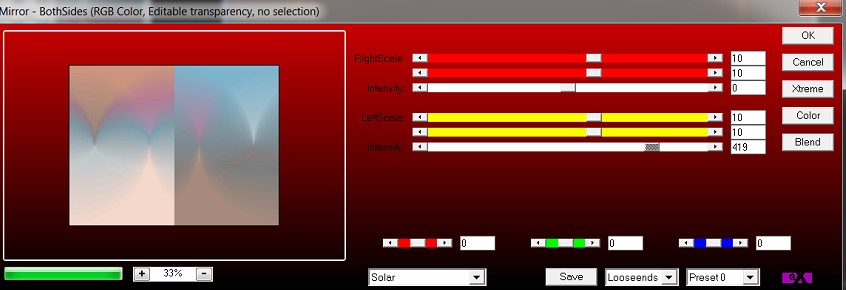
11. Effects/AP 01/[Innovations]/Mirror-Both Sides.
12. Image/Resize/Resize all layers unchecked, Resize by 85%.
13. Using Magic Wand with below settings, activate Raster 2 layer.

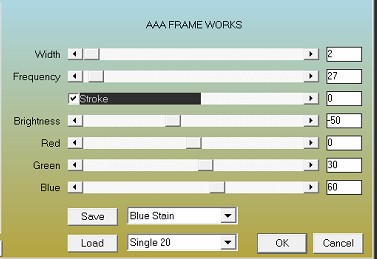
14. Effects/AAA FrameWorks.
15. Effects/3D Effects/Drop Shadow. Vertical 10, Horizontal 10, Opacity 50, Blur 23, color #000000.
16. Effects/3D Effects/Drop Shadow. Vertical -10, Horizontal -10, Opacity 50, Blur 23, color #000000.
17. Selections/Select None.
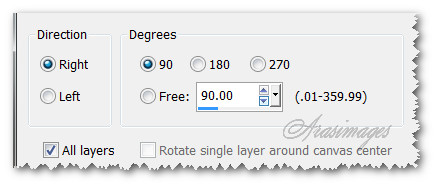
18. Image/Free Rotate/Free Rotate Right by 90 degrees, all layers checked.
19. Open SmallButterflies.png. Copy/Paste as New Layer.
20. Image/Resize/Resize by 85%/Resize all layers unchecked.
21. Move butterflies to right side.
22. Open 0_4f89f_1b8bc655_XL.png (wavy stem). Copy/Paste as New Layer.
23. Using Color Changer, Tolerance set to 15, right click background color #809dab on wavy stem to colorize it blue.
24. Effects/3D Effects/Drop Shadow. Vertical -10, Horizontal -10, Opacity 50, Blur 23, color #000000.
25. Adjust/Sharpness/Sharpen.
26. Open MR_Alisa Doll.pspimage. Copy/Paste as New Layer.
27. Image/Resize/Resize by 80%/Resize all layers unchecked.
28. Move doll to the left and down so her dress fits to the left side of Raster 2 and her shoe is on bottom border.
29. Effects/3D Effects/Drop Shadow. Vertical -10, Horizontal -10, Opacity 50, Blur 23, color #000000.
30. Using Selections tool, select around the watermark of Maryse and press Delete key once. Deselect.
31. Open 0_93721_2cbfa444_M.png (butterfly). Copy/Paste as New Layer.
32. Image/Mirror.
33. Image/Resize/Resize by 70%/Resize all layers unchecked.
34. Adjust/Sharpness/Sharpen. Move to sit on leaf on right side.
35. Effects/3D Effects/Drop Shadow. Vertical -10, Horizontal -10, Opacity 50, Blur 23, color #000000.
36. Duplicate. Effects/MuraMeister/Copies.

37. Image/Mirror. Image/Resize/Resize by 65%/all layers unchecked. Move butterflies into top right corner.
38. Effects/3D Effects/Drop Shadow. Vertical -10, Horizontal -10, Opacity 50, Blur 23, color #000000.
39. Image/Add Borders/Add 3px border, Symmetric checked, color #243241.
40. Image/Add Borders/Add 18px border on each side, 6px on top and bottom, Symmetric unchecked, color #ffffff.
41. With Magic Wand set Match mode to RGB Value, Feather 0, click on border to activate it.
42. In Materials Palette, set Repeats to 3 to change Gradient. Flood fill the border with the gradient.
43. Effects/Graphics Plus/Cross Shadow, default settings.
44. Selections/Select None.
45. Image/Add Borders/Add 3px border, Symmetric checked, color #243241.
46. Image/Add Borders/Add 3px border, Symmetric checked, color #f9c2a9.
47. Sign your name or leave watermark and save as .png or .jpg file.
This tutorial was tested by PamelaD and Evatexas. Thanks ladies!
If you are going to use this tutorial for stationery, cards or place the tutorial/tag on another site, I would appreciate you contacting me for permission, giving Arasimages credit for the original tutorial and if possible, a link back to my site. Thank you.
Copyright © Arasimages All Rights Reserved