
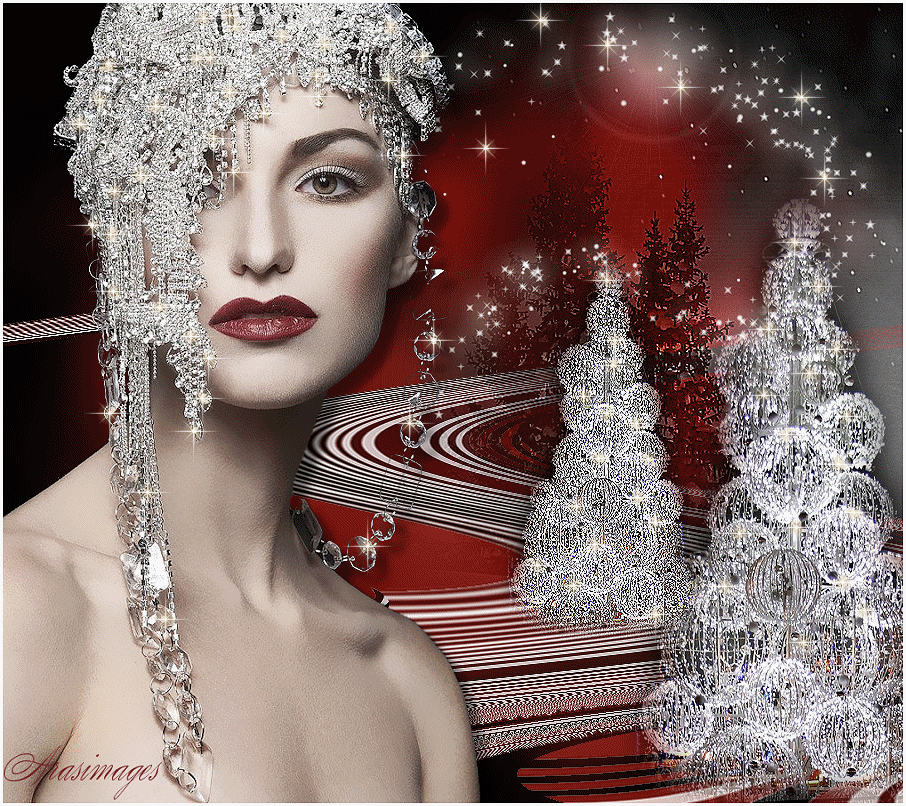
Starry Winter's Night
For Italian, Dutch, Danish and French translations, click on the flags.


For this tutorial you will need the materials in the zip file below.

Unzip the materials into a working folder you have created on your desktop named Starry Winter's Night. Please duplicate and close original tubes. I have used the plugins VM Extravaganza/Stay in Line and PSP's Distortion/Wave and Warp in this tutorial. It is assumed you have a working knowledge of PSP to follow these directions. I have used PSPX6 for this tutorial but other versions may be used.
Thanks go to Nikita and to Benelol Mists and Tubes for their work used in this tutorial.
Use the bookmark below to mark your place along the way.

1. In Materials Palette, set Foreground to #fbfbfb, Background to #70131c.
2. New/New Image 900px by800px. Selections/Select All.
3. Open images_vegetal_1223225290_wallpapers_vegatal.jpg. Copy/Paste into Selection.
4. Selections/Select None.
5. Adjust/Blur/Gaussian Blur, Radius set to 25.
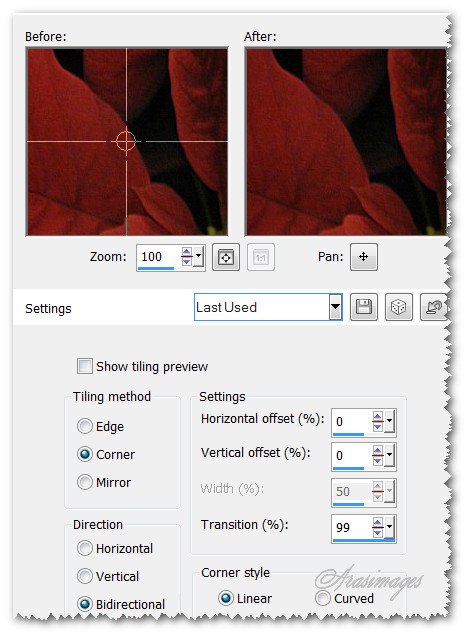
6. Effects/Image Effects/Seamless Tiling.
7. Duplicate Raster 1.
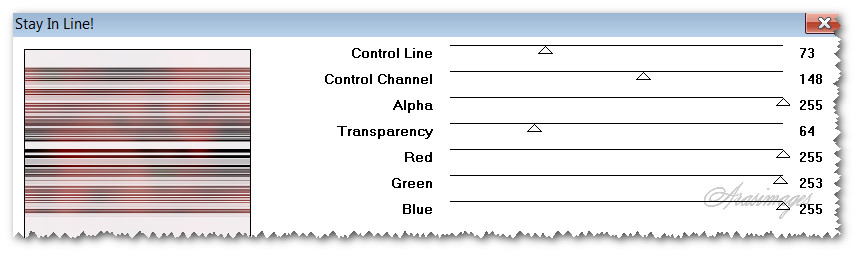
8. Effects/VM Extravaganza/Stay in Line.
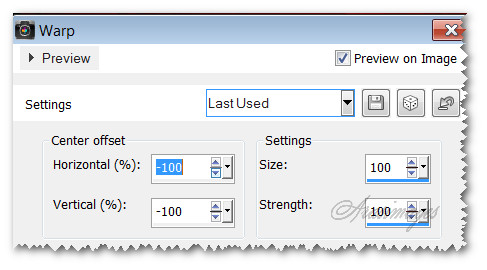
9. Effects/Distortion/Warp.
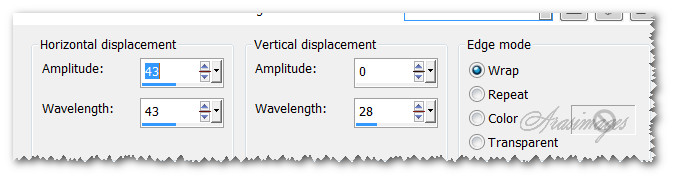
10. Effects/Distortion/Wave.
11. From Tool bar, choose the Selections/Magic Wand tool (see settings below). Select each of the mauve/pink areas as seen below.


12. Layers/New Raster Layer.
13. Open images_vegetal_1223225290_wallpapers_vegatal.jpg. Copy/Paste into Selection.
14. Selections/Select None.
15. Open Christmas6Nov07Bnll.pspimage. Copy center layer/Paste as New Layer.
16. Set Blend Mode to Luminance (Legacy).
17. Move to right side of working image.
18. Open 1252518465_noel.pspimage. Copy/Paste as New Layer.
19. Place in bottom right corner.
20. Duplicate. Image/Resize by 61%/Resize all layers unchecked.
21. Move duplicated tree upward over dark trees as I have done in my finished image.
22. Effects/Edge Effects/Enhance.
23. Open FairyDust3_30.12.2012.pspimage. Copy/Paste as New Layer.
24. Place Fairy Dust in upper right corner among and above trees.
25. Open 13458166970_femmes.pspimage. Copy/Paste as New Layer.
26. Image/Resize/Resize by 89%/Resize all layers unchecked.
27. Using Eraser tool or Selections tool, erase or select around the watermark and delete.
28. Selections/Select None.
29. Effects/3D Effects/Drop Shadow. Vertical 12, Horizontal 12, Opacity 50, Blur 12, color #000000.
30. Move woman to fit to left side and top of image.
31. Image/Add Borders/Add 3px border, Symmetric checked, color #fbfbfb.
32. Adjust/Sharpness/Sharpen.
33. Add your name or watermark if you wish.
34. Duplicate the image 4 times, having 5 layers in all. Close off all layers except the top layer.
35. From the Tool bar, Picture Tube tool, select the white star. Settings as seen below.

36. Making sure top layer is activated, randomly click the white star sparkle on smaller stars, trees and diamonds woman is wearing.
37. Close off top layer. Move down one layer, highlight it.
38. Change the Scale to 35. Randomly click the white star amongst the stars, trees and diamonds.
39. Close off next to top layer. Move down to middle layer, highlight it.
40. Change the Scale to 37. Randomly click the white star amongst the stars, trees and diamonds.
41. Close off layer, drop down to next layer and highlight it.
42. Change the Scale to 40. Randomly click the white star amongst the stars, trees and diamonds.
43. Close off layer, drop down to bottom layer and highlight it.
44. Change the Scale to 45. Randomly click the white star amongst the stars, trees and diamonds. You might want to use less stars on this layer as they are larger.
45. Open all layers and save as a PSP Animation Shop (*psp) file named Starry Winter's Night.
46. Open Animation Shop. File/Open Starry Winter's Night.
47. Click on the View Animation button at the top tool bar to check your animation. If it pleases you, we will now save it. If you wish to change it, make changes in PSP and resave and try the animation again. To slow down the sparkles, Edit/Select All.
48. Animation/Frame Properties. Set the number to a higher number for slower sparkles. Default is 10, I have mine set to 13.
49. Edit/Save As. Save in your folder called Starry Winter's Night, File name the same. Leave the Save as type set to .gif. Click Save.
This tutorial was tested by PamelaD and Evatexas. Thanks ladies!
If you are going to use this tutorial for stationery, cards or place the tutorial/tag on another site, I would appreciate you contacting me for permission, giving Arasimages credit for the original tutorial and if possible, a link back to my site. Thank you.
Copyright © Arasimages All Rights Reserved