
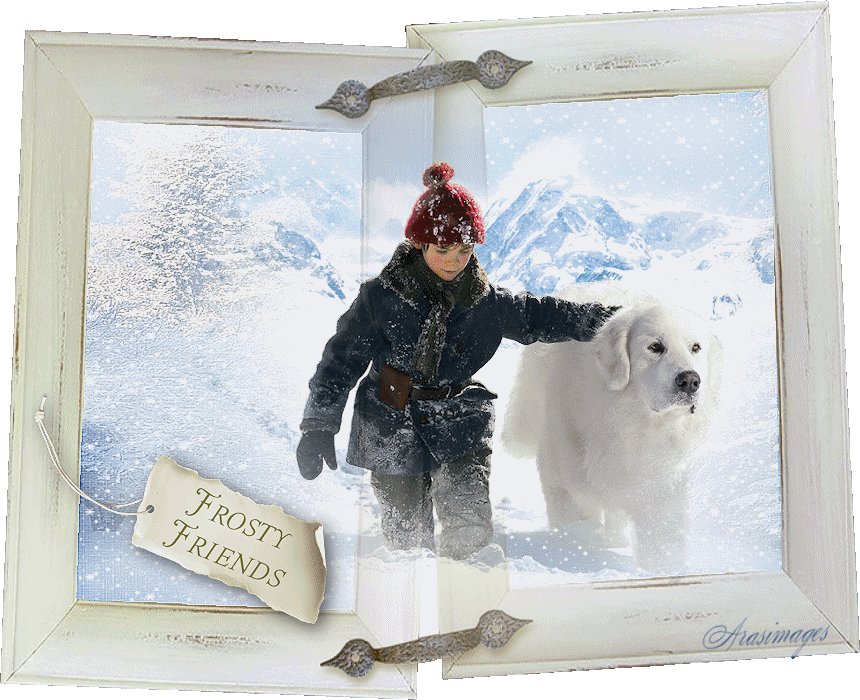
Frosty Friends
For Italian, Dutch, Spanish and Danish translation, click on the flags.


For this tutorial you will need the materials in the zip file below.

Unzip the materials into a working folder you have created on your desktop named Frosty Friends. Please duplicate and close original tubes. It is assumed you have a working knowledge of PSP to follow these directions. Animation Shop is used for animation of snow. I have used PSPX6 for this tutorial but other versions may be used.
Thanks go to Maryse and to the unknown tubers for their work used in this tutorial.
Use the bookmark below to mark your place along the way.

1. New/New Image 860px by 700px. Selections/Select All.
2. Open 0_673ce_d0e0dbea_XL.png (frame). Copy/Paste into Selection.
3. Adjust/Sharpness/Sharpen. Selections/Invert.
4. With Magic Wand, click inside each of the two frame openings to activate them (use settings below).

5. Selections/Modify/Expand by 3px.
6. Open 0_72bce_4e3a389_XL.png (background). Copy/Paste into Selection.
7. Effects/Edge Effects/Enhance.
8. Selections/Select None.
9. Open MR_Belle et Sxe9bastien.pspimage. (boy and dog). Copy/Paste as New Layer.
10. Using Freehand Selection tool, draw around Maryse watermark. Delete.
11. Selections/Select None.
12. Image/Resize/Resize by 90%/Resize all layers unchecked.
13. Duplicate. Merge/Merge Down.
14. Move boy and dog down toward bottom frame and over to right a little.
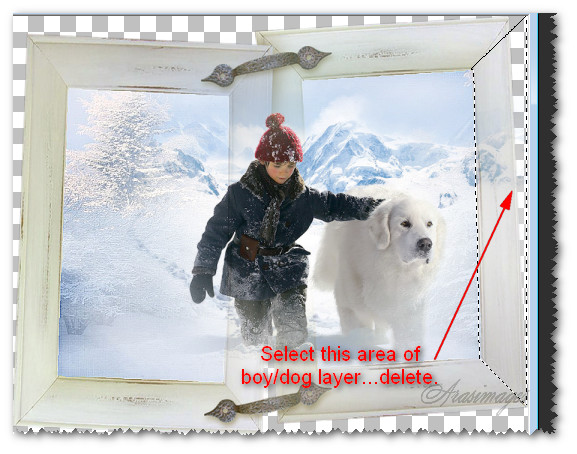
15. Using Freehand Selections tool, select mountains from right side and frame. Delete. Deselect.
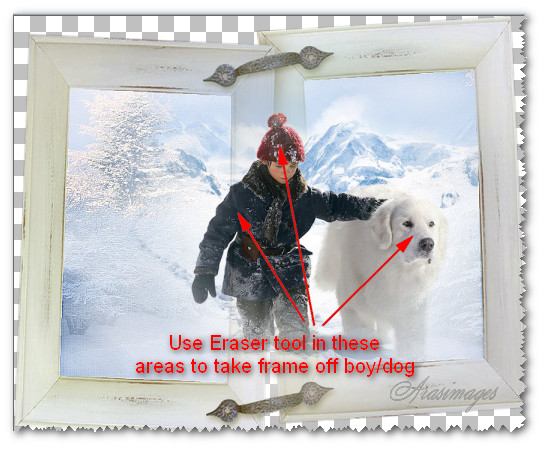
16. Drop down to Raster 1. Using Eraser tool, erase the background off the little boy and dog where indicated.
17. Highlight Raster 2 to continue.
18. Using Freehand Selections tool, select around the boy and the dog. Right click/Promote selection to layer.
19. Drop down to Raster 2 and delete boy and dog from layer. Selections/Select None.
20. Merge/Merge Down. (backgrounds). Highlight top layer.
21. Open 0_b52e8_5e76592_XL.png (tag). Copy/Paste as New Layer.
22. Image/Resize/Resize by 37%/Resize all layers unchecked.
23. Effects/3D Effects/Drop Shadow. Vertical 5, Horizontal 5, Opacity 62, Blur 26, color #000000.
24. Move to bottom left below boy's hand.
25. Adjust/Sharpness/Sharpen. Merge/Merge Down.
26. Close off Promoted Selection layer.
27. Highlight bottom layer. Layers/New Raster Layer.
28. Sign your name or leave your watermark. Adjust angle of your name and Merge Down with bottom layer.
29. The bottom layer is the only layer open now. Duplicate it 9 times so you have 10 layers in all.
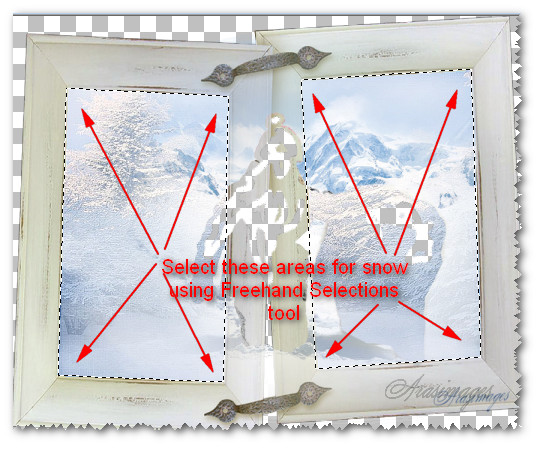
30. Using the Freehand Selection tool, select areas as shown below. This is where the snowfall will go in the background.
31. Open Eva snow saved as AS file.psp. Notice it has 10 layers to it.
32. On Eva's snow.psp file, copy frame one, Paste into Selection of bottom layer of working image. Close off this layer.
33. On Eva's snow.psp file, copy second frame, Paste into Selection of second layer of working image. Close off this layer.
34. Continue Copying snow layers and Pasting into Selection of each background layer of the working image through layers 10 and frames 10.
35. Make sure all snow layers are open. Selections/Select None.
36. File/Save As/Animation Shop (*psp) image called Background.
37. In Animation Shop, open the Background image.
38. Go back to PSP. Open the boy/dog and tag image. Copy.
39. Go back to Animation Shop. Paste as New Animation in a blank space. Copy.
40. On main working image, Edit/Select All. Edit/Propagate Paste. Right click in first frame. Paste/Into Selected Frame.
41. Hover over the working image, fitting the boy and dog in their proper place. Left click to set in place.
42. To save your image, File/Save As. Give your work a name and direct where to save it. Click Save.
43. As the boxes come up, click Next, Next, Next and Finish.
This tutorial was tested by PamelaD and Evatexas. Thanks ladies!
If you are going to use this tutorial for stationery, cards or place the tutorial/tag on another site, I would appreciate you contacting me for permission, giving Arasimages credit for the original tutorial and if possible, a link back to my site. Thank you.
Copyright © Arasimages All Rights Reserved