
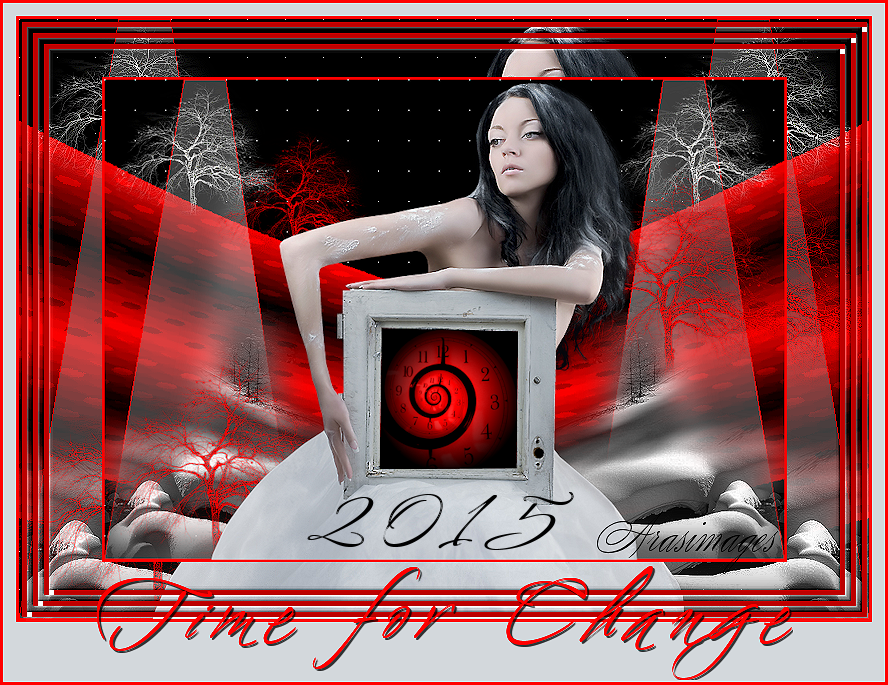
Time for Change
For Italian, Dutch and Danish translation, click on the flags.


For this tutorial you will need the materials in the zip file below.

Unzip the materials into a working folder you have created on your desktop named Time for Change. Please duplicate and close originals. Export the Lone Tree brush into your PSP/Brushes folder. I have used the plugins Penta/color dot, Filter Factory Gallery L/Perspecular, Eye Candy 3.1/Glass, RCS Filter Pack 1.0/Sequins and Bubble Pack and Filter Attacks/Border: Linien in this tutorial. It is assumed you have a working knowledge of PSP to follow these directions. I have used PSPX6 for this tutorial but other versions may be used.
Thanks go to Nikita and to Maryse for their work used in this tutorial.
Use the bookmark below to mark your place along the way.

1. In Materials Palette, set Foreground to #ff0000, Background to #000000.
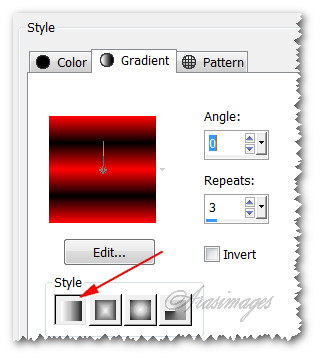
2. In Materials Palette, set to Gradient, Style Linear, Angle 0, Repeats 3, Invert unchecked. Center point: Horizontal/Vertical grayed out.
3. New/New Image 850px by 600px. Flood fill with Background #000000.
4. Effects/Penta/color dot.
5. Effects/Edge Effects/Enhance.
6. Change color in Foreground to #ff0000.
7. Layers/New Raster Layer.
8. Flood fill new layer with Gradient.
9. Effects/RCS Filter Pack 1.0/Sequins.
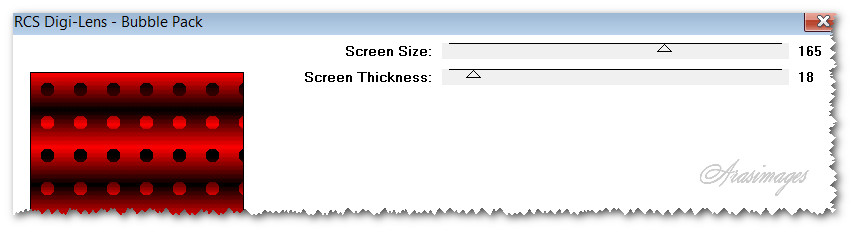
10. Effects/RCS Filter Pack 1.0/Digi-Lens-Bubble Pack.
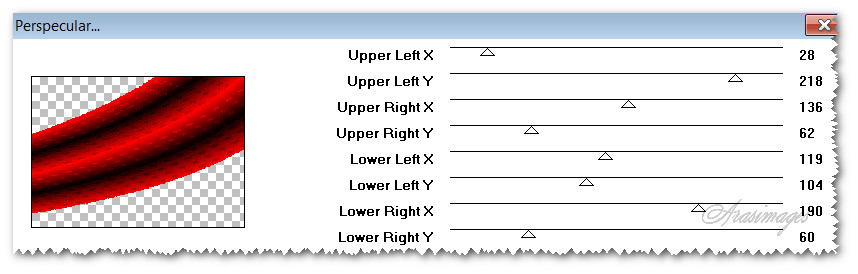
11. Effects/Filter Factory Gallery L/Perspecular.
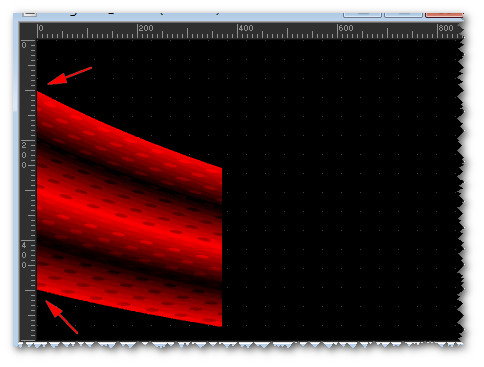
12. Image/Mirror. Pull Perspecular image to left so top is at 100/bottom at 500 at left edge.
13. Duplicate. Image/Mirror.
14. Layers/New Raster Layer.
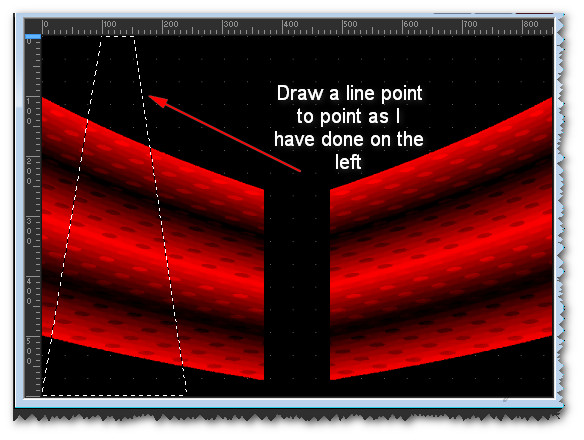
15. Using Selections tool/Freehand Selection, Feather 0, draw a line using Point to Point, starting from 100px at the top, down to bottom left corner, over to 240px, upwards to 150px and back to 100px at beginning. Left click at each intersection and close when you are back at the beginning with right click
16. Change Foreground color back to #d3d8bc. Flood fill new layer with this color.
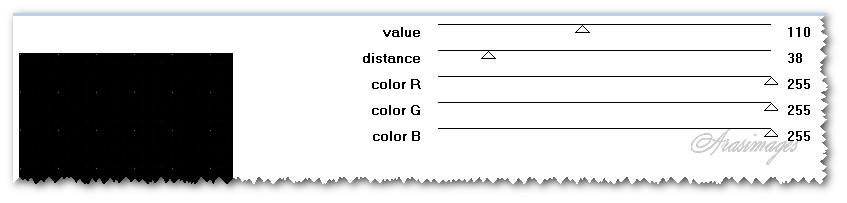
17. Effects/3D Effects/Cutout. Shadow color #000000/Interior color #ffffff.

18. Drop Opacity down to 38.
19. Layers/New Raster Layer. Flood fill with color #ff0000.
20. Selections/Modify/Contract by 1px. Delete.
21. Selections/Select None. Merge/Merge down.
22. Duplicate. Image/Mirror.
23. Open 1228382379_paysages.png file.
24. Using Selections tool or Eraser tool, eliminate watermark. Copy and close out image without saving.
25. Paste as New Layer. Move into left bottom corner.
26. Adjust/Sharpness/Sharpen. Duplicate. Image/Mirror.
27. Open MR_Esther.pspimage of woman. Select and delete or erase with Eraser tool to eliminate watermark. Copy. Close without saving changes.
28. Paste as New Layer. Move woman downward so all of her hair is showing.
29. Adjust/Sharpness/Sharpen.
30. Using Selections tool/Freehand Selection, draw Point to Point inside the picture she is holding.
31. Delete. Flood fill with #000000.
32. Open 12283242444_divers.png. Eliminate watermark as you have done before.
33. Using Color Changer tool, change color to #ff0000 by clicking on image.
34. Copy/Paste into Selection. Selections/Select None.
35. Close out clock image without saving.
36. Have the Background color set to #ff0000/Foreground color set to #d3d8dc.
37. Layers/New Raster Layer.
38. From Tool bar, select the Paint Brush tool. Find Lone Tree brush and set to Size 223. See settings below.

39. Left click a tree on each side of woman (see example below). Then Right click a tree over and on her arm.
40. Right click a tree using Size 350, Background color #ff0000 in bottom left corner. Right click another tree to the right of black trees in snow on right side of image.
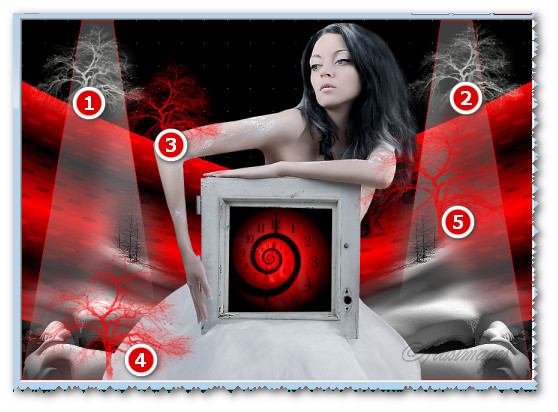
41. Effects/Edge Effects/Enhance. Effects/Edge Effects/Enhance More.
42. Pull tree layer below woman layer and go back to top layer, highlight it to continue.
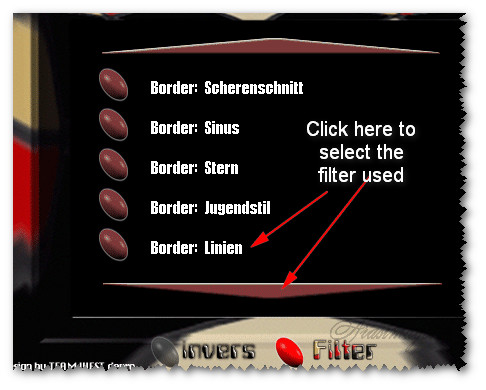
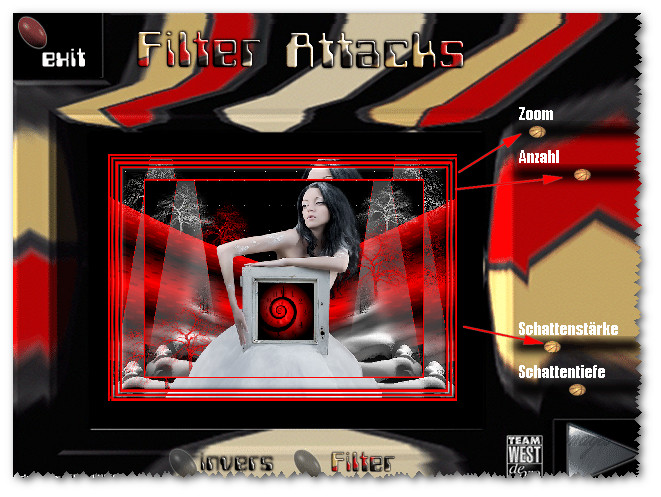
43. Image/Add Borders/Add 3px border, Symmetric checked, color #ff0000.
44. Copy image. Paste as New Layer.
45. Image/Resize/Resize by 80%/Resize all layers unchecked.
46. Merge/Merge Visible.
47. In Materials Palette, have Foreground color #000000/Background color #ff0000.
48. Effects/Filter Attacks/Border: Linien. Click Filter button then on down arrow to find Border: Linien. See settings below.
49. Image/Add Borders/Add 13px border on top and sides, and 60px on bottom in color #d3d8dc, Symmetric unchecked.
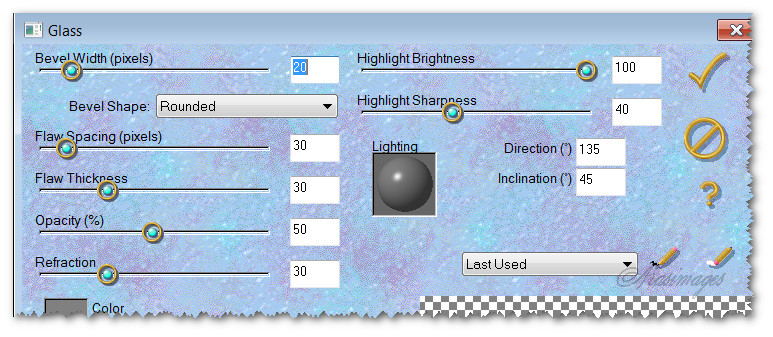
50. Image/Add Borders/Add 3px border, Symmetric checked, color #ff0000.
51. From Tool bar, select the Text tool. Choose Font Ambiance BT Swash, Size 90/Kerning 100/Bold and Italic checked. At the bottom in the 60px border, type out the words "Time for Change".
52. Convert to Raster Layer. Objects/Align/Horizontal Center.
53. Effects/3D Effects/Drop Shadow. Vertical 2, Horizontal 2, Opacity 50, Blur 1, color #000000.
54. Selections/Select All. Selections/Float. Selections/Defloat.
55. Effects/Eye Candy 3.1/Glass.
56. Selections/Select None.
57. OPTIONAL: Change the Background color to #000000. Type the year "2015" using the same text as in Step #48. Place below the clock.
58. Sign your name or leave your watermark if you wish. Merge/Merge Visible if necessary.
59. Adjust/Sharpness/Sharpen. Save as .png or .jpg file.
This tutorial was tested by PamelaD and Evatexas. Thanks ladies!
If you are going to use this tutorial for stationery, cards or place the tutorial/tag on another site, I would appreciate you contacting me for permission, giving Arasimages credit for the original tutorial and if possible, a link back to my site. Thank you.
Copyright © Arasimages All Rights Reserved