
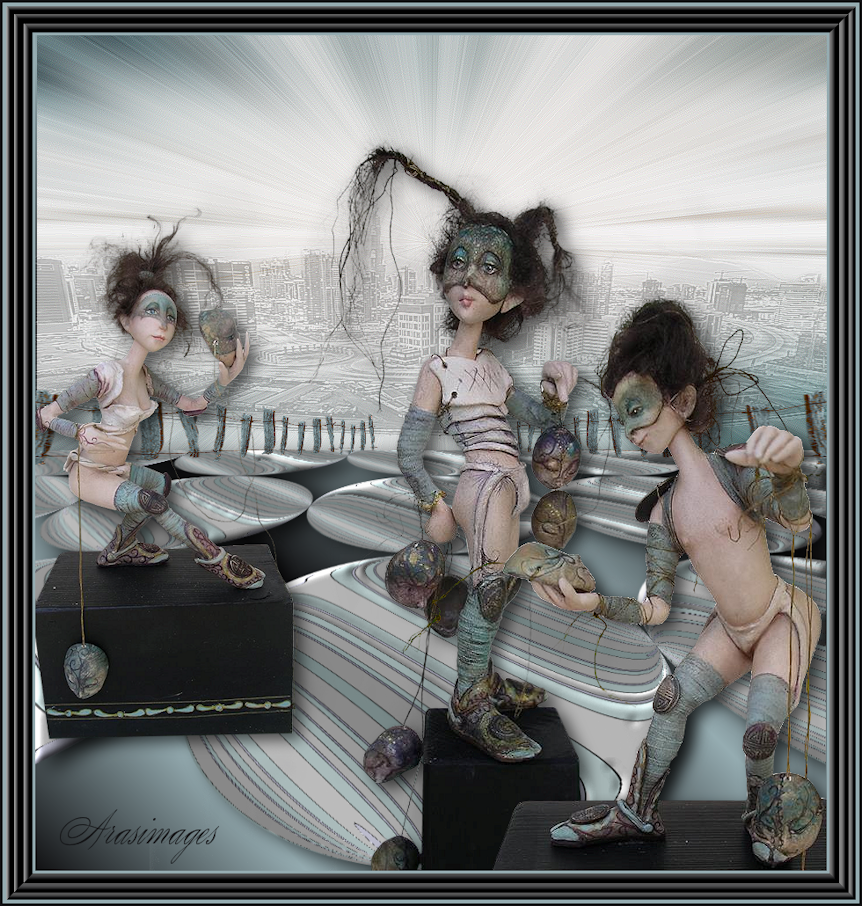
The Masked Ones
For a Dutch, Italian, Spanish and Danish translation, click on the flags.


For this tutorial you will need the materials in the zip file below.

Unzip the materials into a working folder you have created on your desktop named The Masked Ones. Please duplicate and close original tubes. I have used the plugins MuRa'sMeister/Perspective, Bordermania/Ripple and PSP effects in this tutorial. It is assumed you have a working knowledge of PSP to follow these directions. I have used PSPX6 for this tutorial but other versions may be used.
Thanks go to Nikita and to Yvonne Flipse for their work used in this tutorial. Please visit Yvonne Flipse's site where you will find her wonderful works of art. Thanks to the unknown artists for the fence and background scraps also.
Use the star to mark your place along the way.

1. In Materials Palette, set Foreground to #95acb1, Background to #111113. Create Gradient using Style Linear, Repeats 5, Angle 45, Invert checked, all other settings grayed out.

2. New/New Image 900px by 950px. Flood fill with Gradient.
3. Adjust/Blur/Gaussian Blur, Radius set to 30.
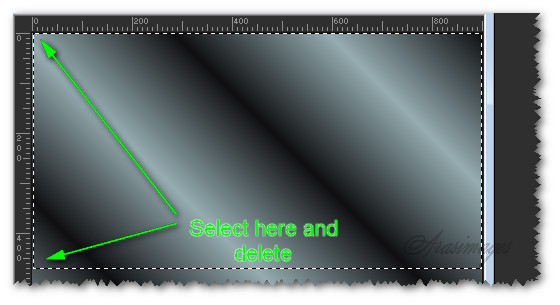
4. Select the top area from 470px upward to top and delete. Keep selected.
5. Open 0_9b5ef_562c98b0_XXL.png background. Copy/Paste into Selection.
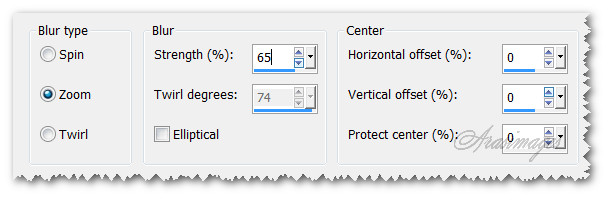
6. Adjust/Blur/Radial Blur.
7. Effects/Edge Effects/Enhance. Repeat.
8. Selections/Select None.
9. Layers/New Raster Layer. Flood fill with Gradient.
10. Adjust/Blur/Gaussian Blur, Radius set to 30.
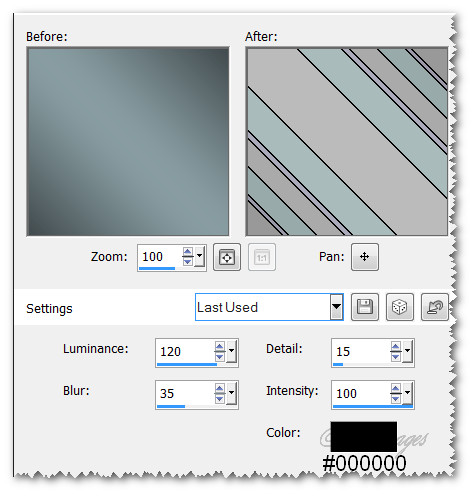
11. Effects/Artistic Effects/Contours.
12. Effects/Geometric Effects/Circle. Transparency checked.
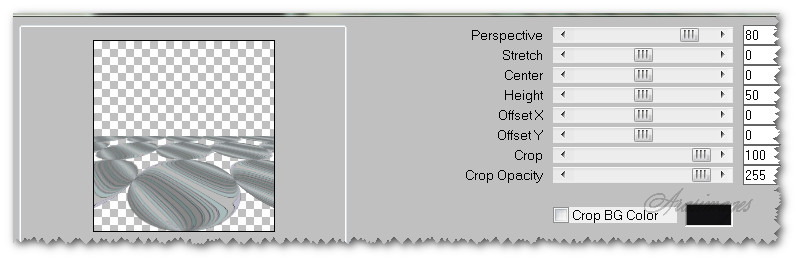
13. Effects/Mura'sMeister/Perspective Tiling. Using Pick tool, pull upward a little to eliminate line at horizon if one is showing.
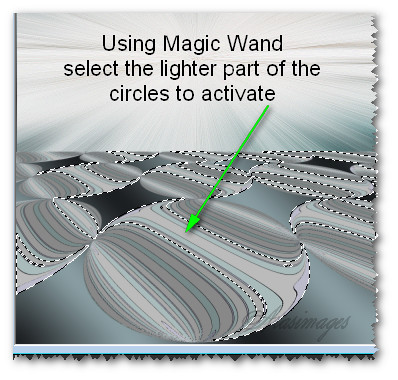
14. Select the lightest parts of the circles using Magic Wand. Have the Mode set to Add (Shift), Match mode: RGB Value, Tolerance 25, Contiguous checked and Feather at 0, Anti-alias checked.
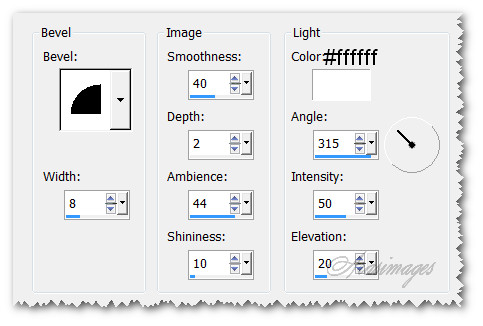
15. Effects/3D Effects/Inner Bevel. Apply twice.
16. Selections/Select None.
17. Effects/3D Effects/Drop Shadow. Vertical 7, Horizontal 16, Opacity 70, Blur 32, color #000000.
18. Open 1293040365_paysages_nikita.pspimage. Copy/Paste as New Layer.
19. Select around watermark, delete then deselect.
20. Image/Resize/Resize by 74%/Resize all layers unchecked.
21. Set to Luminance (Legacy), drop Opacity down to 27.
22. Using Pick tool, pull edges outward on each side to meet side borders. Move upwards to sit at horizon.
23. Effects/Edge Effects/Enhance More.
24. Open 0_8f753_9d2686e9_XXL.png fence. Copy/Paste as New Layer.
25. Image/Resize/Resize by 62%/Resize all layers unchecked.
26. Effects/Geometric Effects/Perspective-Horizontal. Distortion 85/Transparent checked.
27. Place fence into left side along horizon.
28. Duplicate. Image/Mirror. (Move to right side if it mirrored in place.) Merge/Merge Down.
29. Open MaskedPeople3 by YvonneFlipse.pspimage. Copy/Paste as New Layer.
30. Effects/3D Effects/Drop Shadow. Vertical 7, Horizontal 9, Opacity 60, Blur 24, color #000000.
31. Adjust/Sharpness/Sharpen.
32. Move her down into bottom edge of image and to right a little.
33. Open MaskedPeople5.pspimage. Copy/Paste as New Layer.
34. Effects/3D Effects/Drop Shadow. Vertical 7, Horizontal 9, Opacity 60, Blur 24, color #000000.
35. Adjust/Sharpness/Sharpen.
36. Place him into bottom right corner.
37. Open MaskedPeople6.pspimage. Copy/Paste as New Layer.
38. Image/Resize/Resize by 66%/Resize all layers unchecked.
39. Effects/3D Effects/Drop Shadow. Vertical 7, Horizontal 9, Opacity 60, Blur 24, color #000000.
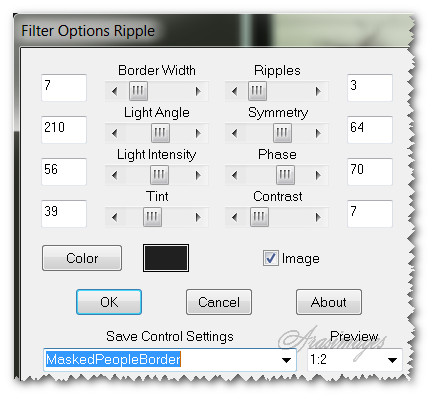
40. Adjust/Sharpness/Sharpen.
41. Place her to the left side of image.
42. Image/Add Borders/Add 3px border, Symmetric checked, color #95acb1.
43. Image/Add Borders/Add 30px border, Symmetric checked, color #111113.
44. Activate 30px border by clicking with Magic Wand.
45. Effects/Bordermania/Ripples. Use color #202020 in Ripples.
46. Selections/Select None.
47. Image/Add Borders/Add 3px border, Symmetric checked, color #95acb1.
48. Image/Add Borders/Add 3px border, Symmetric checked, color #111113.
49. Place your watermark or sign your name if you wish and save as a .png or .jpg file.
50. If you wish for your finished image to be smaller, Image/Resize/Resize by 88%/all layers checked.
This tutorial was tested by PamelaD and Evatexas. Thanks ladies!
If you are going to use this tutorial for stationery, cards or place the tutorial/tag on another site, I would appreciate you contacting me for permission, giving Arasimages credit for the original tutorial and if possible, a link back to my site. Thank you.
Copyright © Arasimages All Rights Reserved