
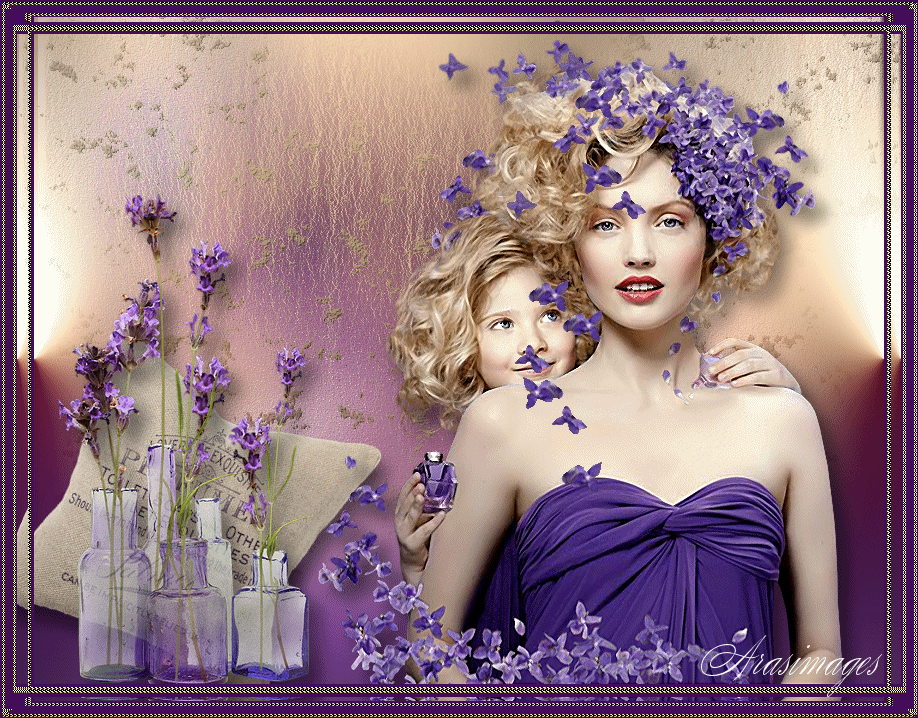
Petals of Lavender
For a Dutch, Danish, Italian and Spanish translation, click on the flags.


For this tutorial you will need the materials in the zip file below.

Unzip the materials into a working folder you have created on your desktop named Petals of Lavender. Please duplicate and close original tubes. I have used the plugins Flaming Pear/SuperBladPro and Flaming Pear/Flexify, Nik Software/Color Efex Pro 3.0, Graphics Plus/Cross Shadow, FiltersUnlimited 2.0/AFS MIRRBVL and the free program Animation Shop in this tutorial. Export the gh.texture05.PspBrush to your custom Brush folder. Place the goldbeads.jpg to your Patterns folder. It is assumed you have a working knowledge of PSP to follow these directions. I have used PSPX7 for this tutorial but other versions may be used.
Thanks go to Maryse and to the unknown tubers for images used in this tutorial. The flower animation I have created myself.
Use the pillow to mark your place along the way.

1. In Materials Palette, set Foreground to #ffffff, Background to #450e59.
2. In Materials Palette, set to Gradient, Style Linear, Repeats 0, Angle 0, Invert checked. Center and Focal Points are grayed out.
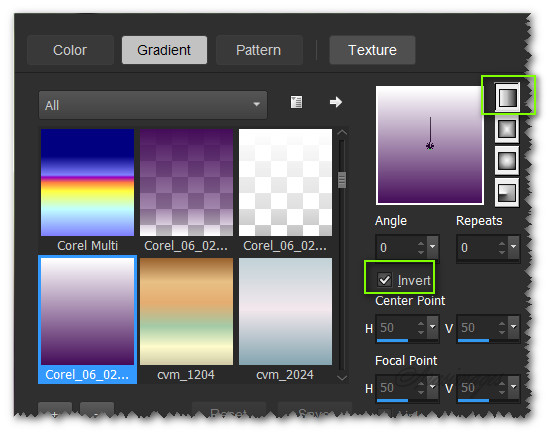
3. New/New Image 850px by 650px. Flood fill with Gradient.
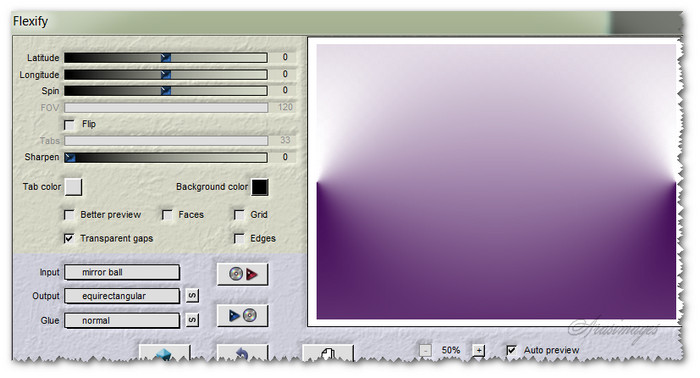
4. Effects/Flaming Pear/Flexify.
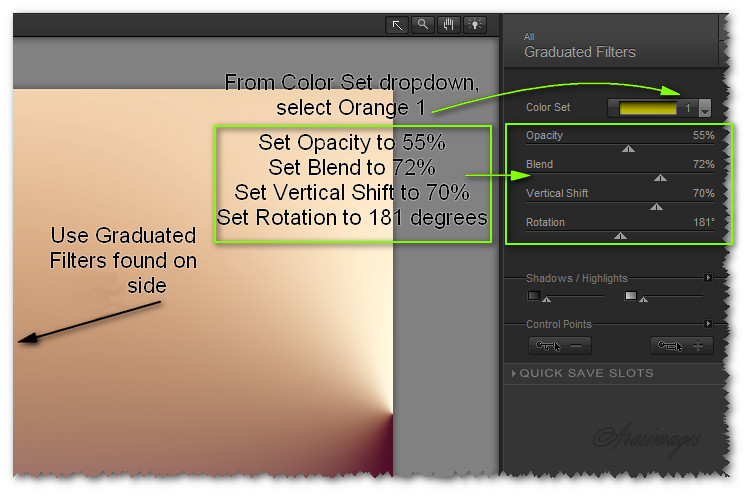
5. Effects/Nik Software/Color Efex Pro 3.0.
6. Effects/Graphics Plus/Cross Shadow.
7. Layers/New Raster Layer.
8. From tool bar select the Paint Brush tool. Find gh_texture05.

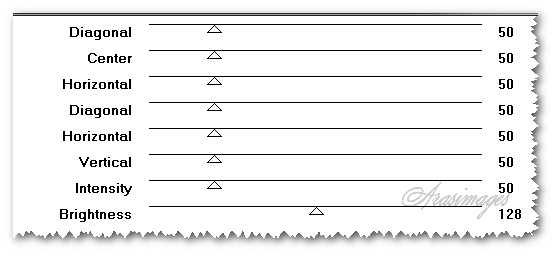
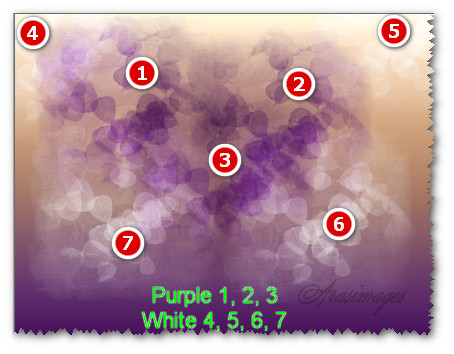
9. Using gh_texture05 and settings below, right click to stamp purple (#450e59) 1, 2 and 3. Left click to stamp white (#ffffff) 4, 5, 6 and 7 as seen in example.
10. Adjust/Blur/Gaussian Blur. Radius of 30.
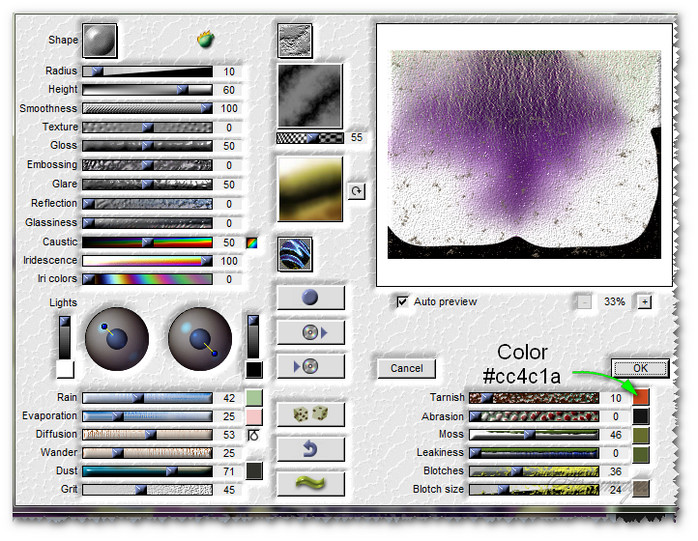
11. Effects/Flaming Pear/SuperBladePro. Change Tarnish color to #cc4c1a. (The Auto Preview image will differ with where you place the stamped flowers....do not worry if yours is different than mine).
12. Move Raster 2 layer upward a small amount to eliminate the darker line across the top border.
13. Open 0_cb662_a84141dc_L.png. file. Copy/Paste as New Layer.
14. Image/Resize/Resize by 60%/Resize all layers unchecked.
15. Adjust/Sharpness/Sharpen.
16. Effects/3D Effects/Drop Shadow. Vertical 12, Horizontal 12, Opacity 50, Blur 22, color #000000.
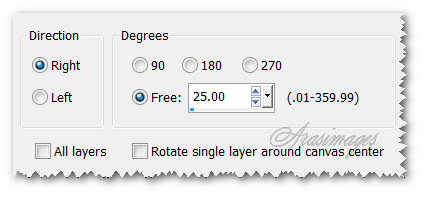
17. Image/Free Rotate. Rotate 25 degrees, Right.
18. Move into bottom left corner.
19. Open 0_cb655_2f2a2033_L.png. Copy/Paste as New Layer.
20. Adjust/Sharpness/Sharpen.
21. Effects/3D Effects/Drop Shadow. Vertical 12, Horizontal 12, Opacity 50, Blur 22, color #000000.
22. Move into bottom left corner.
23. Open MR_Mother and Daughter.pspimage. Copy/Paste as New Layer.
24. Using Selections tool, select around watermark. Press Delete. Deselect. Or use Eraser tool to erase watermark.
25. Adjust/Sharpness/Sharpen.
26. Effects/3D Effects/Drop Shadow. Vertical 12, Horizontal 12, Opacity 50, Blur 22, color #000000.
27. Move to bottom and toward the right.
28. Image/Add Borders. Add 3px border, Symmetric checked, color #450e59.
29. Image/Add Borders. Add 6px border, Symmetric checked, color #ffffff.
30. Click on 6px border with Magic Wand to activate it.
31. In Materials palette, select the Pattern tab. Choose pattern goldbeads.
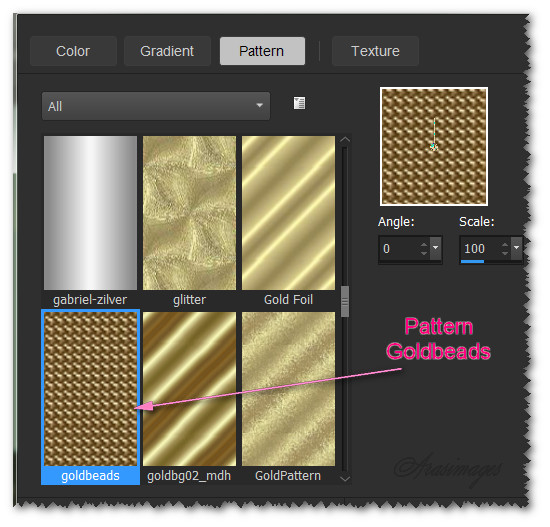
32. Flood fill the selected area with the Pattern.
33. Effects/Edge Effects/Enhance. Deselect.
34. Image/Add Borders. Add 16px border, Symmetric checked, color #450e59.
35. Image/Add Borders. Add 6px border, Symmetric checked, color #ffffff.
36. Click on 6px border with Magic Wand to activate it.
37. Flood fill the selected area with the Pattern.
38. Effects/Edge Effects/Enhance. Deselect.
39. Image/Add Borders. Add 3px border, Symmetric checked, color #450e59.
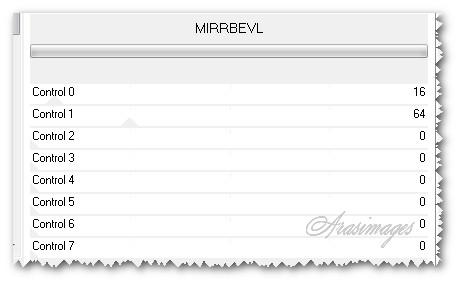
40. Effects/Filters Unlimited 2.0/AFS IMPORT/MRRBEVL.
41. Sign your name or leave your watermark. Save as .jpg file named Petals of Lavender.
42. Open Animation Shop. File/Open the .jpg file Petals of Lavender. Using Duplicate icon in top tool bar, click until you have 33 frames. Highlight and delete the last frame. You now have a total of 32 frames.

43. File/Open. Open FallingLavender.gif. Edit/Select All. COPY.
44. Go back to the main image Petals of Lavender. Edit/Select All.
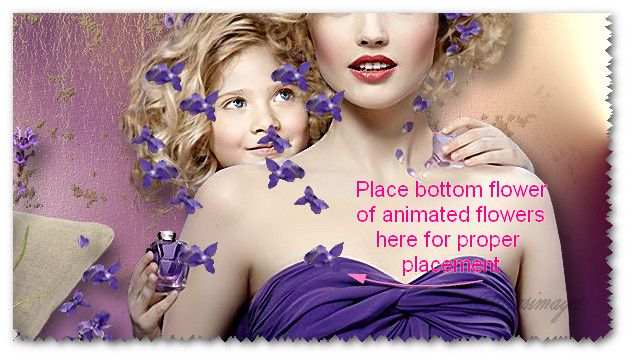
45. Right click inside the first frame/Paste/Into Selected Frame and hover the falling petals to where you want them. Left click to set in place.
46. Edit/Select All. Animation/Frame Properties/Display time set to 15.
47. Click on the View Animation button in top tool bar to check how your animation looks. If you are satisfied, then it is time to save your work.
48. File/Save As. When the first box comes up, select your destination of where you want the file saved, give it a name and let it save as a .gif file. Click Next, Next, Next and Finish. Your file has been saved and you are now finished.
This tutorial was tested by PamelaD and Evatexas. Thanks ladies!
If you are going to use this tutorial for stationery, cards or place the tutorial/tag on another site, I would appreciate you contacting me for permission, giving Arasimages credit for the original tutorial and if possible, a link back to my site. Thank you.
Copyright © Arasimages All Rights Reserved