
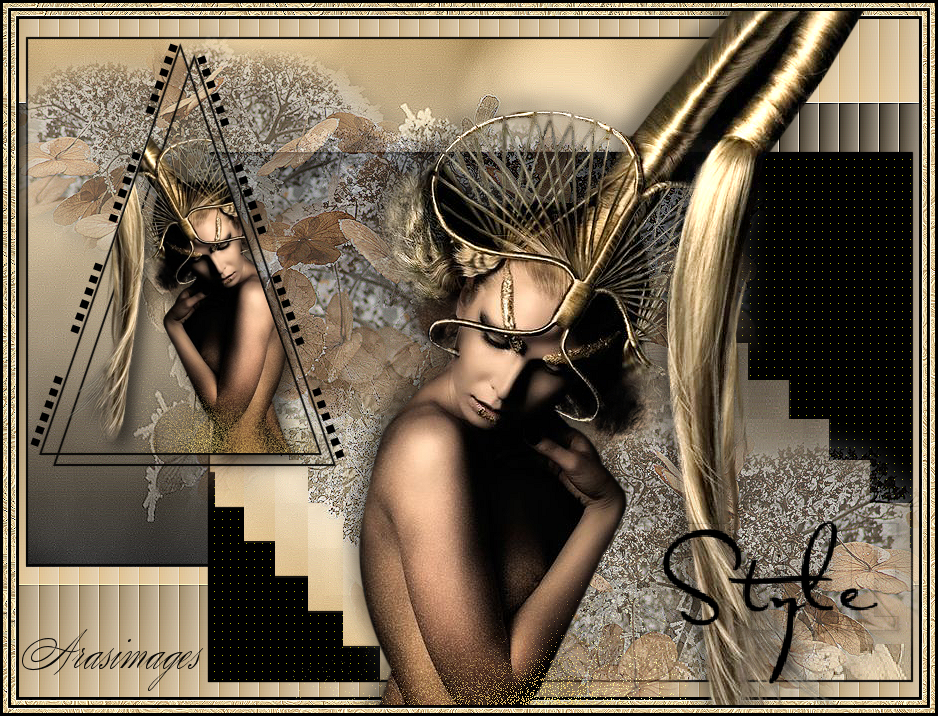
Style
For an Italian, Spanish, Dutch and Danish translation, click on the flags.


For this tutorial you will need the materials in the zip file below.

Unzip the materials into a working folder you have created on your desktop named Style. Please duplicate and close original tubes. I have used the plugins FM Tile Tools/Collage-Circular, AP [Lines]/Lines-SilverLining, FunHouse/Facet Offset, AlienSkin Eye Candy 5/Texture and PSP effects in this tutorial. Click on ArasimagesStyleTinySpirals.f1s file to put it in Eye Candy5. Place the Gradient in your PSP Gradients folder. Place the Selection in the PSP Selections folder, export the two brushes into your PSP Brushes. It is assumed you have a working knowledge of PSP to follow these directions. I have used PSPX7 for this tutorial but other versions may be used.
Thanks go to Nikita and to PamelaD from Arasimages for their tubes used in this tutorial.
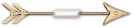
Use the arrow to mark your place along the way.
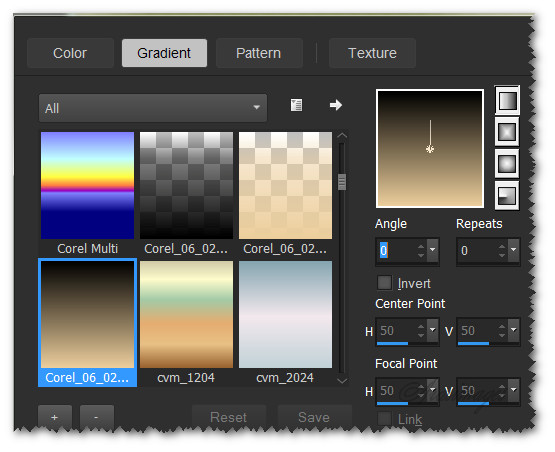
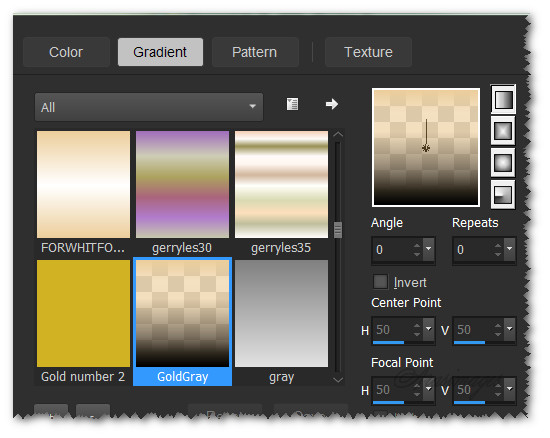
1. In Materials Palette, set Foreground to #ecce9c, Background to #000000. Create Gradient using Style Linear, Repeats 0, Angle 0, Invert unchecked, center and focal points grayed out.
2. New/New Image 900px by 678px. Flood fill with Gradient.
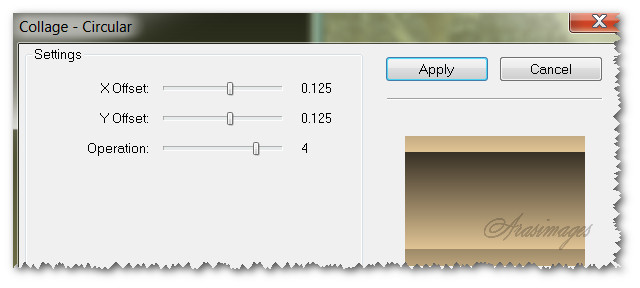
3. Effects/FM Tile Tools/Collage-Circular.
4. Effects/Texture Effects/Blinds.
5. Effects/Edge Effects/Enhance. Set aside as we will paste a New Layer on it that we are about to make.
6. New/New Image 900px by 678px.
7. Keep Foreground/Background colors the same as Step #1. Select and flood fill with GoldGray Gradient.
8. Layers/New Raster Layer. Selections/Select All.
9. Open _MG_5899.jpg background. Copy/Paste into Selection. Deselect.
10. Set Blend Mode to Luminance (Legacy). Drop Opacity to 40.
11. Merge/Merge Flatten .
12. Effects/Edge Effects/Enhance. Repeat. COPY.
13. Activate the first image you made. Paste flower layer on it as a New Layer.
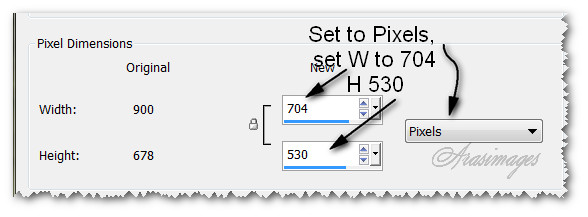
14. Image/Resize/Under Pixel Dimensions, set to Pixels. Width to 704, Height to 530. Resize all layers unchecked.
15. Using the Selections tool set to Rectangle, Add (Shift), Feather 1, Anti-alias checked, select around the Raster 2 layer.
16. Layers/New Raster Layer. Flood fill with #000000.
17. Selections/Modify/Contract by 2px. Press Delete key.
18. Selections/Select None. Merge/Merge Down.
19. Place resized layer into upper left corner as seen here.

20. Duplicate. Image/Flip/Flip Vertical. Image/Mirror/Mirror Horizontal (In older versions of PSP, Image/ImageFlip and Image/ImageMirror).
21. Pull duplicated layer down into bottom right corner opposite layer in upper left corner.
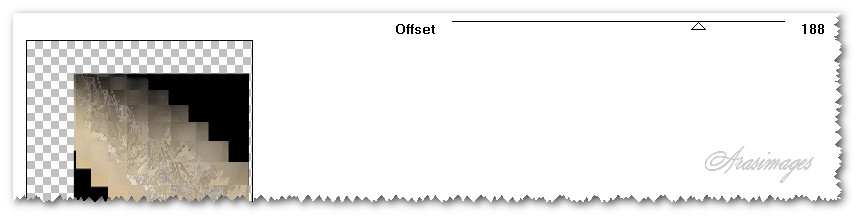
22. Effects/Funhouse/Facet Offset.
23. Using Magic Wand, click inside both black areas to highlight.
24. Effects/AP [Lines]/Lines-SilverLining.
25. Selections/Select None.
26. Repeat Steps #15 through #18.
27. Open _MG_5899.psp. Copy Misted layer/Paste as New Layer.
28. Place in bottom right corner. Lower Opacity to 60.
29. Effects/Edge Effects/Enhance.
30. Duplicate. Place in center.
31. Duplicate. Image/Resize/Resize by 78%/Resize all layers unchecked.
32. Image/Mirror. Place in upper left corner.
33. Merge down twice so all flower layers are in one layer.
34. Layers/New Raster Layer.
35. Selections/Load/Save Selection/Load Selection from Disk. Load.

36. Flood fill Selection with #000000.
37. Selections/Modify/Contract by 2px. Press Delete key.
38. Open 13458166980.pspimage. Image/Mirror. Copy.
39. Layers/New Raster Layer. Paste into Selection. Selections/Select None.
40. Effects/3D Effects/Drop Shadow. Vertical 11, Horizontal 8, Opacity 62, Blur 21, color #000000.
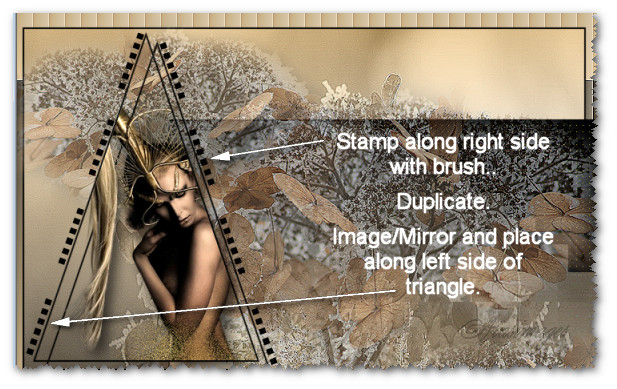
41. Adjust/Sharpness/Sharpen.
42. Drop down to triangle layer. Effects/3D Effects/Drop Shadow. Vertical 11, Horizontal 14, Opacity 100, Blur 0, color #000000.
43. Highlight top layer/Merge/Merge Down.
44. Layers/New Raster Layer.
45. From Tool bar, select the Paint Brush tool. Find hbgbrushes0018 004. Set the Size to 170, Rotation to 70.

46. Stamp along right side of triangle as I have done in example. Use color #000000.
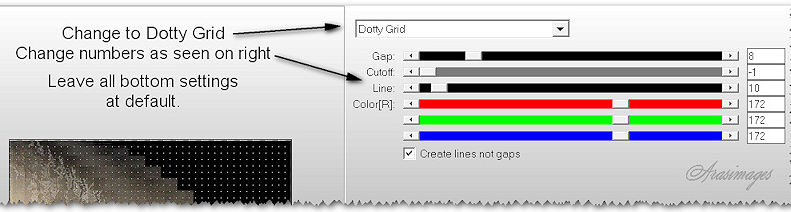
47. Duplicate. Image/Mirror. Place along left side of triangle. Adjust if needed.
48. Merge/Merge Down.
49. Image/Add Borders/Add 3px border, Symmetric checked, color #000000.
50. Image/Add Borders/Add 5px border, Symmetric checked, color #ecce9c.
51. Using Magic Wand, select the outer 5px border.
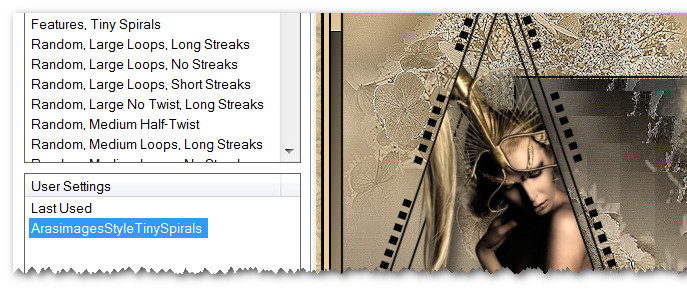
52. Effects/AlienSkin Eye Candy 5/Texture/Swirl. Use the ArasimagesStyleTinySpirals Preset.
53. Effects/Edge Effects/Enhance. Deselect.
54. Open 13458166980_femmes.pspimage. Copy/Paste as New Layer.
55. Effects/3D Effects/Drop Shadow. Vertical -11, Horizontal -8, Opacity 50, Blur 28, color #000000.
56. Adjust/Sharpness/Sharpen. Move woman upward and to right a little.
57. Image/Add Borders/Add 3px border, Symmetric checked, color #000000.
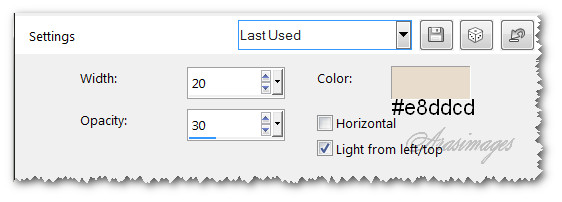
58. Image/Add Borders/Add 5px border, Symmetric checked, color #ecce9c.
59. Using Magic Wand, select the outer 5px border.
60. Effects/AlienSkin Eye Candy 5/Texture/Swirl. Use the ArasimagesStyleTinySpirals Preset. (Same as Step #52).
61. Effects/Edge Effects/Enhance. Deselect.
62. Image/Add Borders/Add 3px border, Symmetric checked, color #000000.
63. From Tool bar, select the Paint brush tool. Choose the brush agi_wb_style. Use settings below. Right click to stamp Style in lower right corner, color #000000.

64. Layers/New Raster Layer. Add your name or watermark if you wish.
65. Merge/Merge Visible. Save as .png or .jpg file.
This tutorial was tested by PamelaD and Evatexas. Thanks ladies!
If you are going to use this tutorial for stationery, cards or place the tutorial/tag on another site, I would appreciate you contacting me for permission, giving Arasimages credit for the original tutorial and if possible, a link back to my site. Thank you.
Copyright © Arasimages All Rights Reserved