
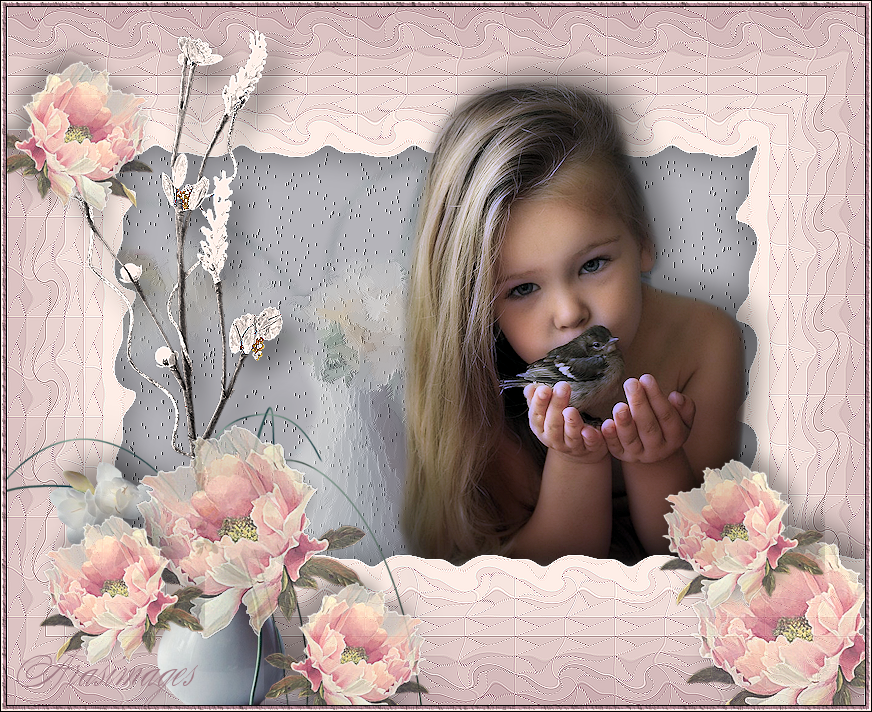
Child of Spring
For an Italian, Spanish, Dutch, Danish and French translation, click on the flags.


For this tutorial you will need the materials in the zip file below.

Unzip the materials into a working folder you have created on your desktop named Child of Spring. Please duplicate and close original tubes. I have used the plugins Xero/Porcelain, AAA Frames/Texture Frames and Photoshopfun II/Russell in this tutorial. It is assumed you have a working knowledge of PSP to follow these directions. I have used PSPX6 for this tutorial but other versions may be used.
Thanks go to Maryse, to Irene, to dhedey for the lovely rose and to the unknown tubers for their work used in this tutorial.
Use the flower to mark your place along the way.

1. In Materials Palette, set Foreground to #feeee7, Background to #b5b4ba.
2. New/New Image 860px by 700px. Flood fill with Background color.
3. Effects/Texture Effects/Straw Wall.

4. Open MR_Still Life OrchardACes.pspimage. Copy/Paste as New Layer. Place as shown below.

5. Effects/Art Media Effects/Brush Strokes.
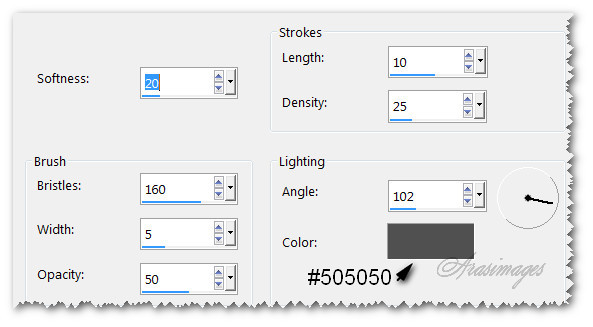
6. Lower Opacity to 50.
7. Layer/New Raster Layer.
8. In Materials Palette change background color to #9e772. Set to Gradient, Style Linear, Repeats 0, Angle 0, Invert checked. Center and Focal Points not relavent.
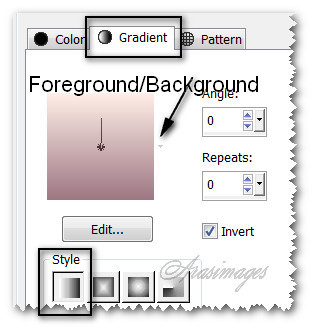
9. Flood fill with Gradient.
10. Effects/Photoshopfuntwo/Russell.

11. Effects/Edge Effects/Enhance.
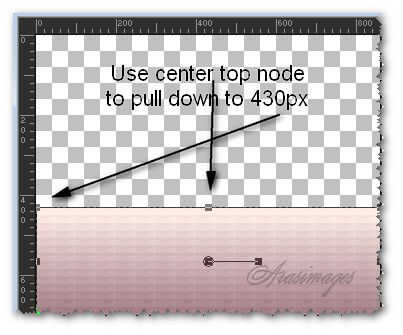
12. Using Pick tool top center node to pull downward to 430px.
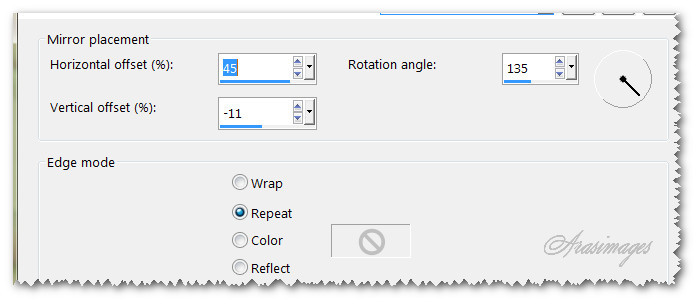
13. Effects/Reflection Effects/Rotating Mirror.
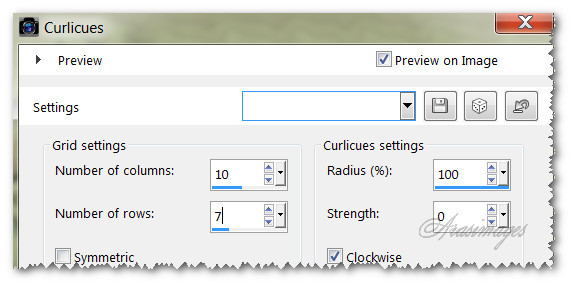
14. Effects/Distortion Effects/Curliques.
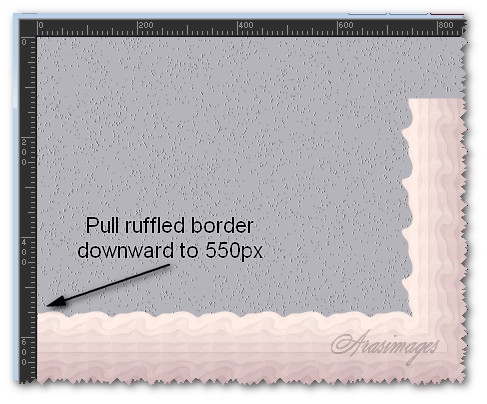
15. Pull ruffled border downward to 550px. Effects/Edge Effects/Enhance.
16. Image/Flip. Effects/3D Effects/Drop Shadow. Vertical 7, Horizontal -7, Opacity 30, Blur 40, color #000000.
17. Adjust/Sharpness/Sharpen.
18. Duplicate. Image/Flip. Image/Mirror.
19. Open DI_kindmetvogel.pspimage. Copy/Paste as New Layer.
20. Image/Mirror. Pull little girl layer down between Raster 3 and Copy of Raster 3 ruffled borders. Place her on right side by border.
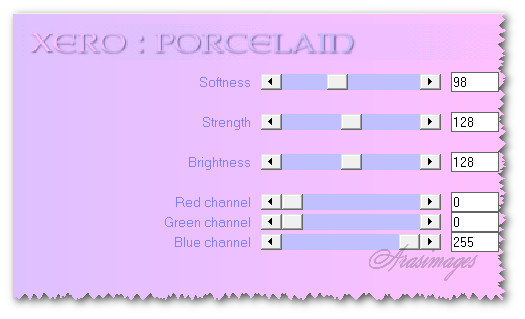
21. Effects/Xero/Porcelain.
22. Adjust/Sharpness/Sharpen.
23. Effects/3D Effects/Drop Shadow. Vertical -14, Horizontal 14, Opacity 40, Blur 35, color #000000.
24. Highlight top layer to continue.
25. Open 0_aab67_35f35213_L.png. Copy/Paste as New Layer.
26. Move to left side of image.
27. Using Color changer tool, Tolerance set to 25, Edge Softness to 20, click several times on flower stem.
28. Effects/Edge Effects/Enhance.
29. Effects/3D Effects/Drop Shadow. Vertical 14, Horizontal 14, Opacity 40, Blur 35, color #000000.
30. Open MR_Still Life OrchardACes.pspimage. Copy/Paste as New Layer.
31. Image/Resize/Resize by 65%/Resize all layers unchecked.
32. Effects/3D Effects/Drop Shadow. Vertical 14, Horizontal 14, Opacity 40, Blur 35, color #000000.
33. Place on left side of image over flower stem.
34. Open Peony03_dhedey.pspimage. Using Selections tool set Point to point, Add (Shift), Feather 0, select and delete the stem off the copy of the tube. Deselect. Copy/Paste as New Layer.
35. Image/Resize/Resize by 70%/Resize all layers unchecked.
36. Move over top of vase. (NOTE: See my finished image for flower placements). Lower Opacity to 75.
37. Effects/Edge Effects/Enhance.
38. Duplicate flower. Move into right bottom corner.
39. Effects/3D Effects/Drop Shadow. Vertical 14, Horizontal 14, Opacity 40, Blur 35, color #000000.
40. Duplicate. Image/Resize/Resize by 70%/Resize all layers unchecked.
41. Move to sit over the top of larger flower in right bottom corner. Set Opacity at 86.
42. Duplicate. Image/Mirror. Move flower in upper left corner where borders meet.
43. Duplicate flower again. Image/Mirror.
44. Move to rest on left side of vase.
45. Image/Add Borders/Add 3px border, Symmetric checked, color #9e7782.
46. Image/Add Borders/Add 3px border, Symmetric checked, color #feeee7.
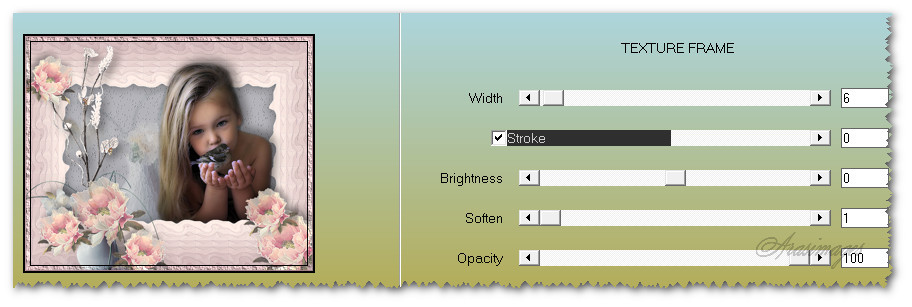
47. Effects/AAA Frames/Texture Frame.
48. Sign your name or leave watermark and save as .png or .jpg file.
This tutorial was tested by PamelaD and Evatexas. Thanks ladies!
If you are going to use this tutorial for stationery, cards or place the tutorial/tag on another site, I would appreciate you contacting me for permission, giving Arasimages credit for the original tutorial and if possible, a link back to my site. Thank you.
Copyright © Arasimages All Rights Reserved