
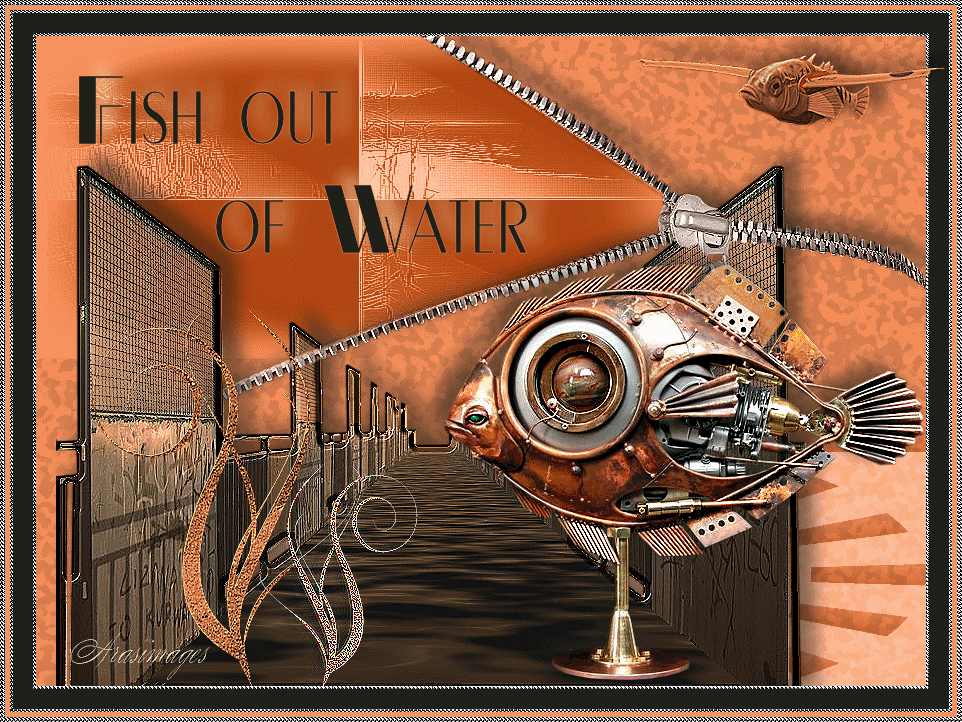
Fish Out Of Water
For a Spanish, Italian, Dutch, Danish and French translation click on the flags.


For this tutorial you will need the materials in the zip file below.

Unzip the materials into a working folder you have created on your desktop named Fish Out of Water. Please duplicate and close originals. Use the copies for your work. Place the Silverpunk Pattern in your PSP/Patterns folder. I have used Animation Shop and the plugins VM Instant Art/Strange Life Form No.4, Artistic/Sponge, Flaming Pear/Flood, Kiwi's Oelfilter/Setzboard and VM Instant Art/Steel Basket for this tutorial. It is assumed you have a working knowledge of PSP to follow these directions. I have used PSPX7 for this tutorial.
Thanks go to Guismo, to Thafs and Krys for the great imaginative Steampunk tubes and to Aimelle and Veda's Precious Creations for the beautiful tubes used in this tutorial.
Use the flying fish to mark your place along the way.
![]()
1. In Materials Palette, set Foreground to #ff945e, Background to #1f1f1a.
2. New/New Image 890px by 650px. Flood fill with Foreground color #ff945e.
3. Layers/New Raster Layer. Flood fill with Foreground color #ff945e.
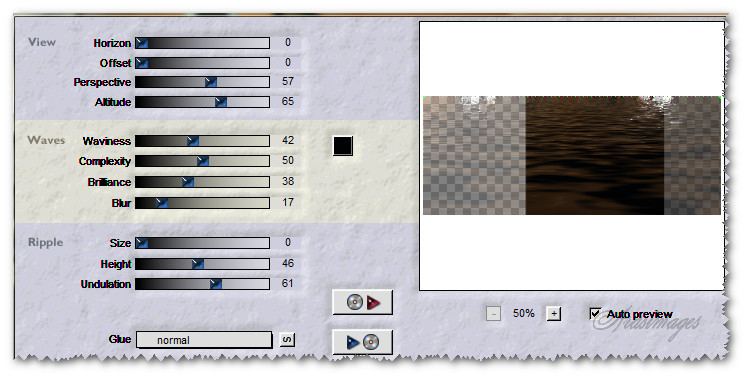
4. Effects/VM Instant Art/Steel Basket.
5. Using Pick tool, pull layer down to 405px.
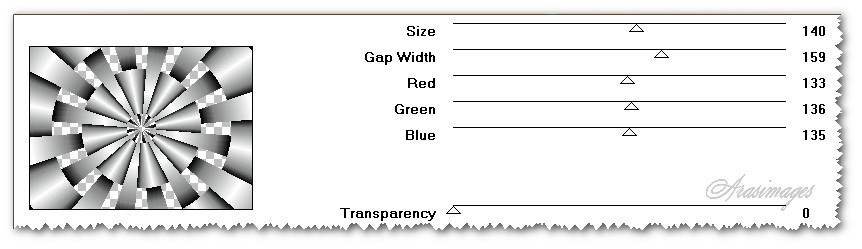
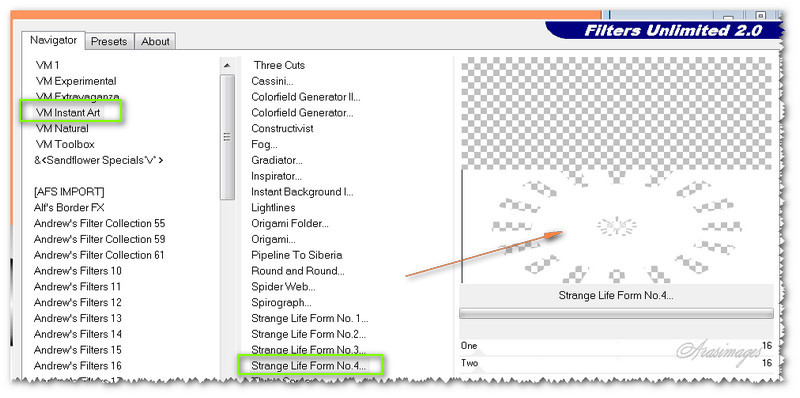
6. Effects/Filters Unlimited2/VM Instant Art/Strange Life Form.4.
7. Effects/3D Effects/Drop Shadow. Vertical -10, Horizontal 15, Opacity 60, Blur 25.25, color #000000.
8. Set to Luminance (L), Opacity of 41. Pull layer to the right so rectangles reach right side of image.
9. Adjust/Sharpness/Sharpen.
10. Open copy of Gerry-Bloemen 68-7 februari 2009.pspimage.
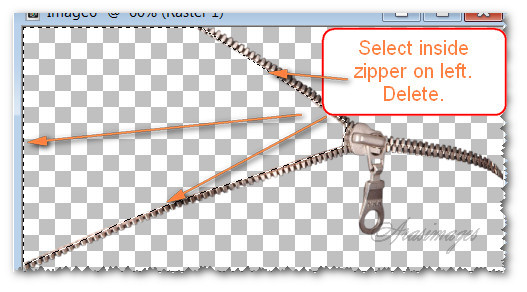
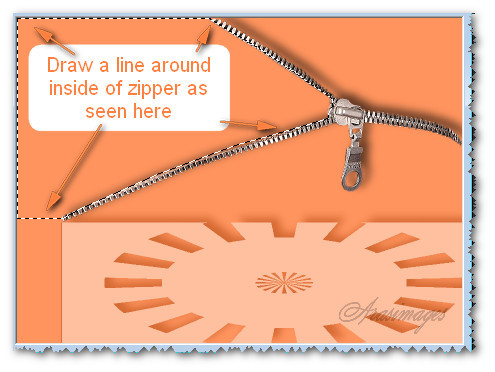
11. Using the Selection tool, Point to Point, Add (Shift), Feather 3, Smoothing 3, draw a line around the zipper inside on left. Delete. Deselect.
12. Copy/Paste as New Layer.
13. Effects/Edge Effects/Enhance.
14. Effects/3D Effects/Drop Shadow. Vertical -10, Horizontal 15, Opacity 60, Blur 25.25, color #000000.
15. Place zipper ends to top and right side borders of image. Left end will not reach to left side border.
16. Using Selections tool, Freehand Selection/Point to Point/Feather set to 3, draw a line from inside top of zipper, along zipper pull, along bottom edge of zipper and including the rest of the upper left corner as seen below.
17. Open AImelle-misted tube_quietude.pspimage. Copy.
18. Layers/New Raster Layer. Edit/Paste into Selection.
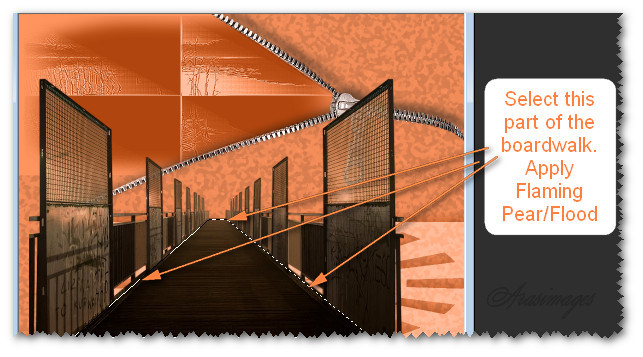
19. Effects/V Kiwi's Oelfilter/Setzboard. Set to Luminance (L), drop Opacity to 45.
20. Effects/Edge Effects/Enhance. Effects/Edge Effects/Enhance More.
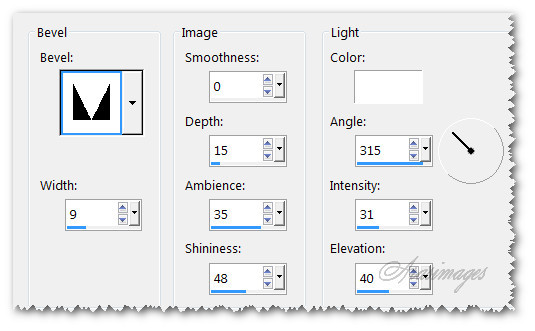
21. Selections/Invert. Drop down to first layer. Apply Effects/Artistic/Sponge.
22. Deselect and go back to top layer to continue.
23. Open calguispasserelle25012012.pspimage. Copy/Paste as New Layer.
24. Move down so end of boardwalk meets with horizon.
25. Using the Selections tool, select the floor of the boardwalk. Keep active.
26. Effects/Flaming Pear/Flood. Color #000000. Deselect.
27. Effects/3D Effects/Inner Bevel.
28. Effects/Edge Effects/Enhance.
29. Effects/3D Effects/Drop Shadow. Vertical -10, Horizontal 15, Opacity 60, Blur 25.25, color #000000.
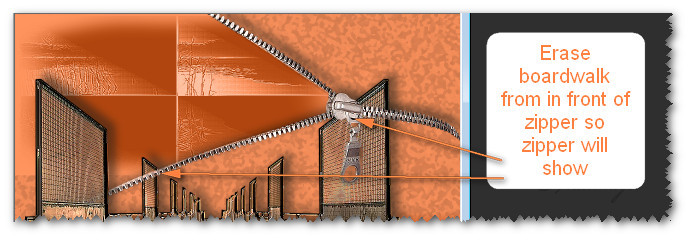
30. Using Eraser tool set to about Size 11, all the rest of the settings at default, expand the working image so you can see well. Carefully erase the boardwalk off of the zipper.
31. Open poisson_steampunk_tubed_by_thafs.pspimage. Copy/Paste as New Layer.
32. Image/Mirror. Pull to right bottom corner.
33. Adjust/Sharpness/Sharpen.
34. Effects/3D Effects/Drop Shadow. Vertical -10, Horizontal -15, Opacity 60, Blur 25.25, color #000000.
35. Open Seaweed.pspimage. Copy/Paste as New Layer.
36. Using Color Changer, left click to change to foreground color.
37. Effects/Edge Effects/Enhance.
38. Effects/3D Effects/Drop Shadow. Vertical -10, Horizontal 15, Opacity 60, Blur 25.25, color #000000.
39. Move to bottom left corner over boardwalk.
40. Duplicate. Image/Resize/Resize by 60%/Resize all layers unchecked.
41. Image/Mirror. Place to right of first Seaweed.
42. Effects/Edge Effects/Enhance. Effects/Edge Effects/Enhance More.
43. From Text tool, select Font Cravat Display SSi, Size 100, Stroke 0.5. Type "Fish out", press Enter key once, then space 4 times, then type "of Water".

44. Convert to Raster Layer.
45. Effects/3D Effects/Drop Shadow. Vertical -10, Horizontal 15, Opacity 60, Blur 25.25, color #f9e3b3.
NOTE: FOR THE FISH TO BE PUT AND REMAIN IN PLACE IN UPPER RIGHT CORNER, FOLLOW INSTRUCTIONS #46 THROUGH #51 AND CONTINUE; IF USING ANIMATION, OMIT STEPS #46 THROUGH #51. IF YOU WISH TO USE ANIMATION, FOLLOW INSTRUCTIONS #65 THROUGH THE END OF TUTORIAL.
46. Open KRYSSURREALISME-13-01-14-93.pspimage. Copy/Paste as New Layer.
47. Image/Resize/Resize by 60%/Resize all layers unchecked.
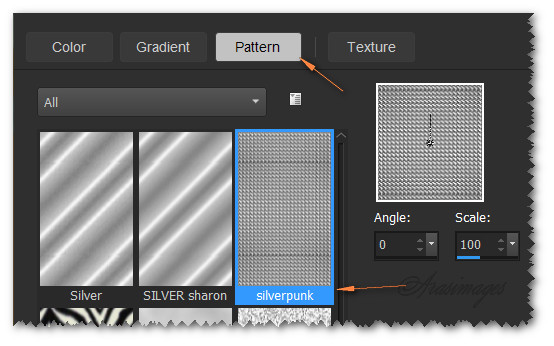
48. Using Color changer, left click a few times on the fish using Foreground color #ff945e to change its color to orange.
49. Adjust/Sharpness/Sharpen.
50. Effects/3D Effects/Drop Shadow. Vertical -10, Horizontal 15, Opacity 60, Blur 25.25, color #000000.
51. Using Eraser tool, erase the watermark off the copy. Place the fish in upper right corner.
52. Place your watermark or name if you wish.
53. Image/Add Borders/Add 3px border, Symmetric checked, color #c0c0c0.
54. Click 3px border with Magic Wand to activate it.
55. In Materials Palette, select Silverpunk pattern.
56. Flood fill with Silverpunk pattern. Effects/Edge Effects/Enhance. Deselect.
57. Image/Add Borders/Add 20px border, Symmetric checked, color #1f1f1a.
58. Image/Add Borders/Add 3px border, Symmetric checked, color #c0c0c0.
59. Click 3px border with Magic Wand to activate it.
60. Flood fill with Silverpunk pattern. Effects/Edge Effects/Enhance. Deselect.
61. Image/Add Borders/Add 5px border, Symmetric checked, color #ff945e.
62. Image/Add Borders/Add 5px border, Symmetric checked, color #c0c0c0.
63. Click outer 5px border with Magic Wand to activate it.
64. Flood fill with Silverpunk pattern. Effects/Edge Effects/Enhance. Deselect. Save as FishOutofWater.png file.
65. FOR ANIMATION: Open Animation Shop. File/Open FishOutofWater.png file. Duplicate image so you have 13 frames in all.
66. File/Open FlyingFishJ.psp file. Click on first frame to highlight it. Edit/Selections/Select all. Copy.
67. Go back to the FishOutofWater.png file. Click on first frame. Edit/Selections/Select All.
68. Right click in first frame. Paste/Paste into Selected Frame. Hover the fish over the upper right corner. Left click to set in place.
69. In top tool bar, click on Animation/Frame Properties. Set the Display time to 16.
70. View Animation to see if you are satisfied with how your animated image looks. If you are satisfied, then we will save your work.
71. File/SaveAs. When the Save As box appears, type in the File name, leave Save as type as (*gif) and click Save. Click Next, Next, Next, Finish as the boxes appear.
72. Your file is now saved and you are finished.
This tutorial was tested by PamelaD and Evatexas. Thanks ladies!
If you are going to use this tutorial for stationery, cards or place the tutorial/tag on another site, I would appreciate you contacting me for permission, giving Arasimages credit for the original tutorial and if possible, a link back to my site. Thank you.
Copyright © Arasimages All Rights Reserved