
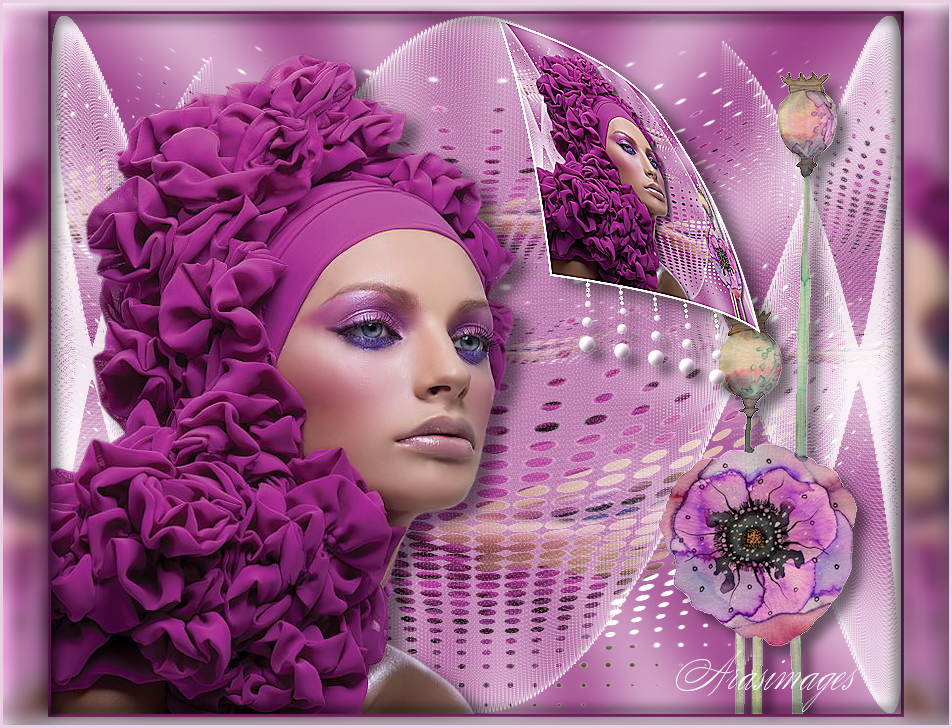
Wrapped in Fuchsia
For an Italian, Danish, Dutch, Spanish, French and German translation, click on the flags.


For this tutorial you will need the materials in the zip file below.

Thanks go to K@rine_Dre@ms , to Colorel and to Narah for their beautiful work used in this tutorial.
Unzip the materials into a working folder you have created on your desktop named Wrapped in Fuchsia. Please duplicate and close originals. Place the Ziggys.cfg file in your PSP Files/Plugins/Dragonfly/Sinedots II folder. I have used Mura'sMeister/Perspective, Dragonfly/SinedotsII/ArasimagesZigZag, AP-01 Innovations/Mirror-Reflections and effects of PSP in this tutorial. It is assumed you have a working knowledge of PSP to follow these directions. I have used PSPX7 for this tutorial but other versions may be used. To work this tutorial, it is assumed you have some working knowledge of Paint Shop Pro.
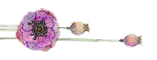
Use the flower below to mark your place along the way.
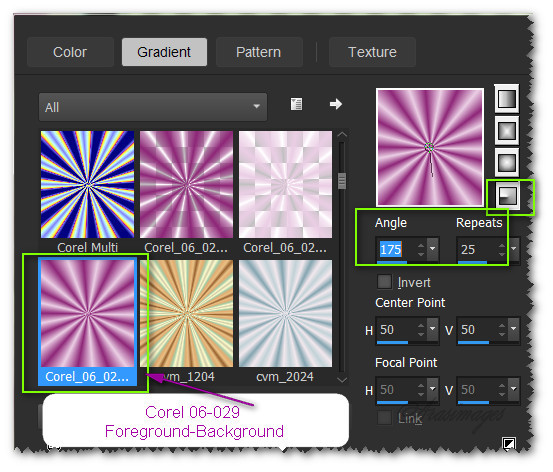
1. In Materials Palette, set Foreground to #eacee4, Background to #8e2778.
2. Create a Gradient using Foreground/Background colors, Radial set to Angle of 175/Repeats of 25, Invert unchecked.
3. New/New Image 850px by 700px. Flood fill with Gradient.
4. Adjust/Blur/Gaussian Blur. Radial set to 30.
5. Layers/New Raster Layer. Change Background color to #ffffff and flood fill new raster layer.
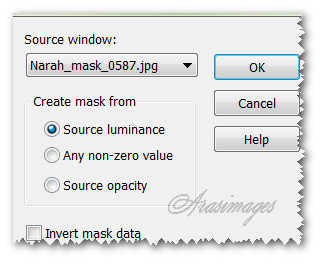
6. Open Narah_mask_0587.jpg file.
7. Working on main image/Layers/New Mask Layer/From Image. Select from the Add Mask From Image drop down Narah_mask_0587 mask. Apply.
8. Merge/Merge Group.
9. Selections/Select All. Selections/Float. Selections/Defloat.
10. Open Karine_Dreams_Pretty_Woman_2945_Mai_2014.pspimage. Copy/Paste into Selection.
11. Selections/Select None.
12. Adjust/Sharpness/Sharpen.
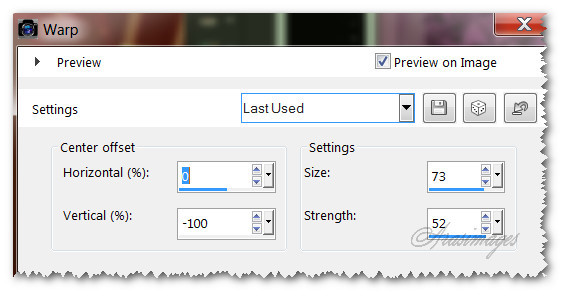
13. Effects/Distortion/Warp.
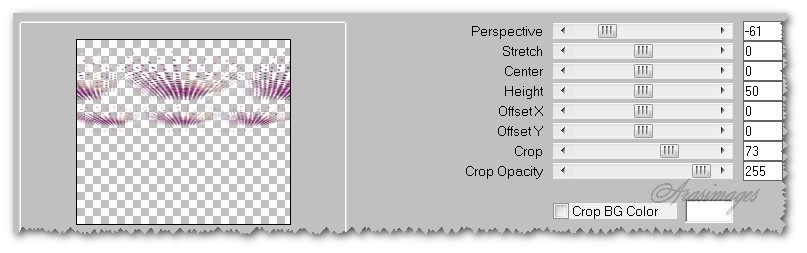
14. Duplicate. Effects/Mura'sMeister/Perspective Tiling.
15. Working on Group-Raster 2 layer, move downward until the bottom dots are along the bottom edge of image.
16. Go back to top layer, highlight to continue.
17. Layers/New Raster Layer.
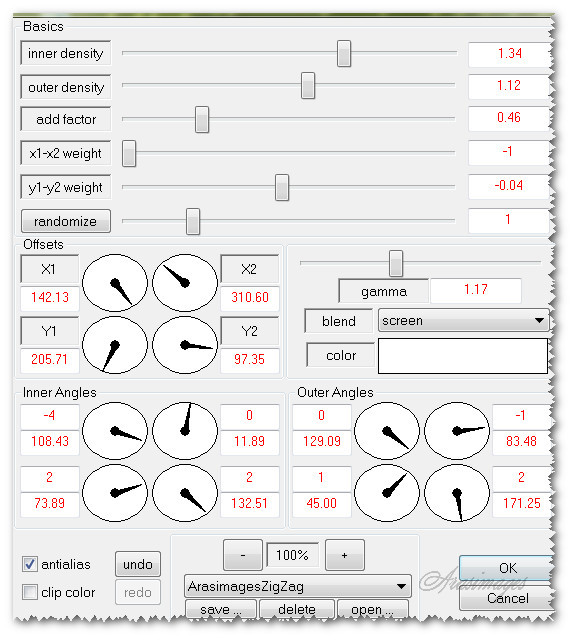
18. Effects/Dragonfly/SinedotsII/ArasimagesZigZag. Click on the dropdown arrow to select Ziggy's.cfg file. Click Open and you will find the list of zig zag.cfg files. At the top will be ArasimagesZigZag. Click on it to make it show in the drop down arrow space. Apply.
19. Drop Opacity to 85.
20. Open pavot_colorel.pspimage. Copy/Paste as New Layer.
21. Image/Resize/Resize by 90%/Resize all layers unchecked.
22. Effects/3D Effects/Drop Shadow. Vertical 12, Horizontal 12, Opacity 50, Blur 15, color #000000.
23. Adjust/Sharpness/Sharpen.
24. Move to right side of image, stems at the bottom.
25. Open Karine_Dreams_Pretty_Woman_2945_Mai_2014.pspimage. Copy/Paste as New Layer.
26. Effects/3D Effects/Drop Shadow. Vertical 10, Horizontal 14, Opacity 50, Blur 20, color #000000.
27. Move into bottom left corner.
28. Adjust/Sharpness/Sharpen.
29. Merge/Merge Visible. Copy! Edit/Undo Merge Visible.
30. Paste as New Layer.
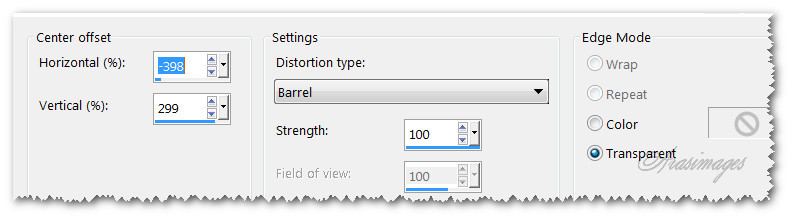
31. Effects/Distortion/Lens Distortion.
32. Image/Resize/Resize by 45%/Resize all layers unchecked.
33. Selections/Select All. Selections/Float. Selections/Defloat.
34. Layers/New Raster Layer.
35. Flood fill with #ffffff. Selections/Modify/Contract by 2px. Delete. Deselect.
36. Merge/Merge Down.
37. Adjust/Sharpness/Sharpen. Sharpen More.
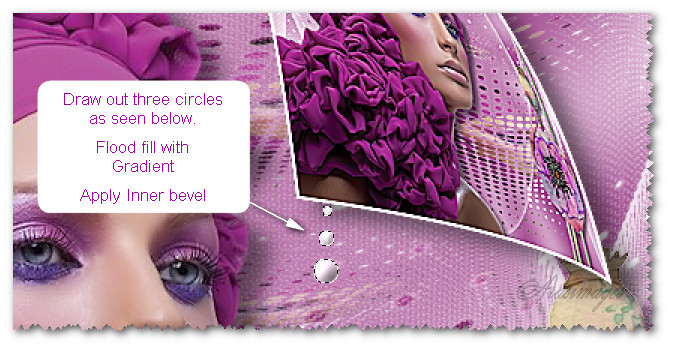
38. Effects/3D Effects/Drop Shadow. Vertical 10, Horizontal 14, Opacity 50, Blur 20, color #000000.
39. Move distorted small image into upper right corner.

40. Layers/New Raster Layer.
41. Set the Selections tool to Selections type Circle, Mode Add(Shift), Feather 0, Anti-alias checked.
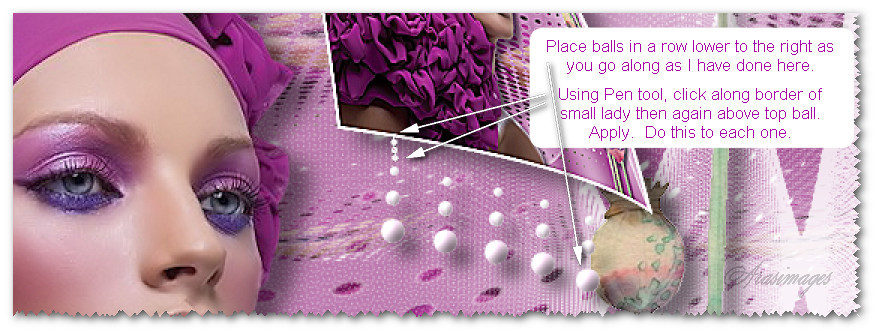
42. Set the View on Grid to help to keep the circles equadistant from each other and in a straight line.
43. Draw out three circles, starting with a small one then drop down a little and draw a larger one, then the largest one.
44. Keeping them selected, having Background color set to #ffffff, Flood fill with current gradient.
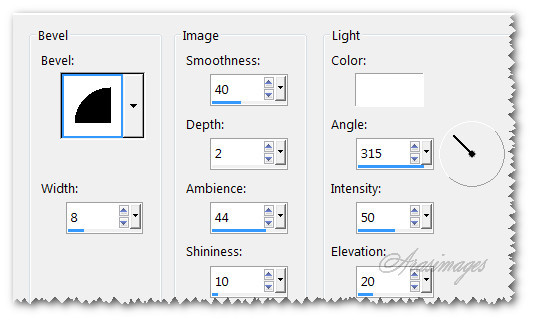
45. Effects/3D Effects/Inner Bevel. Deselect.
46. Effects/3D Effects/Drop Shadow. Vertical 10, Horizontal 10, Opacity 50, Blur 15, color #000000.
47. Duplicate 4 times. Arrange balls so they become lower on the right side. See my example in next step.
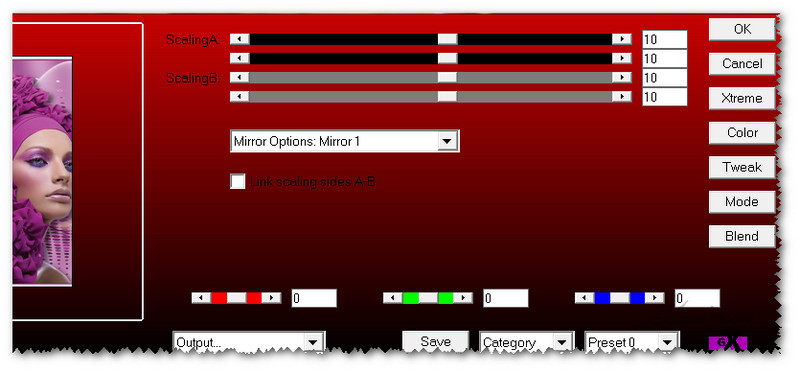
48. Using Pen tool, Style line set to dotted_4, Width 1.60 using Background color #ffffff. Start by clicking at the bottom border of the small lady image. End just above the small circle leaving a small space (2 or 3 clicks). Apply. Do this to each one of the 5 rows of circles. See example below.

49. Adjust/Sharpness/Sharpen. Apply Drop Shadow as in Step #46.
50. Image/Add Borders/Add 3px border, Symmetric checked, color #8e2778.
51. Image/Add Borders/Add Borders of 8px top and bottom, 45 on left and right side, color #ffffff.
52. Using Magic Wand, select white borders to activate.
53. Effects/AP 01 [Innovations]/Mirror-Reflections set to Default.
54. Effects/3D Effects/Inner Bevel.
55. Effects/3D Effects/Drop Shadow. Vertical 10, Horizontal 10, Opacity 50, Blur 15, color #000000.
56. Effects/3D Effects/Drop Shadow. Vertical -10, Horizontal -10, Opacity 50, Blur 15, color #000000.
57. Adjust/Blur/Gaussian Blur. Radial set to 7.80. Selections/Select None.
58. Image/Add Borders/Add 3px border, Symmetric checked, color #eacee4.
59. Sign your name or leave your watermark if you wish. Save as .png or .jpg file.
This tutorial was tested by PamelaD and Evatexas. Thanks ladies!
If you are going to use this tutorial for stationery, cards or place the tutorial/tag on another site, I would appreciate you contacting me for permission, giving Arasimages credit for the original tutorial and if possible, a link back to my site. Thank you.
Copyright © Arasimages All Rights Reserved