

Circus Act
For a Danish, German, Dutch, Italian, Spanish and Russian translation, click on the flags.


For this tutorial you will need the materials in the zip file below.

Thanks go to Nikita for the lovely woman and mask used in this tutorial.
Unzip the materials into a working folder you have created on your desktop named Circus Act. Please duplicate and close original tubes. Use the copies for your work so you will not lose the originals. Place the star .psp Tube in your PSP/Picture Tube folder. I have used the plugin Graphics Plus/Cross Shadow and PSP effects in this tutorial. I have also used Animation Shop. You will be creating your own animations for this tutorial...I show you how and it will be fun! It is assumed you have a working knowledge of PSP to follow these directions. I have used PSPX7 for this tutorial but other versions may be used. To work this tutorial, it is assumed you have some working knowledge of Paint Shop Pro.
Use the little wheel below to mark your place along the way.

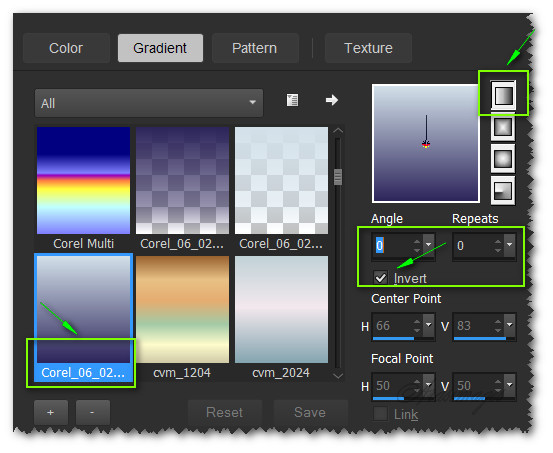
1. In Materials Palette, set Foreground to #d2e0e9, Background to #2d265b. Create a Gradient using these colors, Gradient Corel_06_029 (foreground/background), Style Linear, Angle 0, Repeats 0, Invert checked, Center Points/ Focal Points null.
2. New/New Image 850px by 700px. Flood fill with Background color.
3. Open 1250182062_nikita_masque.jpg on your workspace. Leave open.
4. Back to your main working image. Layers/New Raster Layer. Flood fill with Gradient.
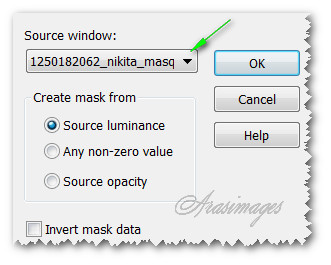
5. Layers/New Mask Layer/From Image. In the Source window drop down that appears, select the nikita masque. Click OK.
6. Layers/Merge/Merge Group.
7. Effects/Edge Effects/Enhance.
8. Open 13458167033_femmes_nikita.pspimage. Copy/Paste as New Layer.
9. Using your Selections tool, Rectangle/Feather 0, select around Nikita's watermark. Delete. Deselect .
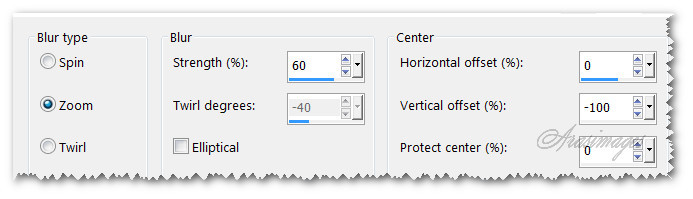
10. Adjust/Blur/Radial Blur.
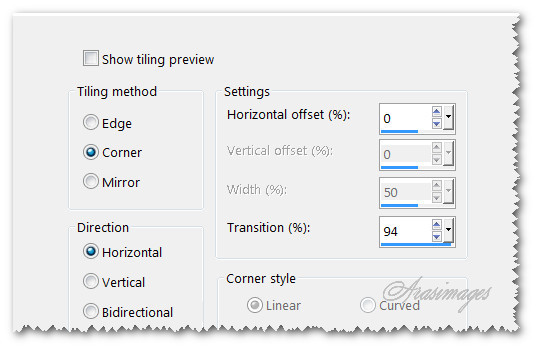
11. Effects/Image Effects/Seamless Tile.
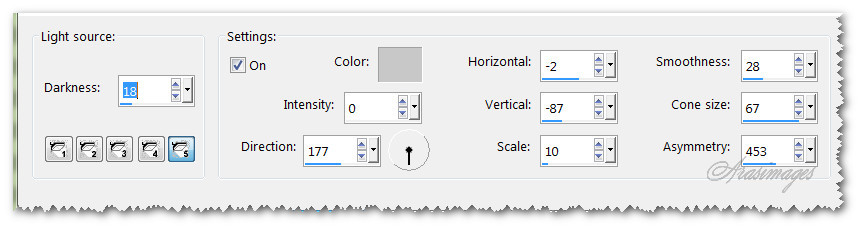
12. Effects/Illumination Effects/Lights. Color #c8c8c8.
13. Image/Add Borders/Add 3px border, Symmetric checked, color #2d265b.
14. Image/Add Borders/Add 15px border, Symmetric checked, color #f0cdb9.
15. Image/Add Borders/Add 3px border, Symmetric checked, color #2d265b.
16. Image/Add Borders/Add 3px border, Symmetric checked, color #d2e0e9.
17. Using Magic Wand, select the 15px border by clicking on it.
18. Effects/Graphics Plus/Cross Shadow.
19. Selections/Select None.
20. Selections/Select All. Selections/Modify/Contract by 25.
21. Selections/Invert. Copy/Paste as New Image on your workspace.
22. File/Save As. Save as PSP Animation Shop (*psp) file in your working folder. Name it Circus Border. We will be using this border later on in Animation Shop.
23. Selections/Select None on main image.
24. Open 13458167033_femmes_nikita.pspimage. Select Nikita's watermark and delete it as you did before.
25. Copy/Paste as New Layer.
26. Image/Resize/Resize by 60%/Resize all layers unchecked.
27. Move into upper left corner so her rope is touching the border at the top.

28. Drop Opacity to 49.
29. Duplicate. Image/Mirror.
30. Image/Resize/Resize by 60%/Resize all layers unchecked.
31. Place smaller lady in upper right corner so her rope is touching the border at the top. (See example in Step #27).
32. Drop Opacity further to 30.
33. Sign your name/watermark. Merge/Merge Visible.
34. Duplicate the working image twice, having 3 layers in all.
35. Close off bottom and middle layer, top layer is highlighted.
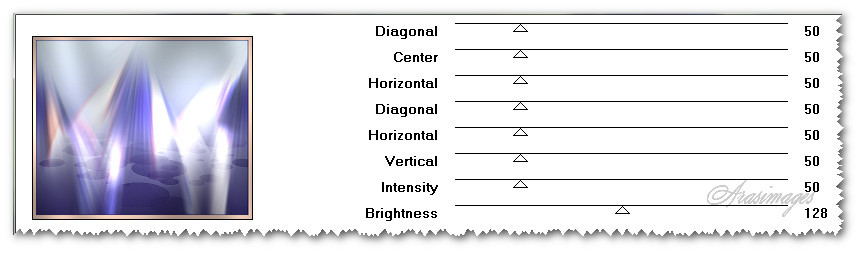
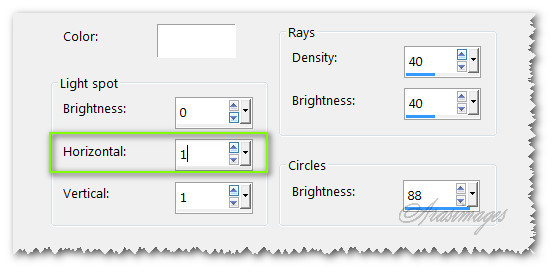
36. Effects/Illumination Effects/Sunburst. Horizontal at 1.
37. Close off top layer, move down. Highlight and open middle layer.
38. Effects/Illumination Effects/Sunburst. Change the Horizontal number to 99, click OK.
39. Close off middle layer. Move down to bottom layer, highlight and open it.
40. Effects/Illimination Effects/Sunburst. Change Horizontal number to 49. Click OK.
41. Open middle and top layers. File/Save As. Save as PSP Animation Shop (*psp) file in your working folder. Name it Circus Animation Background.
42. Open 13458167033_femmes_nikita.pspimage.
43. Adjust/Sharpness/Sharpen.
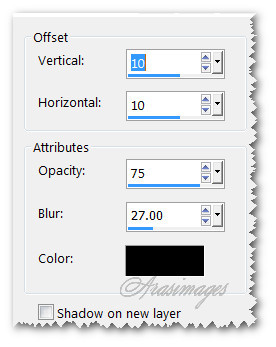
44. Effects/3D Effects/Drop Shadow. Vertical 10, Horizontal 10, Opacity 75, Blur 27, color #000000.
45. Using the Selections tool set to Rectangle, Feather 0, select around the watermark of Nikita. Delete/Deselect.
46. Duplicate twice, having three layers total. Close off the bottom and middle layers.
47. Move to the top layer and highlight it.
48. From your Picture Tube tool, select the star .psp Tube. See settings below.

49. Working on the top layer, click several times using Size 26 on the sparkles of her dress. Do not over do on the sparkles as we have two more layers of them to go!
50. Close off the top layer. Move to middle layer and open it.
51. Change the Scale of the star to 23. Click several times on the sparkles of her dress.
52. Close off the middle layer. Move down to the bottom layer and open it.
53. Change the Scale of the star to 20. Click several times on the sparkles of her dress.
54. Open all layers. File/Save As. Save as PSP Animation Shop (*psp) file in your working folder and name it Circus Lady.
55. Now we have all our files created and will move on to open them in Animation Shop.
56. In Animation Shop, go to File/Open. First open the Circus Animation Background.
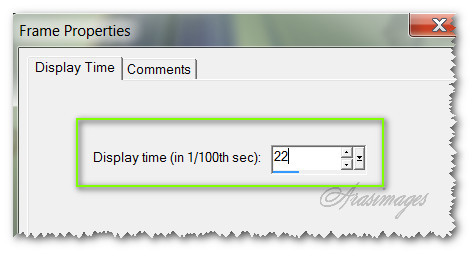
57. Highlight the first frame. Edit/Select All. From the tool bar at the top, click on Animation/Frame Properties and set the rate at 22.
58. File/Open Circus Lady. Highlight first frame. Edit/Select All. Copy.
59. Make sure all frames are selected in Circus Animation Background. Right click in first frame/Paste/Into Selected Frame. Place the lady a little to the right of the smaller lady so the two smaller ladies will show. Left click to set it in place.
60. File/Open Circus Border. Highlight/Edit/Propagate Paste. Copy.
61. Go back to the working main image. Right click in the first frame/Paste/Into Selected Frame. Look carefully where the border is and place it exactly over the existing border, left click to set in place.
62. Click on the View Animation icon in the tool bar at the top. If all appears as you would like then it is time we save our work.
63. File/Save As. When the box comes up, let it save as a .gif, save it in your working folder with the name Circus Act.
64. Click Save. As the boxes continue to come up, click Next, Next, Next and Finish.
This tutorial was tested by PamelaD and Evatexas. Thanks ladies!
If you are going to use this tutorial for stationery, cards or place the tutorial/tag on another site, I would appreciate you contacting me for permission, giving Arasimages credit for the original tutorial and if possible, a link back to my site. Thank you.
Copyright © Arasimages All Rights Reserved