
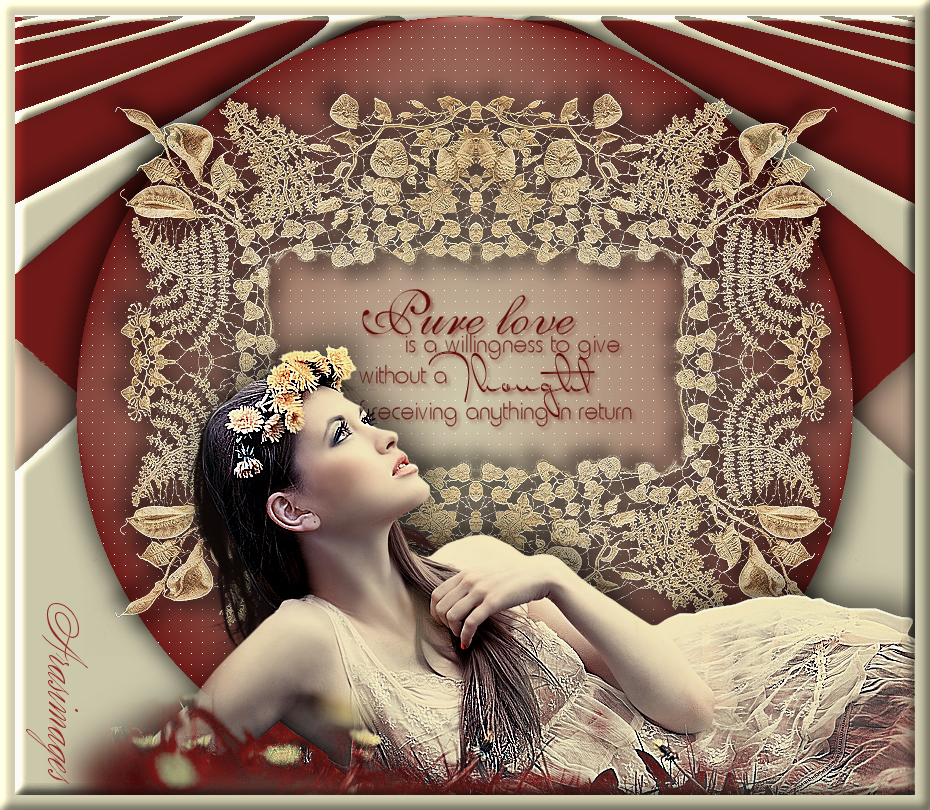
Pure Love
For an Italian, German, Russian, Danish, Dutch and Spanish translation, click on the flags.


For this tutorial you will need the materials in the zip file below.

Thanks go to Roby2765 for her lovely lady used in this tutorial.
Unzip the materials into a working folder you have created on your desktop named Pure Love. Please duplicate and close original tubes. I have used the plugin Penta.com/color dot and PSP effects in this tutorial. Place the ArasimagesInnerBevel in your PSP/Presets folder. Export the agi_purelove brush in your PSP Brushes folder. It is assumed you have a working knowledge of PSP to follow these directions. I have used PSPX6 for this tutorial but other versions may be used. To work this tutorial, it is assumed you have some working knowledge of Paint Shop Pro.
Use the Dragonfly below to mark your place along the way.

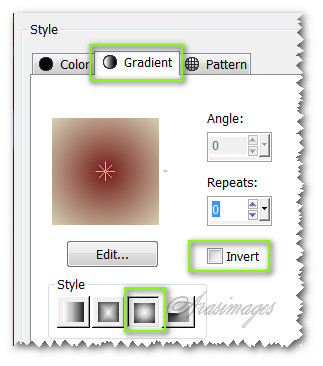
1. In Materials Palette, set Foreground to #731c1a, Background to #d5d0b3. Create Gradient using Style sunburst,Repeats 0, Angle 0, Invert unchecked, Center and Focal points both at 50 Horizontally and Vertically.
2. New/New Image 900px by 780px. Flood fill with Gradient.
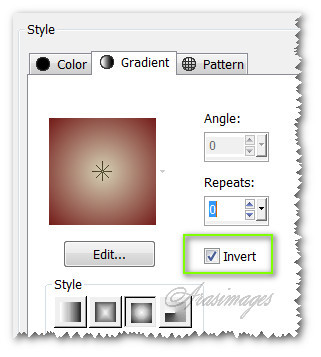
3. Layers/New Raster Layer. In Materials Palette/Gradient, check Invert. Flood fill with new Gradient.
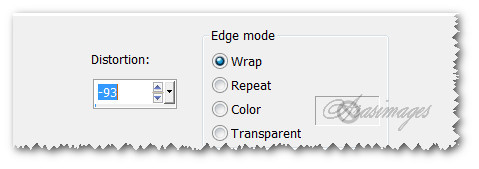
4. Effects/Geometric Effects/Circle.

5. Effects/Penta/ColorDot.
6. Close off Raster 1 layer.
7. Use Magic Wand to select outside the circle. Layers/New Raster Layer. Right click on outside area of circle to flood fill with Background #d5d0b3. Selections/Select None.
8. Effects/Geometric/Perspective-Vertical.
9. Effects/3D Effects/Drop Shadow. Vertical -9, Horizontal 0, Opacity 45, Blur 36, color #000000.
10. Using Magic Wand, Tolerance set to 22, Feather 0, select the Perspective-Vertical.
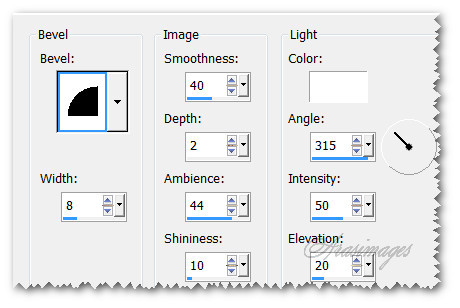
11. Effects/3D Effects/Inner Bevel. Select ArasimagesInnerBevel. Selections/Select None.
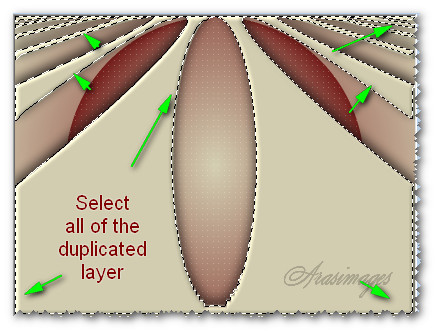
12. Duplicate. Using Selections/Magic Wand set to Tolerance 33, Feather 0, Select all of the duplicated layer.
13. In Materials Palette, set Foreground color to #731c1a. Flood fill the selected area. Deselect.
14. Image/Flip. Pull duplicated layer below original layer. If this layer does not reach all the way to the right, use the Pick tool to stretch it to the right border.
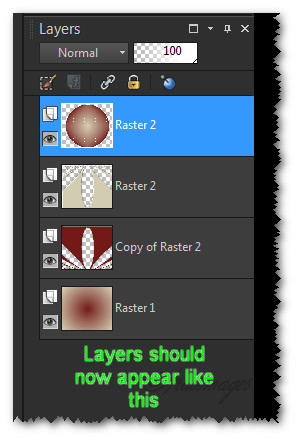
15. Reopen the bottom layer. Pull layer of Circle to the top to continue. See example of Layers below.
16. Effects/3D Effects/Drop Shadow. Vertical -9, Horizontal -9, Opacity 50, Blur 32, color #000000.
17. Effects/3D Effects/Drop Shadow. Vertical 9, Horizontal 9, Opacity 50, Blur 32, color #000000.
18. Open ArasimagesLacewoShadow.pspimage. Copy/Paste as New Layer.
19. Effects/3D Effects/Drop Shadow. Vertical -11, Horizontal -11, Opacity 50, Blur 22, color #000000.
20. Effects/3D Effects/Drop Shadow. Vertical 11, Horizontal 11, Opacity 50, Blur 22, color #000000.
21. Adjust/Sharpness/Sharpen.
22. Open 153 woman.pspimage. Copy/Paste as New Layer.
23. To change the color of the blue at the bottom of the lady, I used a Tolerance of 7/Edge Softness of 23, Foreground color of #912321. Using the Color Changer, left click a few times on the blue to recolor.
24. Effects/3D Effects/Drop Shadow. Vertical -10, Horizontal 8, Opacity 57, Blur 46, color #000000.
25. Place woman at the bottom so the right side fits.
26. Layers/New Raster Layer.
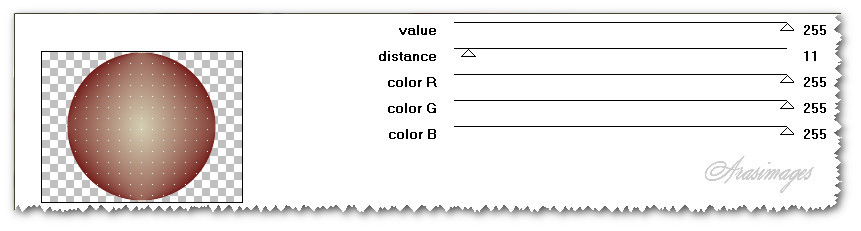
27. Find the Brush Agi_purelove from the Paint Brush tools. Use settings below, stamp in center with Foreground color #731c1a.

28. Pull the text layer below the lady layer. Adjust the text placement if needed.
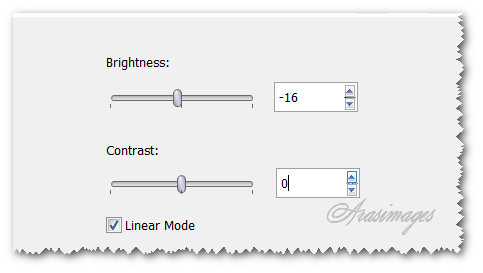
29. Adjust/Brightness and Contrast/Brightness/Contrast.
30. Merge/Merge Visible.
31. Effects/3D Effects/Inner Bevel. Select ArasimagesInnerBevel.
32. Image/Add Borders/Add 15px border, Symmetric checked, color #d5d0b3.
33. Repeat Inner Bevel as in Step #32.
34. Sign your name or leave your watermark. Save as .png or .jpg file.
This tutorial was tested by PamelaD and Evatexas. Thanks ladies!
If you are going to use this tutorial for stationery, cards or place the tutorial/tag on another site, I would appreciate you contacting me for permission, giving Arasimages credit for the original tutorial and if possible, a link back to my site. Thank you.
Copyright © Arasimages All Rights Reserved