

Golden Raindrops
For a Danish, Dutch, Italian, Spanish and French translation, click on the flags.


For this tutorial you will need the materials in the zip file below.

Thanks go to PamelaD and EvaTexas of Arasimages for their lovely tubes used in this tutorial. You can find them and more new tubes on my Tubes link.
Unzip the materials into a working folder you have created on your desktop named Golden Raindrops. Please duplicate and close original tubes. Use the copies for your work so you will not lose the originals. Place the Font AnnabelleJF in your PSP Files/Fonts folder. I have used the effects of PSP and the program Animation Shop in this tutorial. It is assumed you have a working knowledge of PSP to follow these directions. I have used PSPX7 for this tutorial but other versions may be used. To work this tutorial, it is assumed you have some working knowledge of Paint Shop Pro.
Use the toadstools below to mark your place along the way.

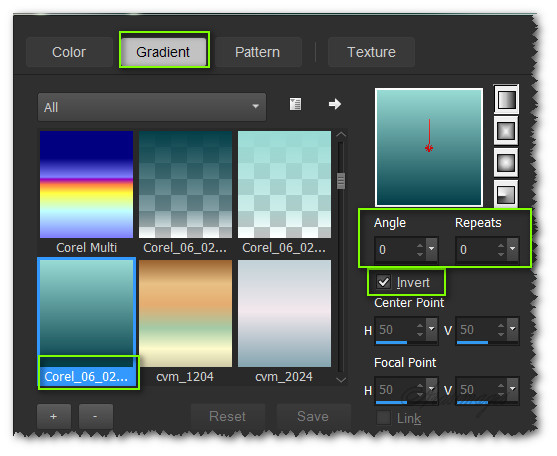
1. In Materials Palette, set Foreground to #98dad4, Background to #053f49. Create a Gradient using these colors, Gradient Corel_06_029 (foreground/background), Style Linear, Angle 0, Repeats 0, Invert checked, Center Points/ Focal Points default.
2. New/New Image 850px by 700px. Selections/Select All.
3. Open Toadstool.pspimage. Copy blur of background layer/Paste into Selection. Ctrl+D.
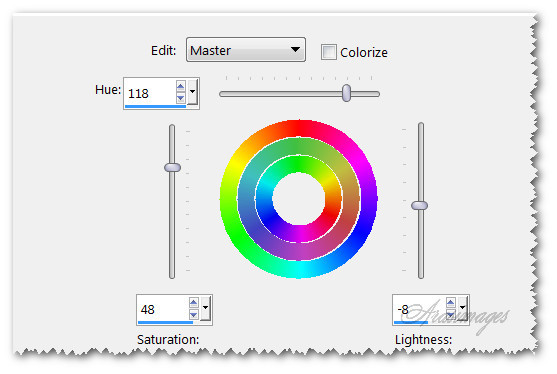
4. Adjust/Hue and Saturation. Hue/Saturation/Lightness.
5. Highlight Toadstool.pspimage misted layer. Copy/Paste as New Layer.
6. Adjust/Hue and Saturation/Lightness as in Step #4.
7. Move to right side.
8. Duplicate. Image/Mirror.
9. Image/Resize/Resize by 75%/Resize all layers unchecked.
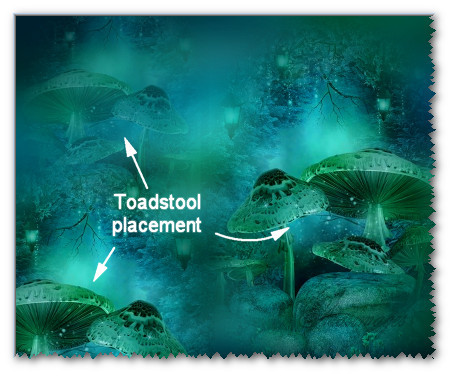
10. Move into top left corner. Drop Opacity down to 37. See below for toadstool placement of Steps #8, #10 and #11.
11. Paste again. Mirror Image/Repeat Step #4 and place in bottom left corner. Opacity at 100%.
12. Open MouseFamily.psp image. Copy Misted layer/Paste as New Layer.
13. Place MouseFamily just left and down from center.
14. Adjust/Sharpness/Unsharpen Mask.

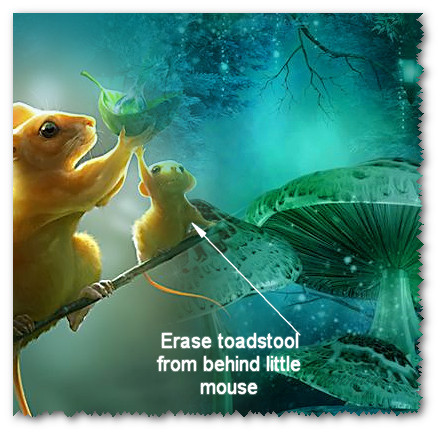
15. Highlight Raster 2 of right side toadstool. Using Eraser tool set to Size 18, erase toadstool from behind little mouse.
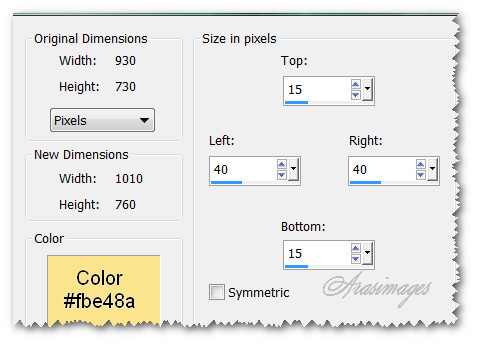
16. In Materials Palette, change Background color to #fbe48a.
17. From Tool bar, select Text tool. Find the Font AnnabelleJF. Set it to Size 36, Stroke width at 0.0, Line style Solid, Kerning -25.

18. With top layer selected, type out the words "Falling raindrops colored gold", click enter once, then type "From whence they come remains untold...".
19. Convert to Raster Layer.
20. Objects/Align/Horizontal Center. Move toward the top just a small amount.
21. Image/Add Borders/Add 40px borders to sides, 15px borders to top and bottom, Symmetric unchecked, color #fbe48a.
22. Click border with Magic Wand to activate it.
23. Layers/Add new Layer.
24. Flood fill with Gradient created in Foreground when you changed the color of background in Step #16.
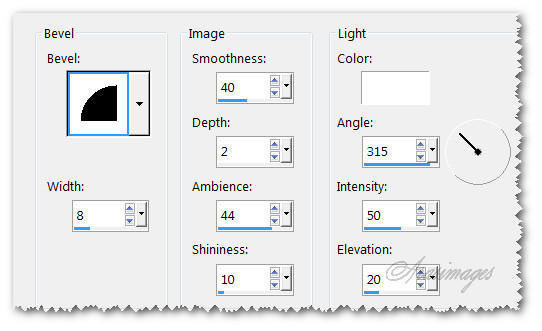
25. Effects/3D Effects/Inner Bevel. Apply settings as seen below.
26. Selections/Select None.
27. Add your watermark or name if you wish. Merge/Merge Visible.
28. File/Save As Golden Raindrops.png or .jpg image.
29. Copy. Open Animation Shop and Paste as New Animation.
30. Duplicate the Golden Raindrops image 7 times, having 8 frames in all.
31. Open the gold02.gif file. Highlight the first frame/Edit-Select All. COPY.
32. Go back to the first of the 8 frames of the main image. Highlight first frame/Edit/Select All.
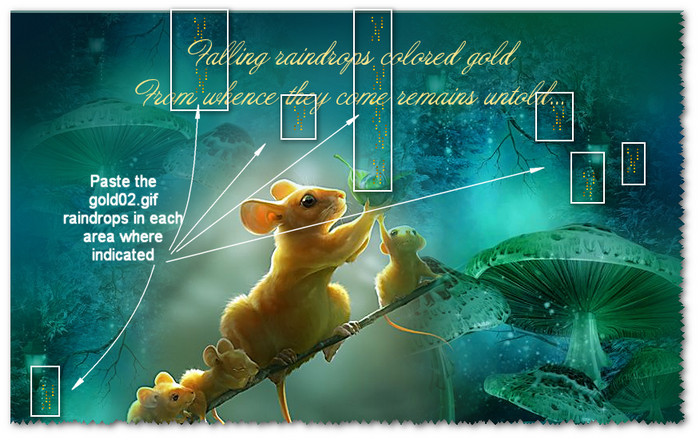
33. Right click in the first frame. Paste/Into Selected Frame. Hover the gold02.gif where you want it and left click into place.
34. You will repeat the Paste/Into Selected Frame and clicking into place for each area you wish to have the falling golden rain. See my example for placement.
35. Now we will save our work. File/Save As. When the Save As box appears, indicate where you want your work to be saved, give it a File name and leave Save as type: (*.gif) stand. Click Save. As the boxes appear, you will click on Next, Next, Next and Finish.
You are now finished with your animated tutorial!
This tutorial was tested by PamelaD and Evatexas. Thanks ladies!
If you are going to use this tutorial for stationery, cards or place the tutorial/tag on another site, I would appreciate you contacting me for permission, giving Arasimages credit for the original tutorial and if possible, a link back to my site. Thank you.
Copyright © Arasimages All Rights Reserved