
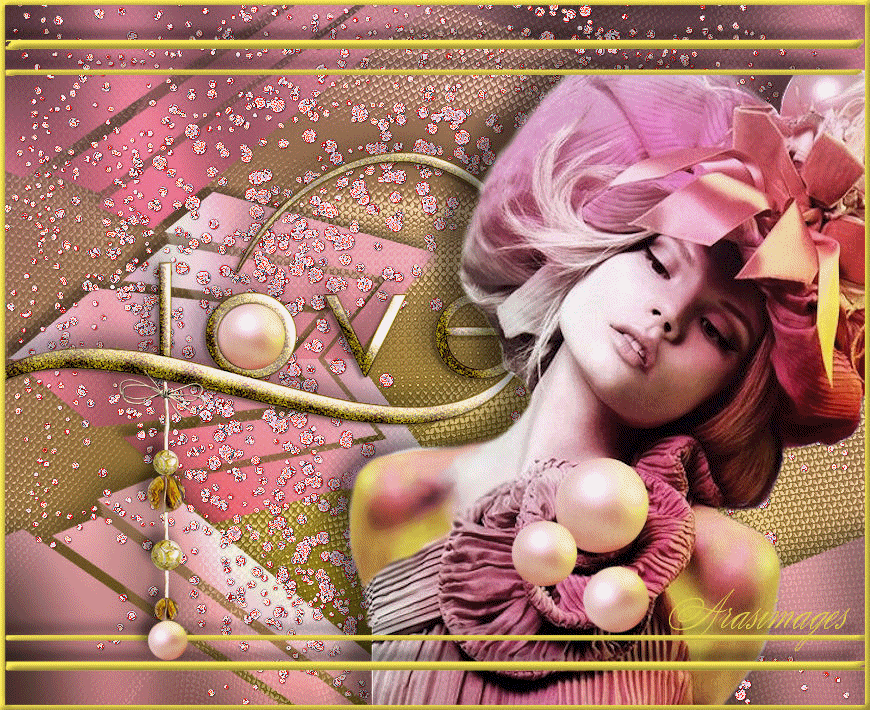
Caught in Love's Hypnosis
For a Danish, Italian, Dutch, French and Spanish translation, click on the flags.


For this tutorial you will need the materials in the zip file below.

Thanks go to the unknown tubers of the materials used in this tutorial.
Unzip the materials into a working folder you have created on your desktop named Caught in Love's Hypnosis. Please duplicate and close original tubes. Use the copies for your work so you will not lose the originals. Place the Selection in your PSP/Selections folder. I have used the Plugin Graphics Plus/Cross Shadow and the program Animation Shop for this tutorial. It is assumed you have a working knowledge of PSP to follow these directions. I have used PSPX7 for this tutorial but other versions may be used. To work this tutorial, it is assumed you have some working knowledge of Paint Shop Pro.
Use the pearl below to mark your place along the way.

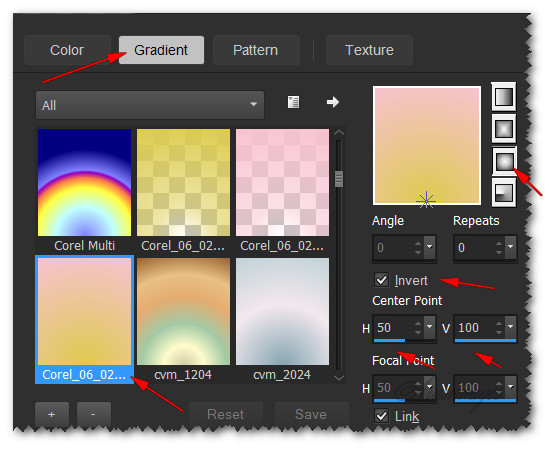
1. In Materials Palette, set Foreground to #f7c2d0, Background to #dccb4d. Create a Gradient using these colors, Gradient Corel_06_029 (foreground/background), Style Sunburst, Angle 0, Repeats 0, Invert checked, Center Points H 50, V 100.
2. New/New Image 860px by 700px. Flood fill with Gradient.
3. Layers/New Raster Layer. Selections/Select All.
4. Open Background.png. Copy/Paste into Selection.
5. Selections/Select None. Blend Mode set to Luminance (L). Drop Opacity to 48.
6. Effects/Edge Effects/Enhance.
7. Layers/New Raster Layer. Change Background color to #a94460 to make new Gradient.
8. Flood fill new layer with new Gradient.
9. Open Mask.png and keep it open on work space.
10. Layers/New Mask Layer/From Image. From the Source window drop down, choose Mask.png. Use settings below. Merge/Merge Group.

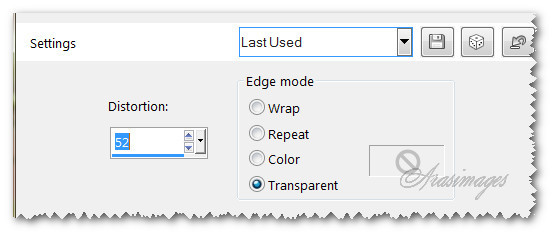
11. Effects/Geometric Effects/Perspective-Horizontal.
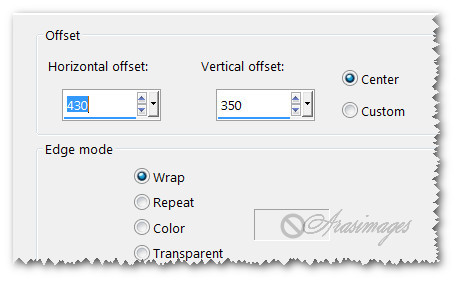
12. Effects/Image Effects/Offset. Use settings below.
13. Effects/3D Effects/Drop Shadow. Vertical -9, Horizontal -9, Opacity 50, Blur 34, color #000000.
14. Effects/Graphics Plus/Cross Shadow set to Default settings.
15. Drop Opacity to 80.
16. Open Insert.png. Copy/Paste as New Layer.
17. Place to the left center. Pull below Group-Raster 2. Set Opacity to 80. Go back to top layer to continue.
18. Open 0_7f73e_135174ed_XXL.png of small stones. Copy/Paste as New Layer.
19. Effects/Edge Effects/Enhance.
20. Open 0_11ba86_58b0e616_XL.png word Love. Copy/Paste as New Layer.
21. Effects/3D Effects/Drop Shadow. Vertical -9, Horizontal -9, Opacity 50, Blur 34, color #000000.
22. Place to the left center.
23. Open Pink.png of woman. Copy/Paste as New Layer.
24. Adjust/Sharpness/Sharpen.
25. Move to bottom and right side to fit.
26. Change color in Background of Materials Palette to #dccb4d.
27. Layers/New Raster Layer.
28. Selections/Load/Save Selection/Load Selection from Disk. From the drop down, select ArasDualStripes2. Load.

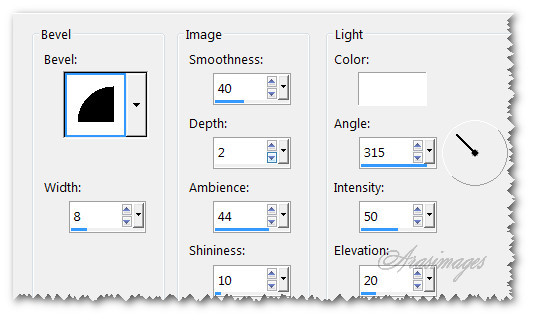
29. Flood fill with Background color. Effects/3D Effects/Inner Bevel.
30. Selections/Select None.
31. Effects/3D Effects/Drop Shadow. Vertical -9, Horizontal -9, Opacity 50, Blur 15, color #000000.
32. Adjust woman layer to fit under second line of top stripes. Highlight top layer to continue.
33. Open 0_a491a_4e6c7835_M.png of hanging balls. Copy/Paste as New Layer.
34. Effects/3D Effects/Drop Shadow. Vertical -9, Horizontal -9, Opacity 50, Blur 15, color #000000.
35. Adjust/Sharpness/Sharpen.
36. Position on left side of image just under the letter "L".
37. Open Pearl.psp image. Copy/Paste as New Layer.
38. Image/Resize/Resize by 70%/Resize all layers unchecked.
39. Place in center of the letter "O" of the word Love.
40. Image/Add Borders/Add 5px border, Symmetric checked, color #000000.
41. Click on the 5px border with Magic Wand to activate it.
42. Flood fill with Background color #dccb4d.
43. Effects/3D Effects/Inner Bevel.
44. Selections/Select None.
45. Sign your name or leave your watermark. Save Caught in Love's Hypnosis as a .jpg.
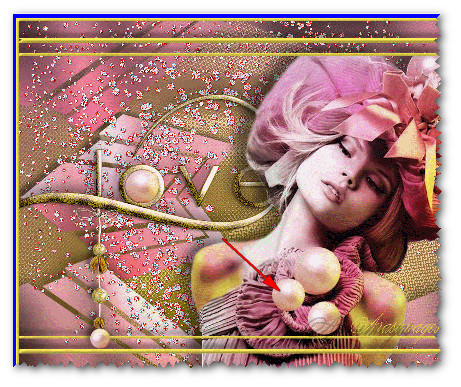
ANIMATION OPTIONAL.
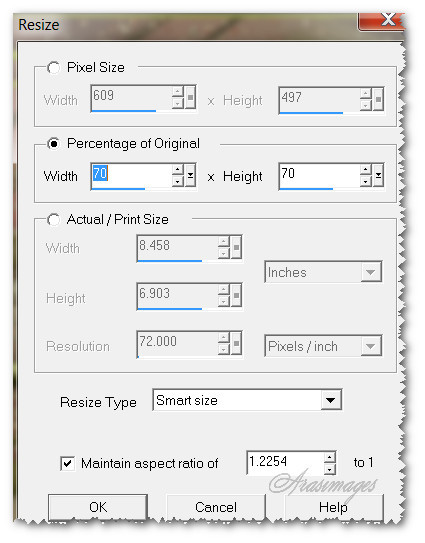
46. In Animation Shop, File/Open the Caught in Love's Hypnosis .jpg. Duplicate until you have 36 frames in all.
47. File/Open Pearl.psp image. Using the Tool bar at the top of Animation Shop, click on Effects/Insert Image Effects. Use settings below. (The total frames will actually be 36).

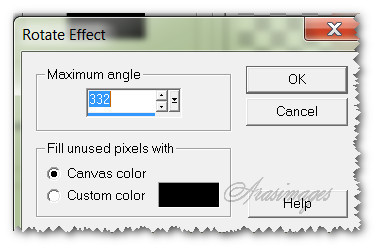
48. While you have Insert Image Effects box open, click on Customize tab and set Maximum angle to 332. Canvas color checked, click OK. Then click OK on the Insert Image Effects. You now can view the pearl rotating when you click on the View Animation button.
49. Highlight the first frame, Edit/Select All. Copy.
50. Go back to the main image. Right click in the first frame. Edit/Select All.
51. Right click within the first frame, Paste/Into Selected Frame. Place the rotating pearl over the pearl under the lady's chin. Left click to set it in place.
52. Go back to the Pearl.psp image. Animation/Resize Animation. Resize by 70 as seen in example below. Copy.
53. Go back to main image. Right click inside first frame, Paste/Into Selected Frame. Hover pearl until it is over the "o" in the word Love and left click into place.
54. Right click inside first frame again and Paste/Into Selected Frame. Place this pearl down and left of the pearl under lady's chin.
55. Go back to the Pearl.psp image. Animation/Reverse Frames. Copy. Right click in first frame of main image, Paste/Into Selected Frame, hover the pearl near the other two pearls, lower and to the right and left click into place.
56. Go back to the Pearl.psp image. Animation/Resize Animation. Resize by 60. Copy.
57. Right click inside first frame of main image, Paste/Into Selected Frame, place pearl over bottom ball of hanging balls and left click into place.
58. When you are finished placing all of the animated pearls into place, we will save our work.
59. File/Save As. When the box comes up, give your work a name, where to save it and leave it to save as a .gif file. Click Save. Then click Next, Next, Next as the boxes continue to come up and click Finish.
60. That is it! All done. Hope you enjoyed creating your own animation.
This tutorial was tested by PamelaD and Evatexas. Thanks ladies!
If you are going to use this tutorial for stationery, cards or place the tutorial/tag on another site, I would appreciate you contacting me for permission, giving Arasimages credit for the original tutorial and if possible, a link back to my site. Thank you.
Copyright © Arasimages All Rights Reserved