

Little Fire Starter
For an Italian, Danish, Spanish, French and Dutch translation, click on the flags.
For this tutorial you will need the materials in the zip file below.
Thanks go to Evatexas and PamelaD of Arasimages for the tubes used in this tutorial.
Unzip the materials into a working folder you have created on your desktop named Little Fire Starter. Please duplicate and close original tubes. Use the copies for your work so you will not lose the originals. Export the Brushes into your PSP Brushes folder. I have used the Plugins Alien Skin Eye Candy 5: Nature/Fire, Alien Skin Xenofex2/Lightening, VM Experimental/Deep Crunch, Filters Unlimited2/Buttons&Frames/Glass Frame 1 and the program Animation Shop for this tutorial. I have used PSPX7 for this tutorial but other versions may be used. To work this tutorial, it is assumed you have some working knowledge of Paint Shop Pro.
Use the star below to mark your place along the way.

1. In Materials Palette, set Foreground to #2d4375, Background to #181617. Create a Gradient using these colors, Gradient Corel_06_029 (foreground/background), Style Linear, Angle 0, Repeats 0, Invert checked, Center Points/Focal Points grayed out.
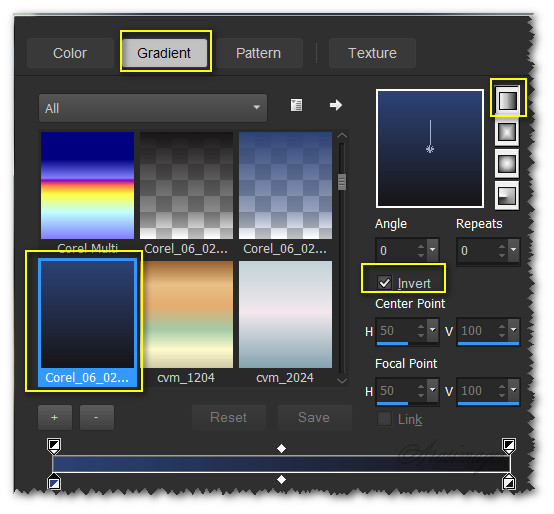
2. New/New Image 900px by 700px. Flood fill with Gradient.
3. Open fond foret.jpg. Copy/Paste as New Layer.
4. Move the image into the bottom right corner.
5. Using the Pick tool, Mode: Scale, hover mouse over top left node until cross hair arrows show, grab the node and pull outward as seen below.
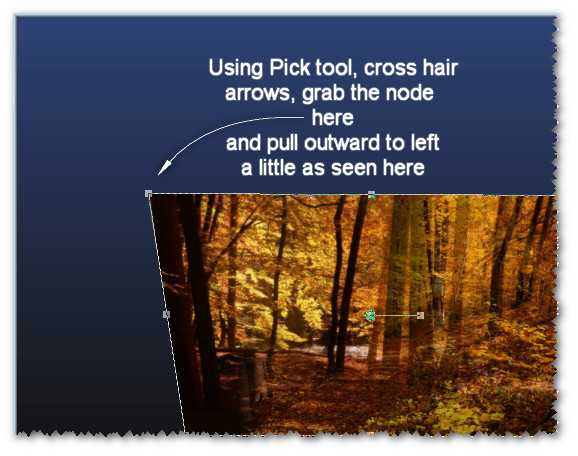
6. Deselect Pick Tool. Set Blend Mode to Luminance (Legacy). Drop Opacity to 40.
7. Open Anotherhobbithouse.pspimage. Copy Misted layer/Paste as New Layer.
8. Place into right side of image about half way. Duplicate. Move the duplicated image to left side of image into corner.
9. Merge/Merge Down.
10. Adjust/Sharpness/Sharpen.
11. Add New Layer. From Tool bar, find the Paint Brush tool. Select Brush TreeOnesided. Set to below settings and using color #181617, stamp once where indicated.

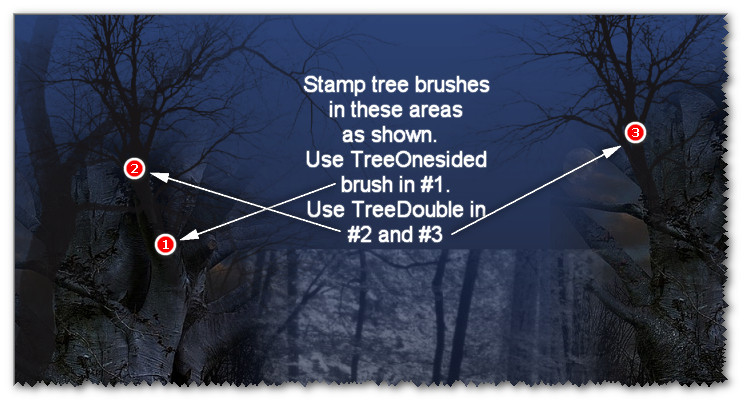
12. Using the Paint Brush tool again, select Brush TreeDouble. Use settings below and stamp twice where indicated with same color as last step.

13. Adjust/Sharpness/HighPassSharpen.
14. Effects/3D Effects/Drop Shadow. Vertical -17, Horizontal-17, Opacity 23, Blur 36, color #fad87e.
15. Effects/3D Effects/Drop Shadow. Vertical -28, Horizontal -15, Opacity 23, Blur 36, color #fad87e.
16. Effects/Edge Effects/Enhance.
17. Layers/New Raster Layer. Flood fill with Gradient.
18. Effects/Geometric Effects/Circle. Transparent checked.
19. Image/Resize/Resize by 75%/Resize all layers unchecked.
20. Effects/3D Drop Shadow. Vertical -4, Horizontal 0, Opacity 23, Blur 70, color #fad87e.
21. Effects/3D Drop Shadow. Vertical 0, Horizontal -2, Opacity 23, Blur 25, color #000000.
22. Using Magic Wand, Match Mode: RGB Value, click on circle to activate it. Mode set to Add (Shift), Tolerance 50 or higher, Feather 0.
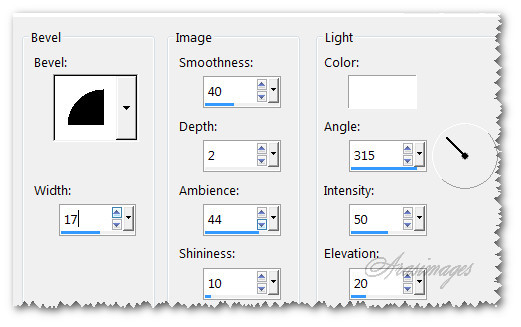
23. Effects/Inner Bevel. Use settings below.
24. Selections/Select None. Set Opacity to 58.
25. Move circle to right and down.
26. Effects/VM Experiemental/Deep Crunch.

27. Effects/Edge Effects/Enhance.
28. Layers/New Raster Layer.
29. Effects/AlienSkin Xenofex2/Lightening.
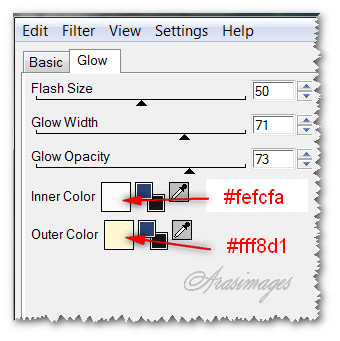
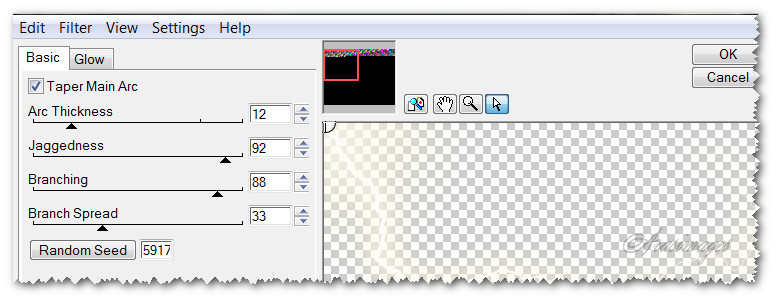
30. Image/Mirror.
31. Open Tube_255.pspimage of little girl. Copy Tubed layer/Paste as New Layer.
32. Image/Resize/Resize by 75%/Resize all layers unchecked.
33. Using Smudge Tool, smudge along the right side of her hair and dress to eliminate hard line.

34. Use the Soften tool along the edge you smudged. Use Default settings.
35. Effects/3D Effects/Drop Shadow. Vertical -17, Horizontal -17, Opacity 23, Blur 25, color #000000. Repeat.
36. Adjust/Sharpness/Sharpen.
37. Move little girl over circle so she is positioned on bottom border.
38. Image/Add Borders/Add 5px border, Symmetric checked, color ##c19a01.
39. Effects/Filters Unlimited2/Buttons & Frames/Glass Frame 1. Frame size 23, Contrast 128.
40. OPTIONAL ANIMATION.
1. Duplicate image layer twice having 3 layers in all.
2. Close off bottom and middle layer. Highlight top layer.
3. Scroll the image to 150% for easier selecting. Using Selections tool/Freehand Selection set Point to Point, Add(Shift), Feather 0, Anti-alias checked, select around the portion of the flames in little girl's hands which you want to animate.
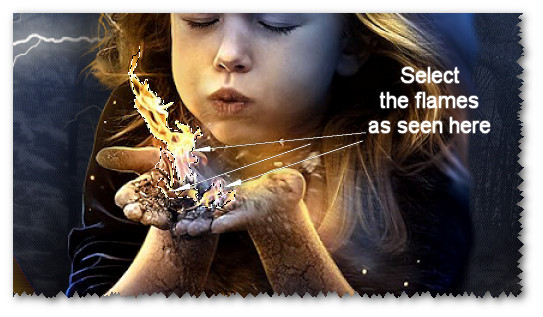
4. Effects/Alien Skin/Eye Candy 5: Nature/Fire.
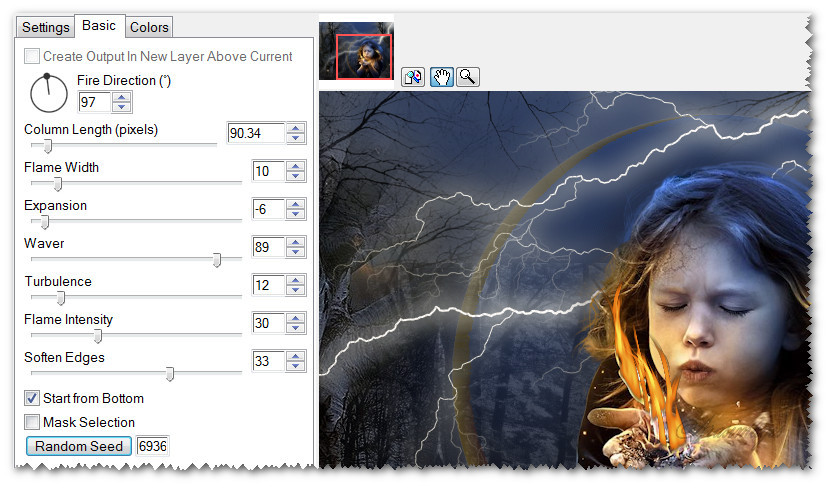
5. Close top layer. Move to middle layer and highlight it.
6. Repeat fire by clicking on Random seed. Click OK.
7. Close middle layer and open bottom layer. Highlight it.
8. Apply fire once again, clicking on Random Seed. Click OK.
9. Open all layers. Selections/Select None.
10. File/Save As/Little Fire Maker PSP Animation Shop (*psp).
11. Open Animation Shop. File/Open Little Fire Starter.
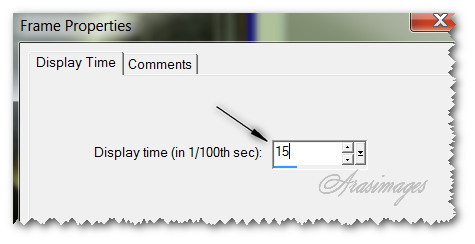
12. Edit/Select All. Click on Animation/Frame Properties. Change the display speed from 10 to 15.
13. Click on the View Animation button in the tool bar and check your animation. If you are satisfied, then you can now save it.
14. File/Save As. When the box comes up, give your work a name, where to save it and leave it to save as a .gif file. Click Save. Then click Next, Next, Next as the boxes continue to come up and click Finish.
This tutorial was tested by PamelaD and Evatexas. Thanks ladies!
If you are going to use this tutorial for stationery, cards or place the tutorial/tag on another site, I would appreciate you contacting me for permission, giving Arasimages credit for the original tutorial and if possible, a link back to my site. Thank you.
Copyright © Arasimages All Rights Reserved


