
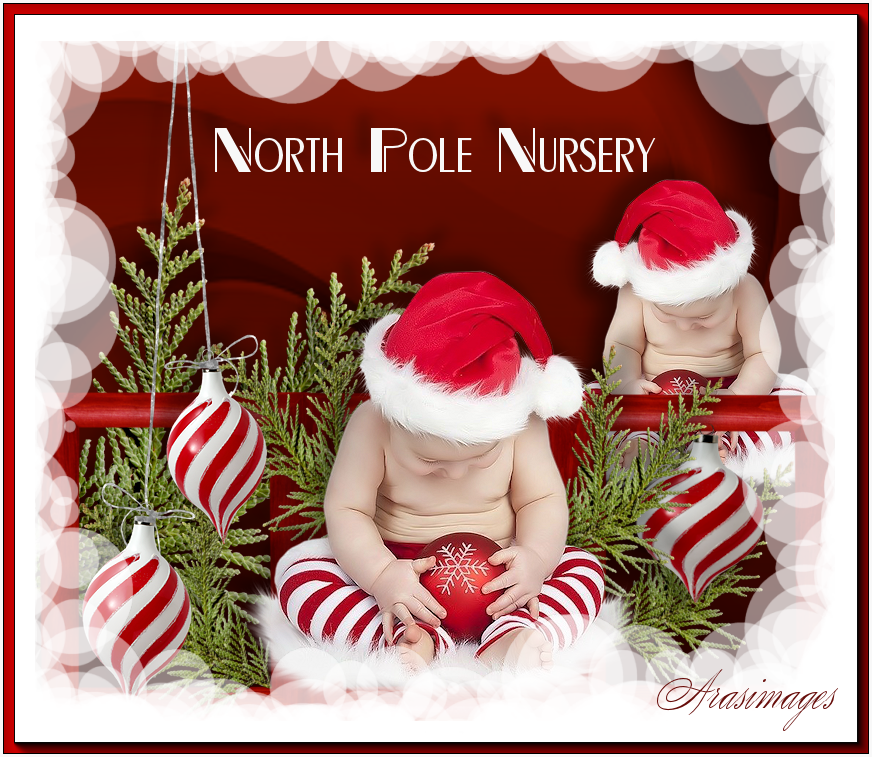
North Pole Nursery
For an Italian, Danish, Dutch, German and Spanish translation, click on the flags.


For this tutorial you will need the materials in the zip file below.

Thanks go to Beatriz of http://ibtubesandmists.blogspot.ca for her baby santa and to the unknown tubers for their lovely tubes used in this tutorial.
Unzip the materials into a working folder you have created on your desktop named North Pole Nursery. Please duplicate and close original tubes, using duplicates for your work. Place the font in your PSP/Fonts folder and install. (check first to make sure you don't already have it in your folder). Place the Picture Frame in your PSP/Picture Frames folder. I have used the plugin AAA Frames/Foto Frame and the effects of PSP for this tutorial. It is assumed you have a working knowledge of PSP to follow these directions. I have used PSPX8 for this tutorial but other versions may be used. To work this tutorial, it is assumed you have some working knowledge of Paint Shop Pro.
Use the ornament below to mark your place along the way.

1. In Materials Palette, set Foreground to #831100, Background to #220100.
2. In Materials Palette, set to Gradient, Foreground/Background, Style Linear, Repeats 0, Angle 0, Invert checked. Center points and Focal Points N/A.
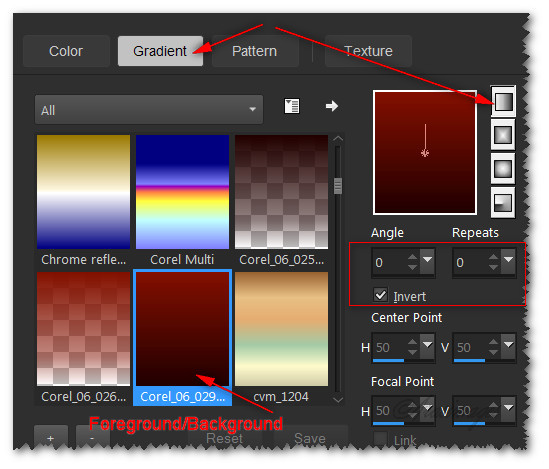
3. New/New Image 800px by 680px. Flood fill with Gradient.
4. Layers/New Raster Layer. Flood fill with color #210000.
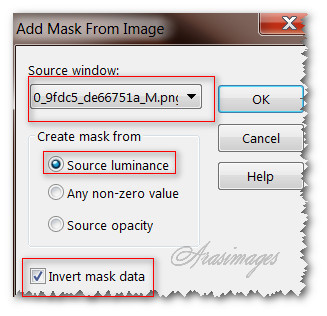
5. Open 0_9fdc5_de66751_a_M.png of background. Leave open on your workspace.
6. Highlight the working file. Layers/New Mask Layer/From Image. When the Add Mask From Image box appears, from the dropdown select the background file. Invert Mask Data checked. Click OK.
7. Merge/Merge Group.
8. Open 0_b5643_561e4936_XL.png of greenery. Copy/Paste as New Layer.
9. Image/Resize/Resize by 72%/Resize all layers unchecked.
10. Place first greenery as seen below on left side.
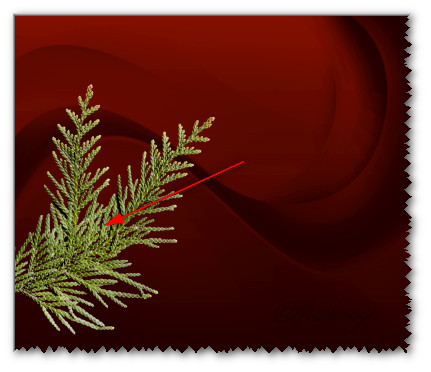
11. Effects/3D Effects/Drop shadow. Vertical -15, Horizontal 13, Opacity 35, Blur 20, color #000000.
12. Open 2059-baby-LB TUBES.pspimage. Copy/Paste as New Layer.
13. Image/Resize/Resize by 55%/Resize all layers unchecked.
14. Image/Mirror.
15. Effects/3D Effects/Drop shadow. Vertical -15, Horizontal -13, Opacity 35, Blur 20, color #000000.
16. Move little Santa baby to middle right side.
17. Adjust/Sharpness/Sharpen.
18. Open 0_cd13d_f0aa46c6_XL.png frame. Copy/Paste as New Layer.
19. Move to bottom and to the right so frame meets with right side.
20. Using Selections set to Rectangle, Add (Shift), Feather 3, select inside the right opening of the frame.
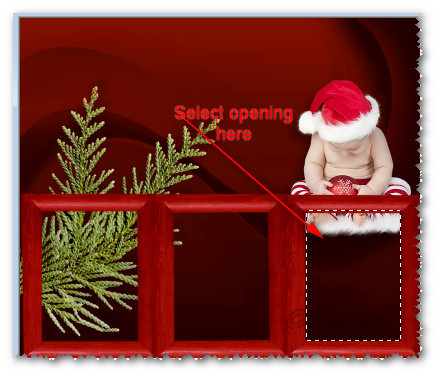
21. Layers/New Raster Layer.
22. Open 0_b5643_561e4936_XL.png of greenery. Copy/Paste into Selection. Deselect.
23. Effects/3D Effects/Drop shadow. Vertical -15, Horizontal -13, Opacity 35, Blur 20, color #000000.
24. Duplicate. Image/Mirror. Move in bottom right corner of left opening of frame.
25. Duplicate greenery in Step #24. Move to left side of center opening in frame.
26. Duplicate greenery again. Image/Mirror. Place to the right side of center opening. See snapshot for greenery placement and adjust if necessary.
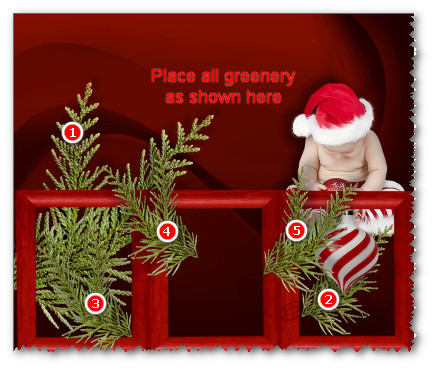
27. Layers/New Raster Layer. Select the right opening of the frame like you did in step #20.
28. Open 0_cd114_c811a28_XL.png ornament. Copy/Paste into Selection.
29. Image/Resize/Resize by 70%/Resize all layers unchecked.
30. Move ornament to the top of opening. Selections/Select None.
31. Effects/3D Effects/Drop shadow. Vertical -15, Horizontal -13, Opacity 35, Blur 20, color #000000.
32. Pull beneath last greenery layer you worked on. (Step #26). Go back to top layer to continue.
33. Open 0_cd125_8abdbbf_XL.png of hanging ornaments. Copy/Paste as New Layer.
34. Effects/3D Effects/Drop shadow. Vertical -15, Horizontal -13, Opacity 35, Blur 20, color #000000.
35. Adjust/Sharpness/Sharpen.
36. Move to left side of image.
37. Open 2059-baby-LB TUBES.pspimage. Copy/Paste as New Layer.
38. Image/Resize/Resize by 72%/Resize all layers unchecked.
39. Adjust/Sharpness/Sharpen. Place baby santa at the bottom center.
40. Effects/3D Effects/Drop shadow. Vertical -15, Horizontal -13, Opacity 35, Blur 20, color #000000.
41. In Materials Palette, change background color to #f8f8f8.
42. From Tool bar, select the Text tool. Set it to Font: Cravat Display SSi, Size 65, stroke width 0.0, Kerning 0.

43. Type out the words "North Pole Nursery". Convert to Raster Layer.
44. Place toward the top in the center.
45. Object/Align/Horizontal Center.
46. Effects/3D Effects/Drop shadow. Vertical -15, Horizontal -13, Opacity 35, Blur 20, color #000000.
47. Image/Add Borders/Add 30px border, Symmetric checked, color #f8f8f8.
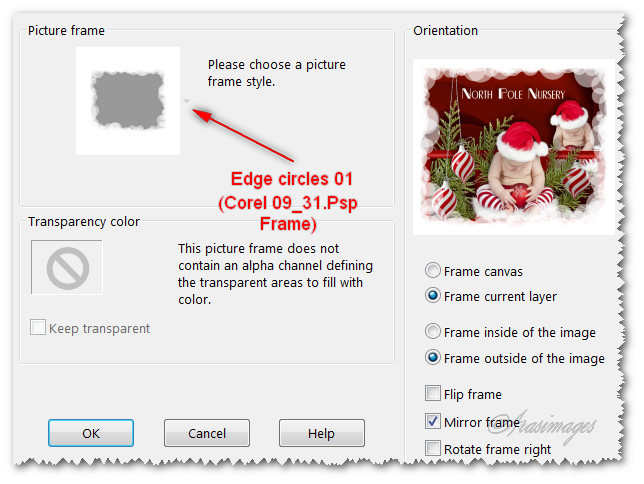
48. Image/Picture Frame. Select Corel_09_031.Psp Frame from Drop down. Use settings below.
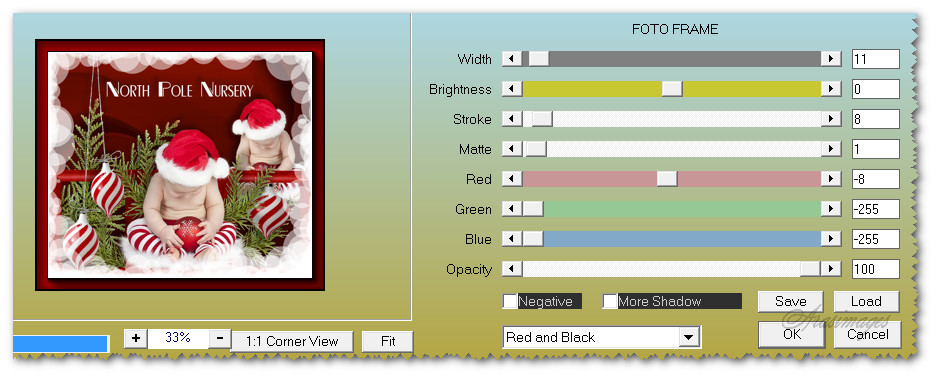
49. Effects/AAA Frames/Foto Frame. Use settings below.
50. Image/add borders/Add 3px border, Symmetric checked, color #f8f8f8.
This tutorial was tested by PamelaD and Evatexas. Thanks ladies!
If you are going to use this tutorial for stationery, cards or place the tutorial/tag on another site, I would appreciate you contacting me for permission, giving Arasimages credit for the original tutorial and if possible, a link back to my site. Thank you.
Copyright © Arasimages All Rights Reserved