
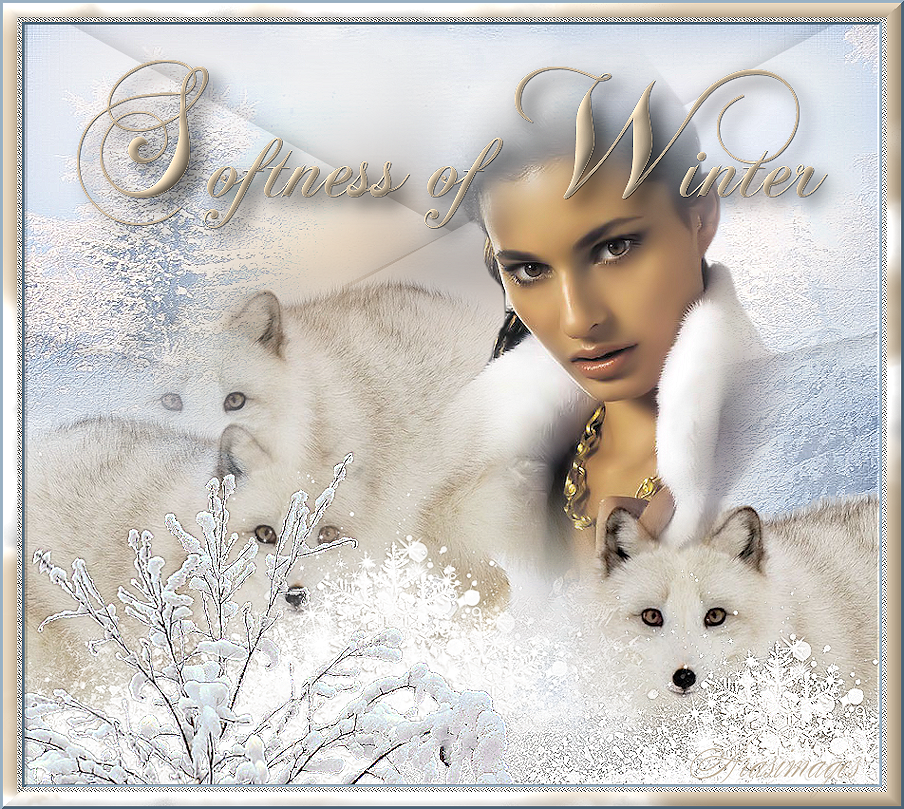
Softness of Winter
For a Danish, Italian, Spanish, French, Dutch and German translation, click on the flags.


For this tutorial you will need the materials in the zip file below.

Thanks go to Pascale and to Nikita and to PamelaD from Arasimages for their lovely tubes used in this tutorial.
Unzip the materials into a working folder you have created on your desktop named Softness of Winter. Please duplicate and close original tubes. Use the copies for your work so you will not lose the originals. Place the Andromeda Preset in the Perspective-Presets/andromeda/02Full Canvas/22Side Walls folder. Place the Selection in your PSP/Selections folder. I have used the plugins Andromeda/Perspective, Filters Unlimited/Buttons & Frames/3D Glass Frame and Creativity/Splatter in this tutorial. It is assumed you have a working knowledge of PSP to follow these directions. I have used PSPX8 for this tutorial but other versions may be used. To work this tutorial, it is assumed you have some working knowledge of Paint Shop Pro.
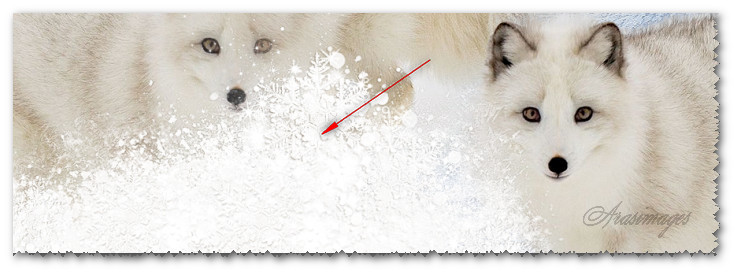
Use the snowflake below to mark your place along the way.

1. In Materials Palette, set Foreground to #72899b, Background to #ffffff.
2. New/New Image 900px by 800px. Selections/Select All.
3. Open BlueSnowScene.pspimage. Copy/Paste into Selection.
4. Selections/Select None.
5. Effects/Edge Effects/Enhance. Set Blend Mode to Darken.
6. Open BG-Mist.png. Copy/Paste as New Layer. Set Blend Mode to Darken.
7. Layers/New Raster Layer.
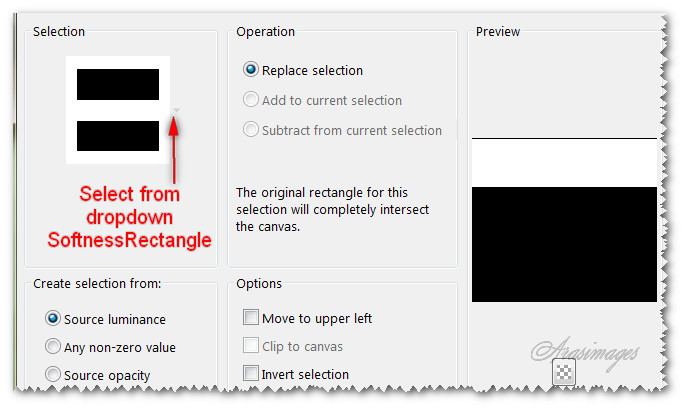
8. Selections/Load/Save Selection. Load Selection from Disk. From dropdown, choose SoftnessRectangle. Load.
9. Flood fill with Background color #ffffff.
10. Selections/Select None.
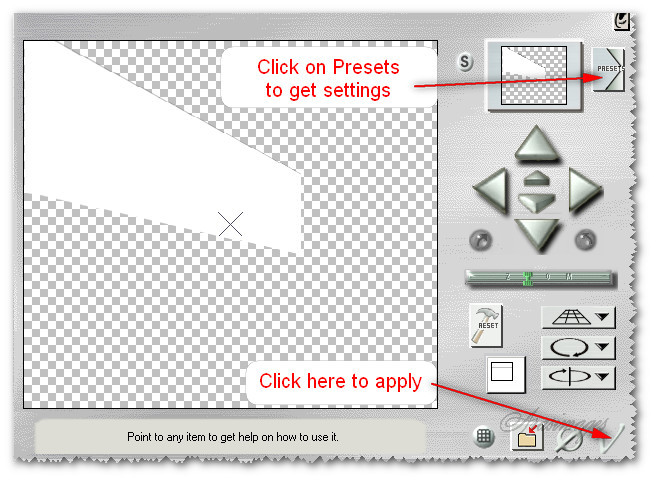
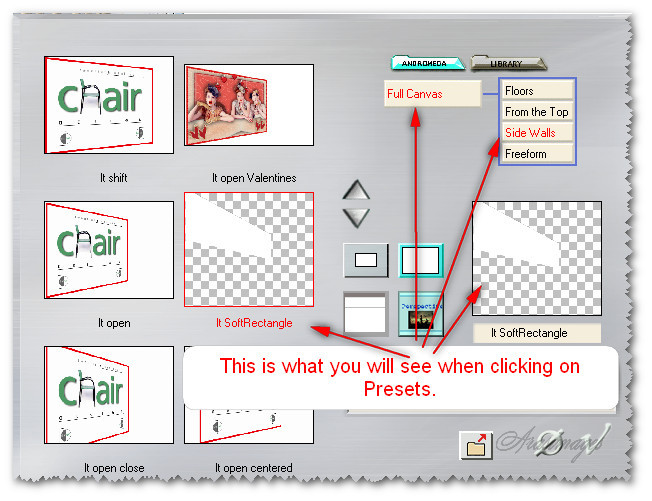
11. Effects/Andromeda/Perspective. Use below settings.
12. Effects/3D Effects/Drop Shadow. Vertical 13, Horizontal 13, Opacity 50, Blur 25, color #000000.
13. Effects/3D Effects/Drop Shadow. Vertical -13, Horizontal -13, Opacity 50, Blur 25, color #000000.
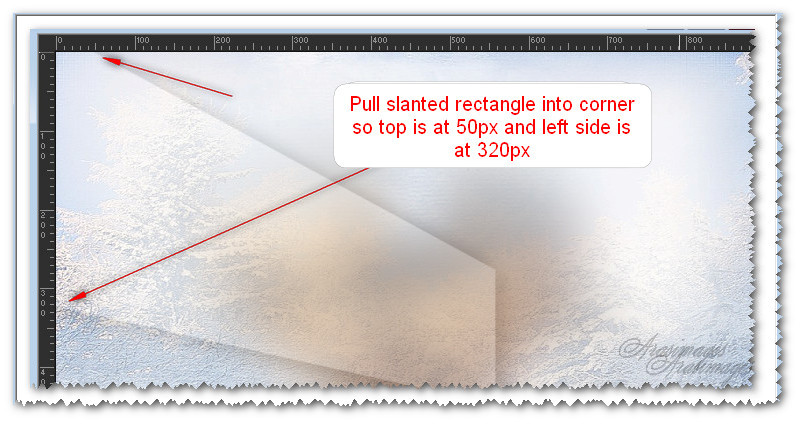
14. Pull angled rectangle into left corner so top is at 50px, left side is at 320px as seen in example below.
15. Drop Opacity down to 20.
16. Duplicate. Image/Mirror.
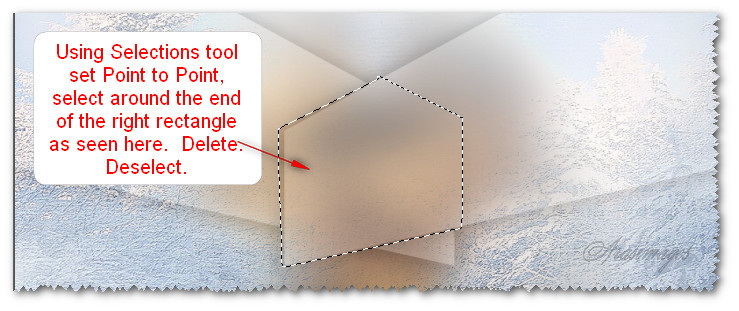
17. Highlight Raster 3 (first angled rectangle on left). Selections/Freehand Selection/Point to Point, all other settings at default, select around the end of the left rectangle as seen below and press Delete key. Deselect.
18. Highlight top layer to continue.
19. Open arcticfox.pspimage. Copy MISTED layer. Paste as New Layer.
20. Image/Mirror.
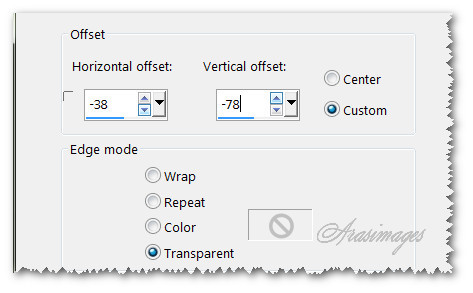
21. Effects/Image Effects/Offset. Horizontal offset: -38, Vertical offset: -78, Custom/Transparent.
22. If the bottom rectangle is showing through on the fox's head, use Eraser tool to get rid of it like you did in Step #17 with Point to Point.
23. Then highlight top layer to continue.
24. Paste MISTED fox again as New Layer.
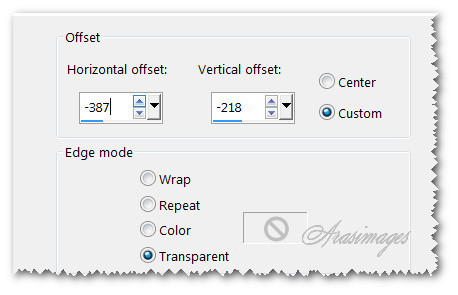
25. Effects/Image Effects/Offset. Horizontal offset: -387, Vertical offset: -218, Custom/Transparent.
26. Highlight first fox layer, use Eraser tool and erase from the nose so the second fox nose will show. Go back to top layer to continue.
27. Using arcticfox.pspimage, copy TUBED layer. Paste as New Layer.
28. Image/Mirror.
29. Effects/Image Effects/Offset. Horizontal offset: 444. vertical offset: -291. Custom/Transparent.

30. Open FluffySnow.pspimage. Copy/Paste as New Layer.
31. Place into bottom left corner and middle. Use example below for placement.
32. Adjust/Sharpness/Sharpen.
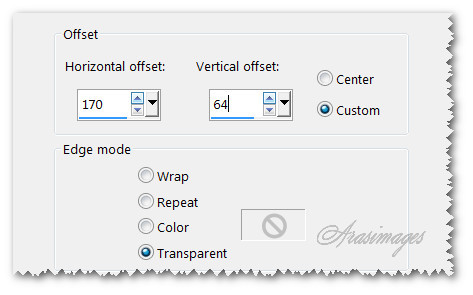
33. Duplicate and move to bottom right corner.

34. Effects/Edge Effects/Enhance.
35. Open PPT14-09-07_WinterBeauty.pspimage. Copy/Paste as New Layer.
36. Duplicate. Merge/Merge Down.
37. Adjust/Sharpness/Sharpen.
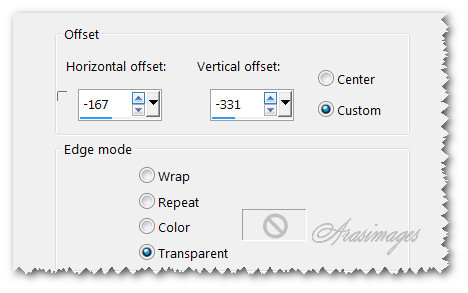
38. Effects/Image Effects/Offset. Horizontal offset: 170, Vertical offset: 64. Custom/Transparent.
39. Highlight the right rectangle layer. Use Eraser tool to erase the line off woman's head.
40. Highlight woman layer. Erase away woman's necklace area from over the fox's ear. Go back to top layer to continue.
41. Open 12930417598_fleurs-nikita.png. Copy/Paste as New Layer.
42. Using Selections tool set to Rectangle, Add (Shift), Feather 0, select around Nikita's watermark and press Delete key once. Deselect.
43. Effects/Image Effects/Offset. Horizontal offset: -167, Vertical offset: -331, custom/Transparent.
44. Effects/Edge Effects/Enhance.
45. Change background color in Materials Palette to #bdac94.
46. From Text tool, select the font ChopinScript, Size 200px, Stroke width 0.0, Line style solid, type the letter "S". Change the size to 100 px. Type the rest of the word "oftness". Space and type the word "of". Space. Change the size to 200px and type the letter "W". Change the size back to 100 and type out the rest of the word "inter". Convert to Raster Layer.

47. Objects/Align/Horizontal center.
48. Selections/Select All. Selections/Float. Selections/Defloat. You will see the "marching ants" around the text.
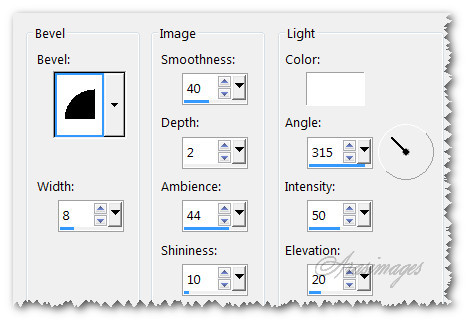
49. Effects/3D Effects/Inner Bevel.
50. Selections/Select None.
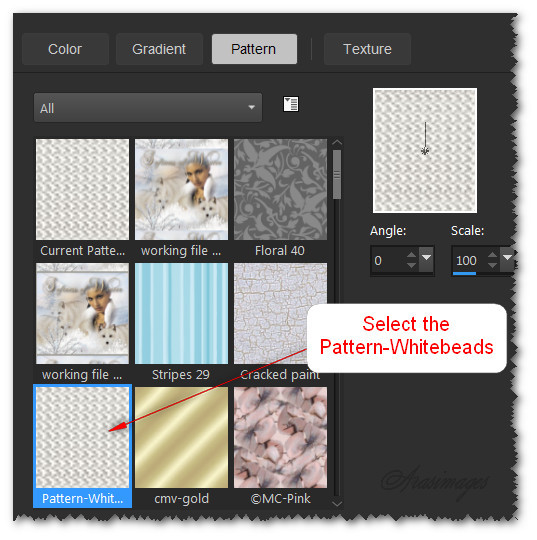
51. Effects/3D Effects/Drop Shadow. Vertical 10, Horizontal 10, Opacity 50, Blur 25, color #000000.
52. Effects/3D Effects/Drop Shadow. Vertical 1, Horizontal 1, Opacity 50, Blur 0, color #000000.
53. Adjust/Sharpness/Sharpen.
54. Image/Add Borders/Add 3px border, Symmetric checked, color #72899b.
55. Image/Add Borders/Add 5px border, Symmetric checked, color #bdac94.
56. Open Pattern-Whitebeads on your desktop. Go to the Materials Palette, select Pattern tab and choose Pattern-Whitebeads so it shows in the Foreground.
57. Using Magic Wand, select the 5px border. Flood fill it with the Pattern-Whitebeads.
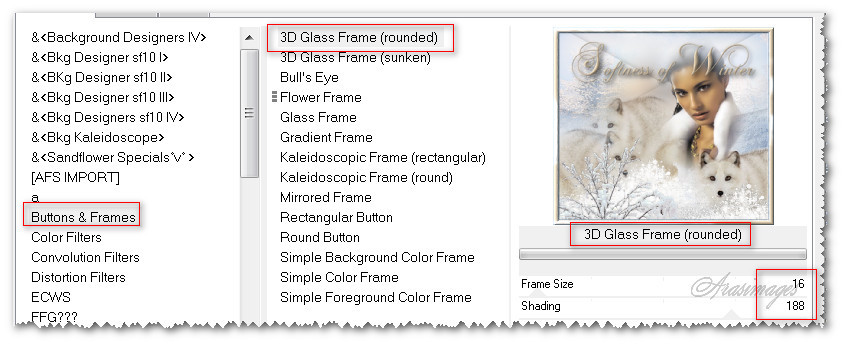
58. Effects/Edge Effects/Enhance. Deselect.
59. Image/Add Borders/Add 15px border, Symmetric checked, color #bdac94.
60. Using Magic Wand, select the 15px border.
61. Effects/Creativity/Splatter. Apply then Deselect.
62. Image/Add Borders/Add 3px border, Symmetric checked, color #72899b.
63. Effects/Filters Unlimited/Buttons&Frames, frame size 16, Shading 188.
64. Image/Resize/Resize by 95%/Resize all layers checked. (Optional). If you like a larger image, then leave this step out.
65. Adjust/Sharpness/Sharpen.
Thanks for doing this tutorial!
This tutorial was tested by PamelaD and Evatexas. Thanks ladies!
If you are going to use this tutorial for stationery, cards or place the tutorial/tag on another site, I would appreciate you contacting me for permission, giving Arasimages credit for the original tutorial and if possible, a link back to my site. Thank you.
Copyright © Arasimages All Rights Reserved