
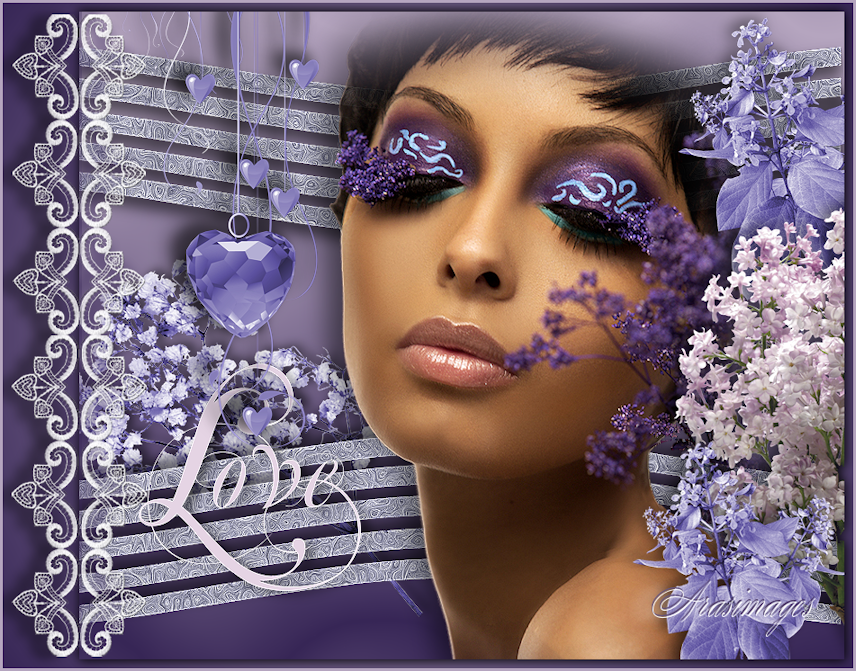
Lavender Lace 'n Love
For an Italian, Danish, German, Spanish, Russian, French and Dutch translation, click on the flags.


For this tutorial you will need the materials in the zip file below.

Thanks go to Nikita for the lovely woman used in this tutorial and to the unknown tubers of the scraps.
Unzip the materials into a working folder you have created on your desktop named Lavender Lace n' Love. Please duplicate and close original tubes. Use the copies for your work so you will not lose the originals. Place the ArasimagesLavenderLaceNLove.f1s file into the AlienSkin/Eye Candy5 Textures/Settings/Swirl folder. It will show up in your Eye Candy 5/Textures when needed. Place the Selection in the PSP/Selections folder. I have used the plugin Filter Forge 2/Noise Distortion, Alien Skin Eye Candy5/Textures/Swirl and PSP effects in this tutorial. It is assumed you have a working knowledge of PSP to follow these directions. I have used PSPX8 for this tutorial but other versions may be used. To work this tutorial, it is assumed you have working knowledge of Paint Shop Pro.
Use the flower below to mark your place along the way.

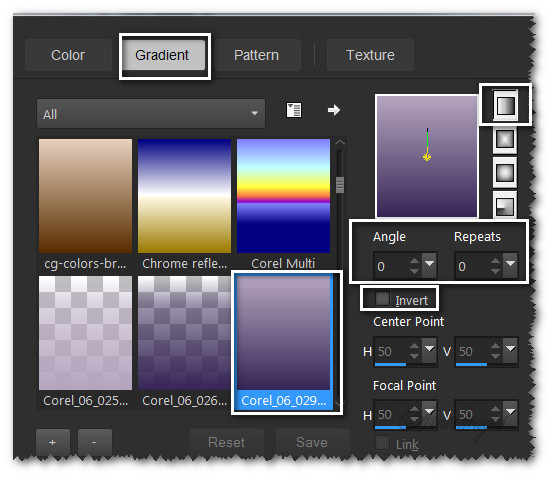
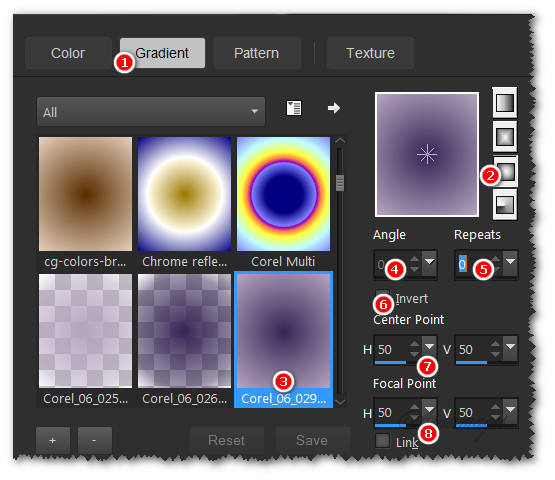
1. In Materials Palette, set Foreground to #372656, Background to #b5a5bf. Create a Gradient using these colors, Gradient Corel_06_029 (foreground/background), Style Linear, Angle 0, Repeats 0, Invert unchecked, Center Points/ Focal Points null.
2. New/New Image 850px by 720px. Flood fill with Gradient.
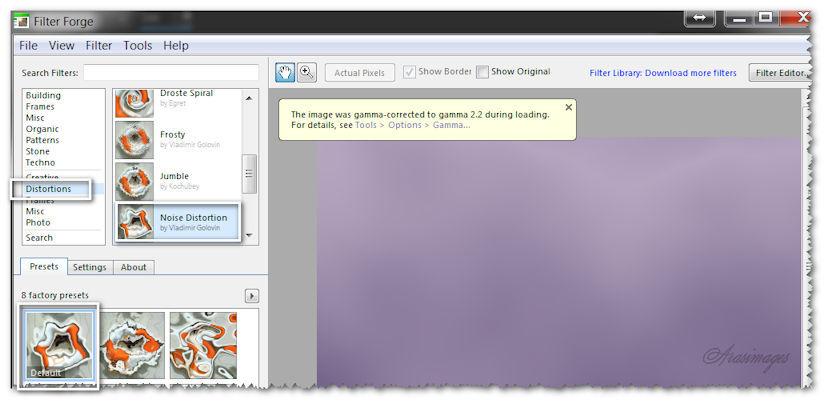
3. Effects/Filter Forge/Filter Forge 2/Distortions/Noise Distortion. Apply.
4. Open 0_5dfa9_c72a8f15_XL.png. Copy/Paste as New Layer.
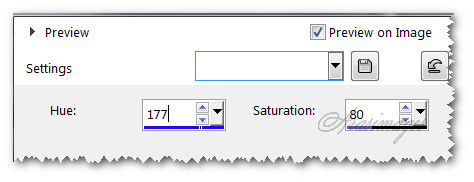
5. Adjust/Hue and Saturation/Colorize. Hue 177/Saturation 80.
6. Image/Resize/Resize by 68%/Resize all layers unchecked.
7. Effects/3D Effects/Drop Shadow. Vertical -4, Horizontal 8, Opacity 50, Blur 16, color #000000.
8. Adjust/Sharpness/Sharpen.
9. Move flower into bottom left corner.
10. Layers/New Raster Layer.
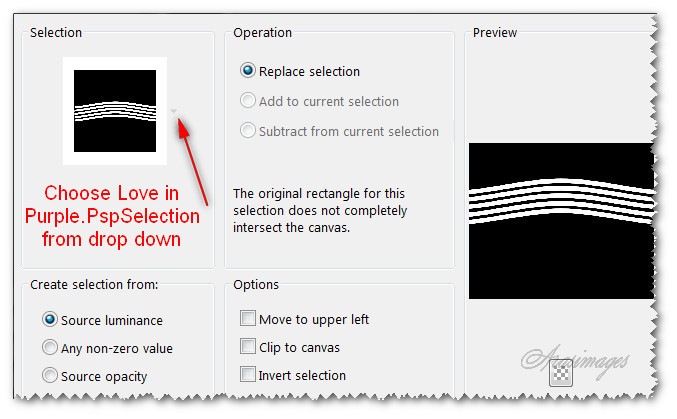
11. Selections/Load/Save Selection/Load Selection from Disk. Select Love in Purple .PspSelection. Load.
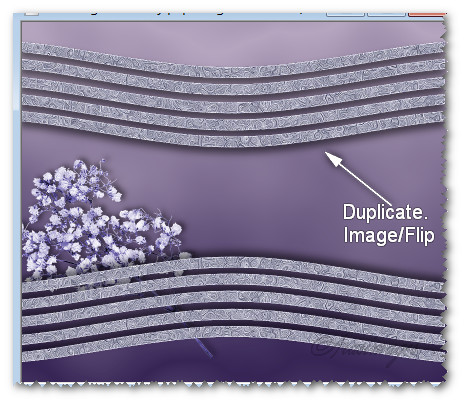
12. In Materials Palette, change the Gradient Style to Sunburst.
13. Flood fill Selection with new Gradient. Selections/Select None.
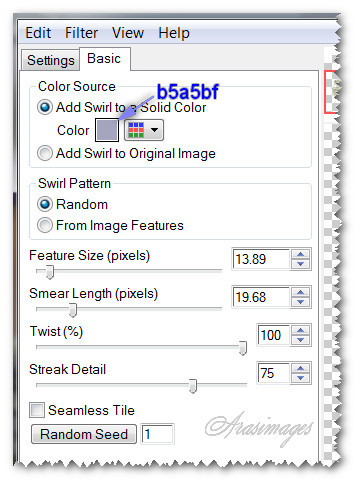
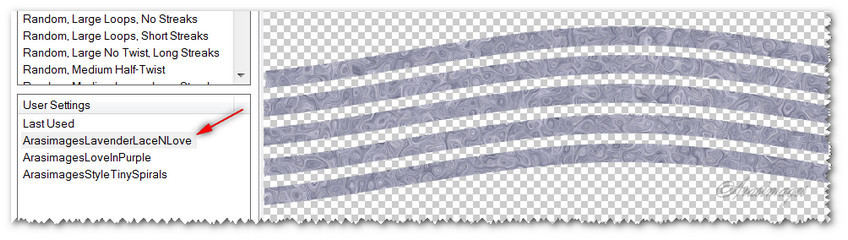
14. Effects/Alien Skin Eye Candy 5: Texture/Swirl. Click on ArasimagesLavenderLaceNLove. Click OK.
15. Effects/Edge Effects/Enhance.
16. Effects/3D Effects/Drop Shadow. Vertical -11, Horizontal 0, Opacity 60, Blur 23, color #000000.
17. Move Selections down almost to bottom of image. Duplicate. Image/flip.
18. Open 13458166788_femmes.pspimage. Copy/Paste as New Layer.
19. Pull lady down and to right a little.
20. Adjust/Sharpness/Sharpen.
21. Effects/3D Effects/Drop Shadow. Vertical -11, Horizontal -18, Opacity 50, Blur 40, color #000000.
22. Open 0_66bf0_6a07247b_XL.png of word Love. Copy/Paste as New Layer.
23. Image/Resize/Resize by 42%/Resize all layers unchecked.
24. Adjust/Sharpness/Sharpen.
25. Effects/3D Effects/Drop Shadow. Vertical 4, Horizontal 8, Opacity 50, Blur 16, color #000000.
26. Open 0_67fbf_f0bc8d85_XL.png. Copy/Paste as New Layer.
27. Image/Resize/Resize by 72%/Resize all layers unchecked.
28. Adjust/Hue and Saturation/Colorize. Hue at 177, Saturation at 80.
29. Effects/3D Effects/Drop Shadow. Vertical -4, Horizontal -8, Opacity 50, Blur 22, color #000000.
30. Move flower into upper right corner. See snapshot below in Step #31.
31. Duplicate. Resize by 90%, all layers unchecked. Place in bottom right corner. See snapshot below.

32. Open 0_9f8d8_7006aebf_XL.Png of Lilacs. Copy/Paste as New Layer.
33. Image/Resize/Resize by 66%/Resize all layers unchecked.
34. Effects/3D Effects/Drop Shadow. Vertical -4, Horizontal -8, Opacity 50, Blur 22, color #000000.
35. Adjust/Sharpness/Sharpen.
36. Move to right side of image. Pull below duplicated flower layer in bottom right corner. Go back to top layer to continue.
37. Open 0_6c9b6_62d64a9a_L.png of hearts.
38. Using Selections tool set to Rectangle/Replace/Feather 0, select around the hearts on the right side of the tube. Copy.
39. Paste as New Layer on working image.
40. Adjust/Hue and Saturation/Colorize. Hue at 177, Saturation at 80.
41. Effects/3D Effects/Drop Shadow. Vertical -8, Horizontal -14, Opacity 65, Blur 22, color #000000.
42. Adjust/Sharpness/Sharpen.
43. Move to upper left corner.
44. Open 0_9c999_5a54ccf4_XL.png of lace.
45. Using Selections tool set to Rectangle/Replace/Feather 0, select around the heart lace, third from right side. Copy.
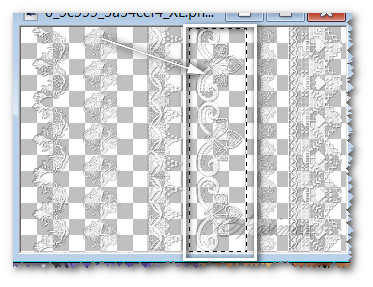
46. Paste as New Layer.
47. Image/Resize/Resize by 80%/Resize all layers unchecked.
48. Duplicate. Align both lace layers along left side of image so they fit nicely. Merge/Merge Down.
49. Effects/3D Effects/Drop Shadow. Vertical -8, Horizontal -14, Opacity 70, Blur 18, color #372656.
50. Copy/Paste as New Image on workspace for use further down if needed.
51. Image/Add Borders/Add 10px border on top, right side and bottom, 85px on left side, Symmetric unchecked, color #000000.
52. Select borders with Magic Wand. Add a Raster Layer.
53. In Materials Palette, check the Invert of the current Gradient. Flood fill borders.
54. Selections/Invert. Place a Drop Shadow of Vertical -2, Horizontal -2, Opacity 70, Blur 18, color #000000.
55. Effects/3D Effects/Drop Shadow. Vertical 2, Horizontal 2, Opacity 70, Blur 18, color #000000.
56. Selections/Select None.
57. Paste as New Layer (the lace which you copied earlier).
58. Image/Mirror. Move to left side of lace in image to mirror.
59. Effects/3D Effects/Drop Shadow. Vertical 2, Horizontal -18, Opacity 60, Blur 18, color #000000.
60. Image/Add Borders/Add 3px border, Symmetric checked, color #b5a5bf.
61. Add your name if you wish on a new layer. Merge/Merge Visible.
This tutorial was tested by PamelaD and Evatexas. Thanks ladies!
If you are going to use this tutorial for stationery, cards or place the tutorial/tag on another site, I would appreciate you contacting me for permission, giving Arasimages credit for the original tutorial and if possible, a link back to my site. Thank you.
Copyright © Arasimages All Rights Reserved