
Silver and Gold
For a Spanish, Italian, French, German, Danish, Dutch and Portuguese translation, click on the flags.


For this tutorial you will need the materials in the zip file below.

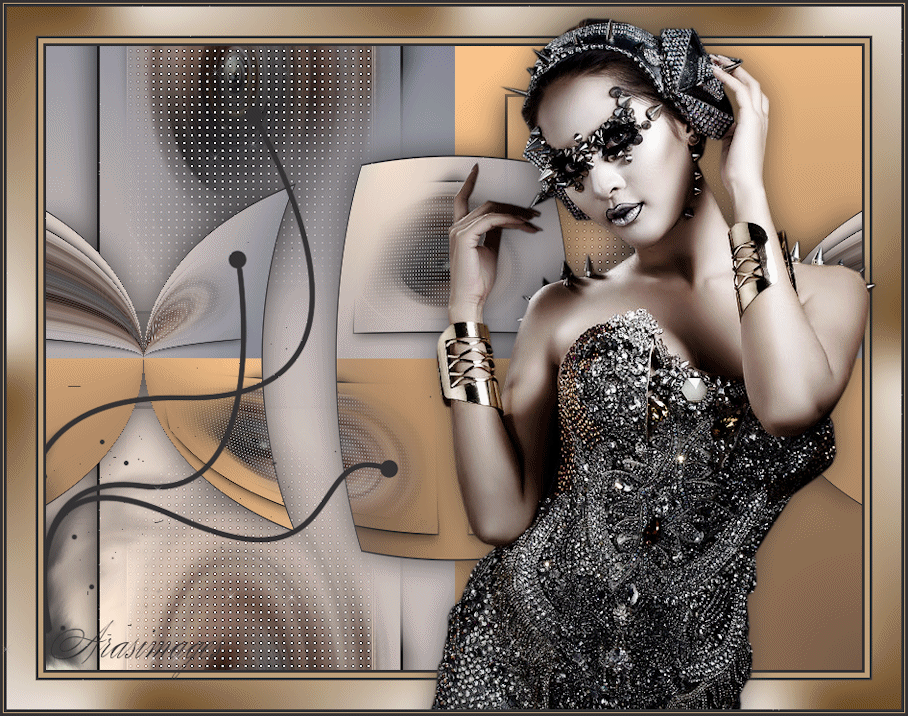
Thanks go to K@rine_Dre@ms for the wonderful lady tube.
Unzip the materials into a working folder you have created on your desktop named Silver and Gold. Please duplicate and close original tubes. Use the copies for your work so you will not lose the originals. Place the Selection in your PSP Selections folder. Export the Echo 5 brush into your PSP Brushes folder. I have used the plugins Neology/Rotational Blender, AlienSkin Xenofex 2/Constellation, AP Innovations01/Mirror-Both Sides, AAA Frames/Foto Frames and effects of PSP. It is assumed you have a working knowledge of PSP to follow these directions. I have used PSPX8 for this tutorial but other versions may be used. To work this tutorial, it is assumed you have some working knowledge of Paint Shop Pro.
Use the Ecol below to mark your place along the way.

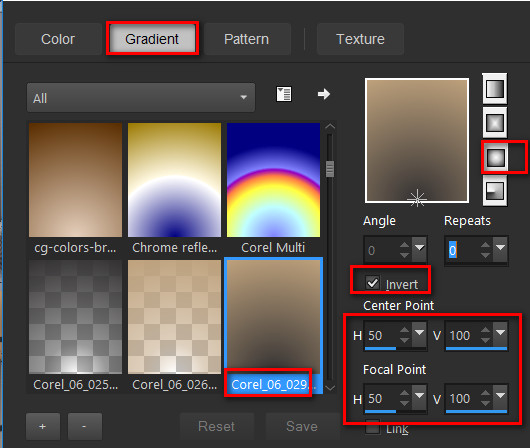
1. In Materials Palette, set Foreground to #bea17c, Background to #343233. Create a Gradient using these colors, Gradient Corel_06_029 (foreground/background), Style Sunburst, Angle/Repeats 0, Invert checked, Center Points set H 50/V 100, Focal Points set H 50/V 100.
2. New/New Image 850px by 650px. Flood fill with Gradient.
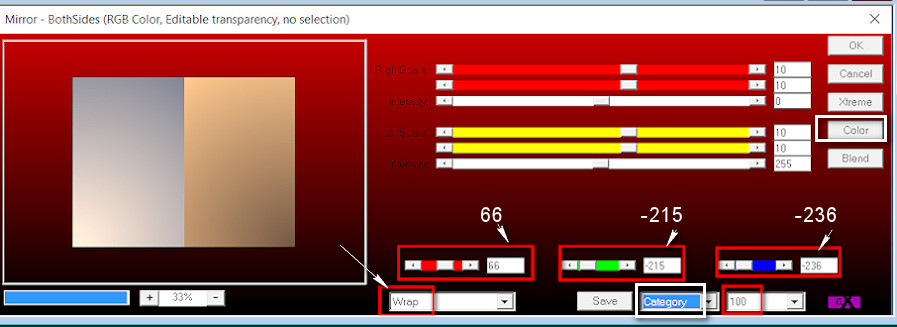
3. Effects/AP 01[Innovations]/Mirror-BothSides. (Click on "color" before you set the settings).
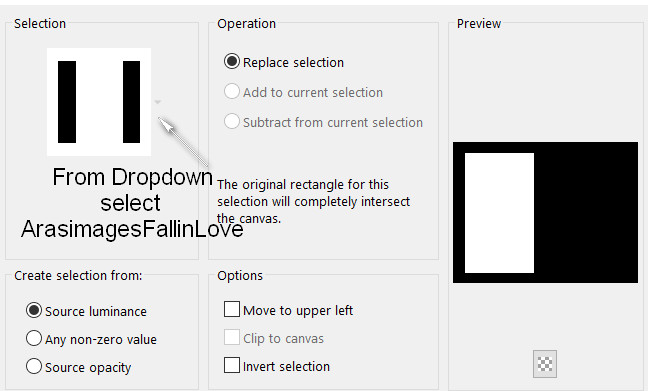
4. Selections/Load Save Selections/Load Selection from Disk. Load .
5. Layers/New Raster Layer.
6. Open K@rine_dreams_Metallic_Woman_3496_Juin_2016.pspimage. Copy/Paste into Selection.
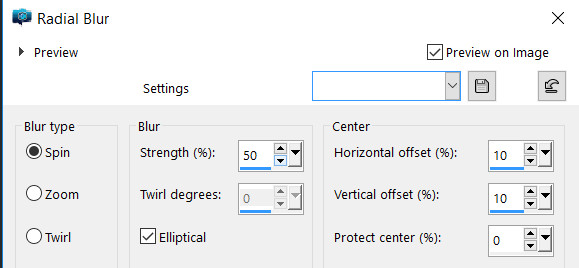
7. Adjust/Blur/Radial Blur.
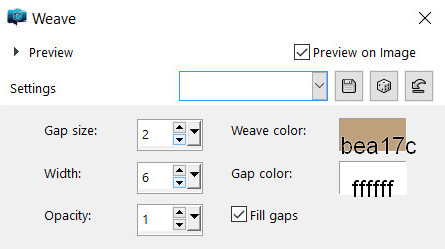
8. Effects/Texture Effects/Weave.
9. Effects/Edge Effects/Enhance.
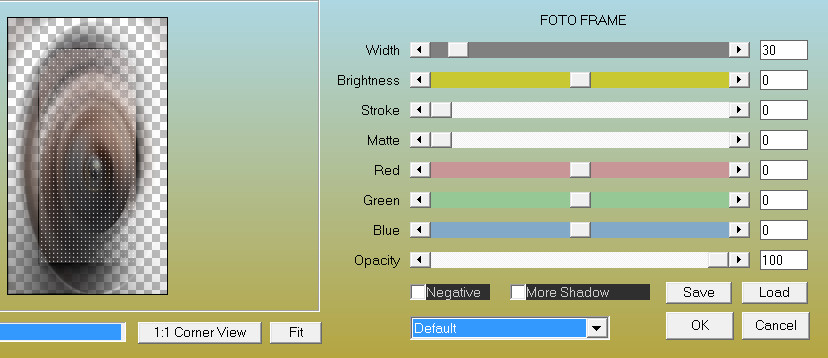
10. Effects/AAA Frames/Foto Frame.
11. Layers/New Raster Layer. Flood fill with Background color #343233.
12. Selections/Modify/Contract by 3px. Delete.
13. Effects/3D Effects/Drop Shadow. Vertical 0, Horizontal 0, Opacity 100, Blur 50, color #000000.
14. Selections/Select None. Merge/Merge Down.
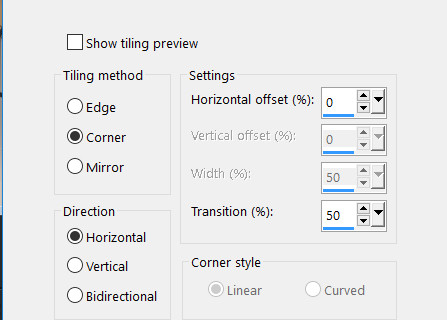
15. Effects/Image/Effects/Seamless Tiling.

16. Edit/Copy Special/Copy Merged. Paste as New Layer.
17. Image/Resize/Resize by 50%/Resize all layers unchecked.
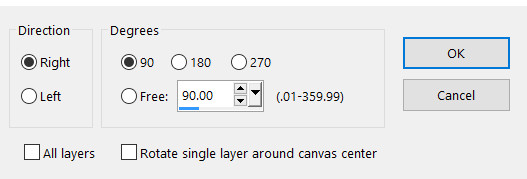
18. Image/Free Rotate. Rotate by 90 degrees Right.
19. Selections All/Selections Float/Selections Defloat.
20. Layers/New Raster Layer. Flood fill with Background color #343233.
21. Selections/Modify/Contract by 2px. Delete.
22. Selections/Select None. Merge/Merge Down.
23. Effects/Image Effects/Seamless Tiling.
24. Effects/Geometric Effects/Circle.
25. Effects/3D Effects/Drop Shadow. Vertical 0, Horizontal 0, Opacity 60, Blur 45, color #000000.
26. Drop down to Raster 2. Image/Mirror. Go back to top to continue.
27. Layers/New Raster Layer.
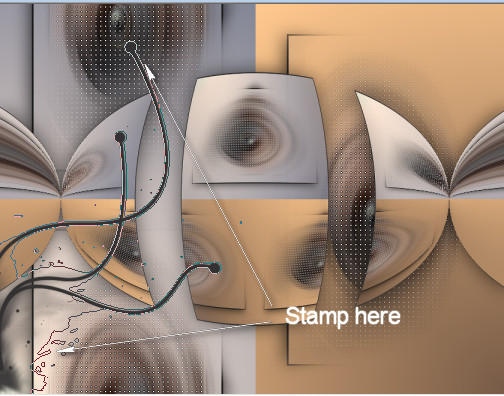
28. From Tool bar choose the Paint brush tool. Find Brush Ecol 5. Using Background color #343233 and settings below, stamp on left side of image as seen below.

29. Image/Add Borders/Add 3px border, Symmetric checked, color #343233.
30. Image/Add Borders/Add 5px border, Symmetric checked, color #bea17c.
31. Image/Add Borders/Add 3px border, Symmetric checked, color #343233.
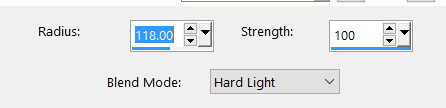
32. Image/Add Borders/Add 30 px border, Symmetric checked, color #bea17c.
33. In Materials Palette, change the gradient to Linear, Repeats 3, Invert unchecked.

34. Select the 30px border with the Magic Wand to activate it.
35. Layers/New Raster Layer. Flood new layer with Gradient.
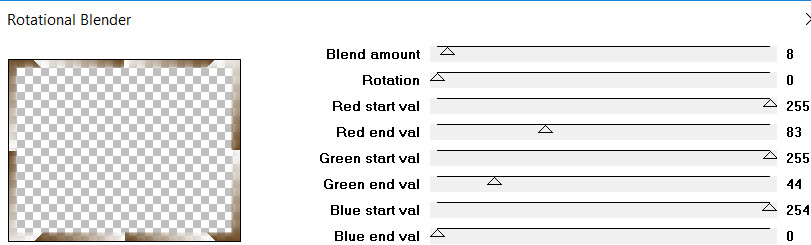
36. Effects/Neology/Rotational Blender.
37. Adjust/Blur/Gaussian Blur. Radius set to 26.
38. Selections/Select None.
39. Open K@rine_dreams_Metallic_Woman_3496.June_2016.pspimage. Copy/Paste as New Layer.
40. Pull down and to the right as seen in my image.
41. Effects/3D Effects/Drop Shadow. Vertical -2, Horizontal 0, Opacity 60, Blur 45, color #000000.
42. Adjust/Sharpness/High Pass Sharpen.
43. Image/Add Borders/Add 3px border, Symmetric checked, color #343233.
44. Image/Add Borders/Add 1px border, Symmetric checked, color #bea17c.
45. Image/Add Borders/Add 3px border, Symmetric checked, color #343233.
46. Image/Resize/Resize by 96%/Resize all layers checked.
47. FOR ANIMATION....OPTIONAL! Duplicate twice having three layers in all.
48. Close off bottom and middle layers having top layer open and highlighted.
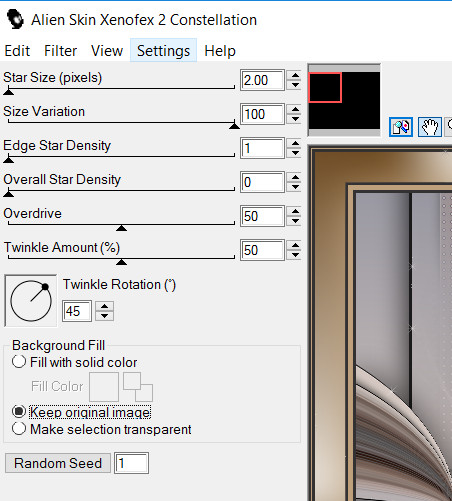
49. Effects/AlienSkin Xenofex 2/Constellation. Apply using settings below.
50. Close off top layer. Move to middle layer, open and highlight.
51. Effects/AlienSkin Xenofex 2/Constellation. Click on Random Seed/Apply.
52. Close off middle layer. Move to bottom layer, open and highlight.
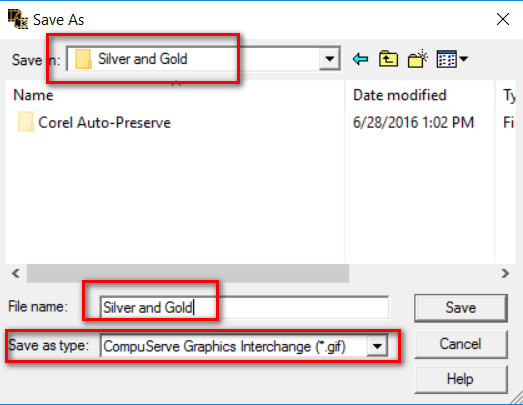
53. Effects/AlienSkin Xenofex 2/Constellation. Click on Random Seed/Apply.
54. Open all layers. File/Save As. Save as Animation Shop (*psp) file named Silver and Gold.
55. Open Animation Shop. File/Open. Open the saved file Silver and Gold.
56. From the top tool bar, click on View Animation to check your animation. If it is correctly sparkling, we will now save.
57. Edit/Select All. File/Save As.
58. When the first box appears, select where you will save the file, give it a name and leave save as .gif as is. Click Save.
59. As the boxes appear, simply click on Next, Next, Next and Finish.
60. All done! Thanks for working this tutorial and I hope you have enjoyed the PSP journey.
This tutorial was tested by PamelaD and Evatexas. Thanks ladies!
If you are going to use this tutorial for stationery, cards or place the tutorial/tag on another site, I would appreciate you contacting me for permission, giving Arasimages credit for the original tutorial and if possible, a link back to my site. Thank you.
Copyright © Arasimages All Rights Reserved