
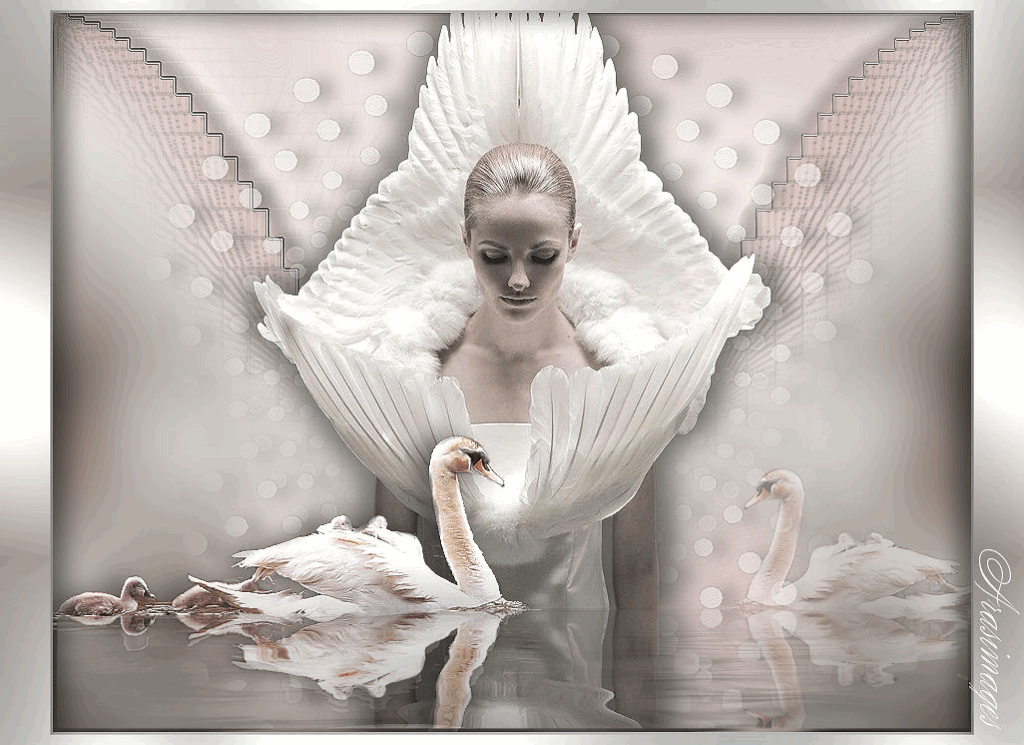
Swan Princess
For a Dutch, Danish, Italian, Turkish, French and Spanish translation, click on the flags.


For this tutorial you will need the materials in the zip file below.

Thanks go to Marcio C and to Franie Margot for the lovely tubes used in this tutorial.
Unzip the materials into a working folder you have created on your desktop named Swan Princess. Please duplicate and close original tubes. Use the copies for your work so you will not lose the originals. Place the Mask in your PSP/Masks folder. I have used the plugins Flaming Pear/Flood, Filters Unlimited/BKgDesigners f10 II/Emboss with Color, PhotoShop II/Bailey Spelen, Graphics Plus/Cross Shadow and PSP effects in this tutorial. I have also used the program Sqirlz for the animation. It is assumed you have a working knowledge of PSP to follow these directions. I have used PSPX8 for this tutorial but other versions may be used. To work this tutorial, it is assumed you have some working knowledge of Paint Shop Pro.
Use the swans below to mark your place along the way.
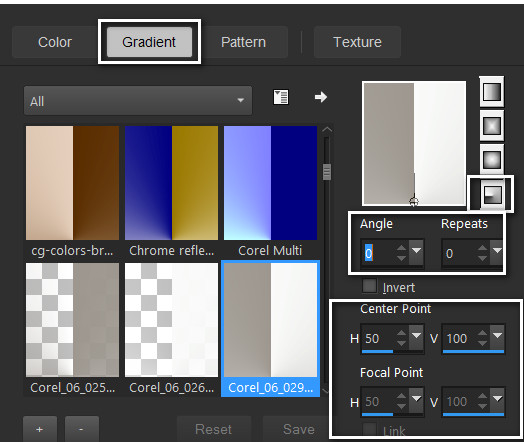
1. In Materials Palette, set Foreground to #f9faf9, Background to #9d978f. Create a Gradient using these colors, Gradient Corel_06_029 (foreground/background), Style Radial, Angle 0, Repeats 0, Invert unchecked, Center Points H 50/V 100/ Focal Points null.
2. New/New Image 920px by 720px. Flood fill with Gradient.
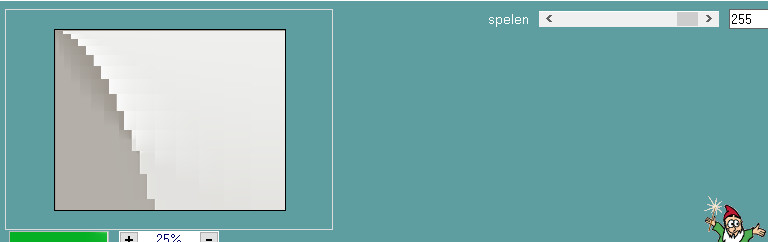
3. Effects/Photoshop II/Bailey/Spelen.
4. Effects/Edge Effects/Enhance.
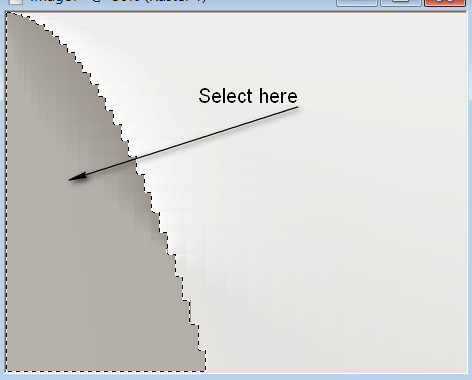
5. Using the Magic Wand with settings below, select the dark area on left side as seen below.

6. Effects/3D Effects/Drop Shadow. Vertical 0, Horizontal 15, Opacity 60, Blur 23, color #000000.
7. Effects/Edge Effects/Enhance. Copy. Selections/Select None.
8. Paste as New Layer.
9. Image/Mirror. Objects/Align/Right.
10. Effects/3D Effects/Drop Shadow. Vertical 0, Horizontal -15, Opacity 60, Blur 23, color #000000.
11. Merge/Merge Down.
12. Effects/Graphics Plus/Cross Shadow.
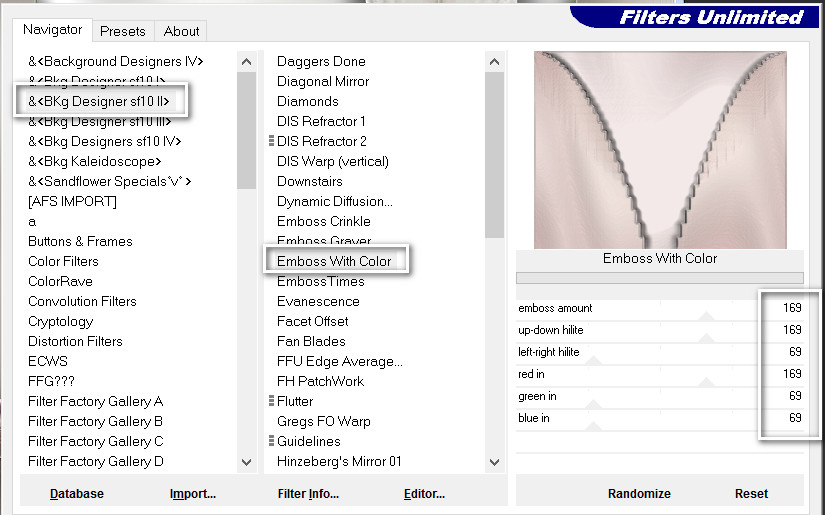
13. Effects/Filters Unlimited/BKg Designer sf10 II/Emboss With Color.
14. Layers/New Raster Layer. Flood fill with Foreground color #f9faf9.
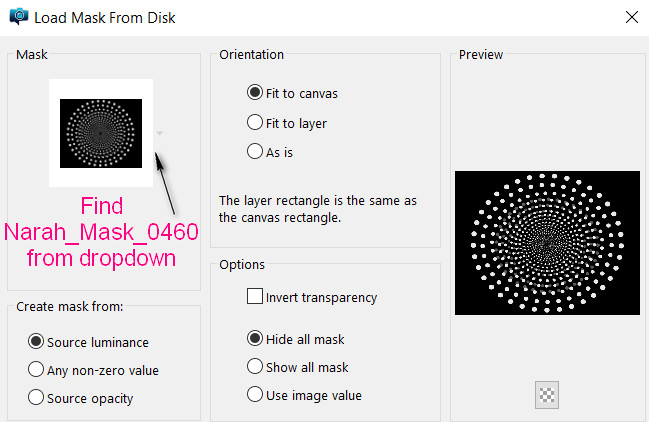
15. Layers/Load/Save Mask/Load Mask from Disk. Select Narah_Mask_0460 from drop down. Load.
16. Merge/Merge Group.
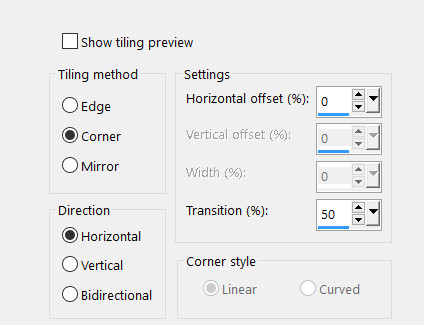
17. Effects/3D Effects/Drop Shadow. Vertical 0, Horizontal 15, Opacity 60, Blur 23, color #000000.
18. Effects/Edge Effects/Enhance.
19. Drop Opacity down to 50.
20. Open woman_639franiemargot.pspimage. Copy Raster 1 layer/Paste as New Layer.
21. Objects/Align/Bottom.
22. Effects/Image Effects/Seamless Tiling.
23. Adjust/Blur/Gaussian Blur. Radius set to 34.
24. Open mc827.pspimage of swans. Copy Raster 1 layer/Paste as New Layer.
25. Image/Mirror.
26. Image/Resize/Resize by 80%/Resize all layers unchecked.
27. Move into right side of image with bottom at 600px.
28. Drop Opacity down to 41.
29. Open woman_639franiemargot.pspimage. Copy Raster 1 layer/Paste as New Layer.
30. Adjust/Sharpness/Sharpen.
31. Effects/3D Effects/Drop Shadow. Vertical 0, Horizontal -15, Opacity 60, Blur 35, color #000000.
32. Effects/3D Effects/Drop Shadow. Vertical 0, Horizontal 15, Opacity 60, Blur 35, color #000000.
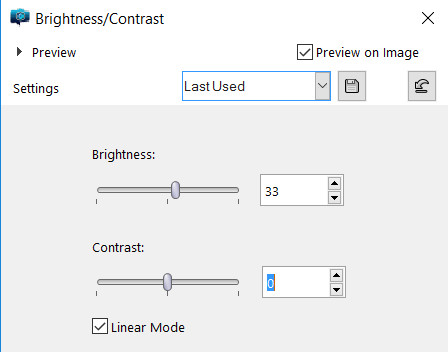
33. Adjust/Brightness/Contrast.
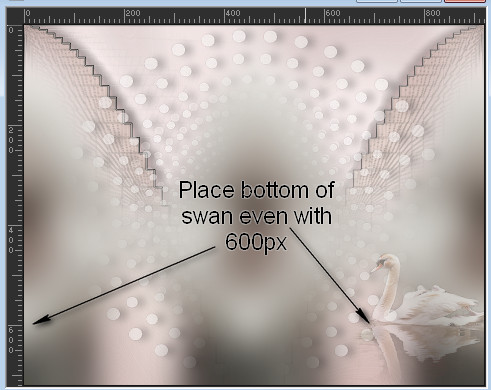
34. Adjust/Sharpness/Sharpen.
35. Move her upward to 600px, placing bottom even with swan on right.
36. Open mc827.pspimage of swans. Copy Raster 1/Paste as New Layer.
37. Effects/3D Effects/Drop Shadow. Vertical 0, Horizontal -15, Opacity 60, Blur 35, color #000000.
38. Adjust/Sharpness/Sharpen.
39. Move to left side, placing bottom even with 600px.
40. Using the Selection tool set to Rectangle/Add(Shift)/Feather 0, draw a rectangle from below swans to sides and bottom.


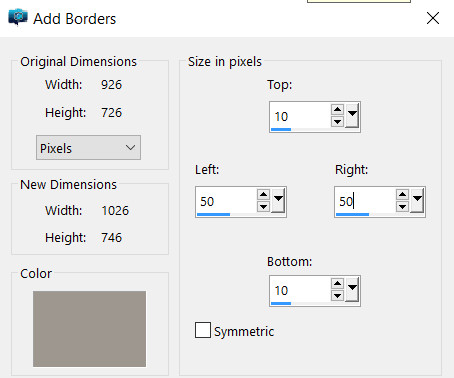
41. Go to the bottom layer and highlight it.
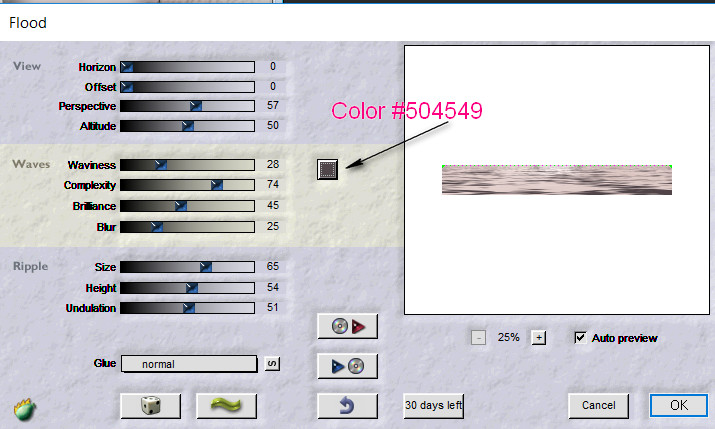
42. Effects/Flaming Pear/Flood.
43. Selections/Select None.
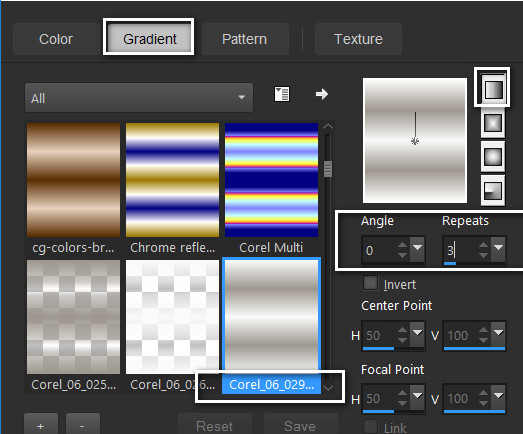
44. Save your working layers if you need to make a change later.
45. Image/Add Borders/Add 3px border, Symmetric layers checked, color #f9faf9.
46. Image/Add Borders/Add 10px border at top, 50px border on sides and 10px border at bottom. Symmetric unchecked/Color #9d978f.
47. Activate the wide borders with the Magic Wand settings as seen below.
48. Layers/New Raster Layer.
49. Using Foreground/Background colors, change Style to Linear, Repeats to 3, leave all other settings as is.
50. Flood fill border with Gradient. Selections/Select None.
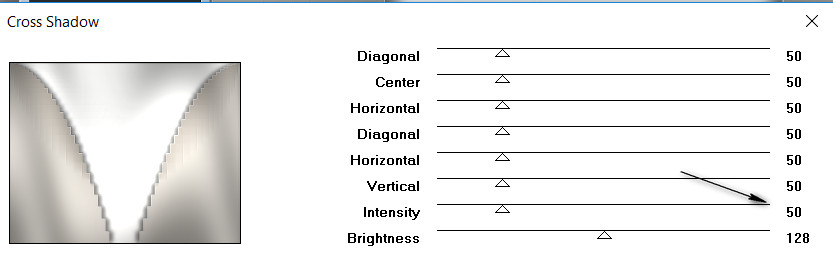
51. Effects/Graphics Plus/Cross Shadow. (Intensity set to 50, all others at default).
52. Effects/3D Effects/Drop Shadow. Vertical 0, Horizontal -15, Opacity 60, Blur 35, color #000000.
53. Effects/3D Effects/Drop Shadow. Vertical 0, Horizontal 15, Opacity 60, Blur 35, color #000000.
54. Image/Add Borders/Add 3px border, Symmetric checked, color #f9faf9.
55. Add your name if you wish on a new layer. Merge/Merge Visible.
56. Save the image as Swan Princess.jpg in your working folder.
57. You may leave the tutorial in its present form without animation if you wish. Following is how to add water effect using Sqirlz Program.
1. Open the Sqirlz Program. File/Open Swan Princess.jpg file.
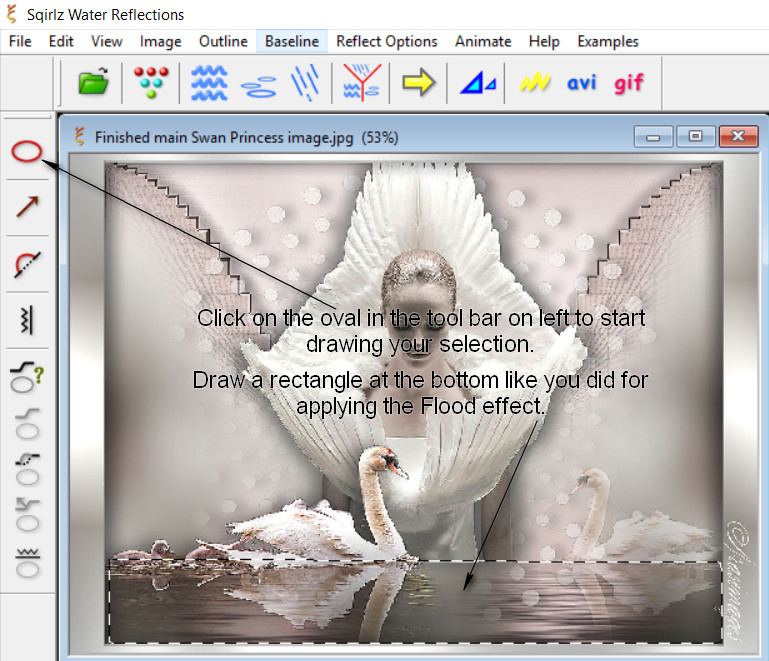
2. Click on the red oval at the top of the tool bar on the left. Left click to start to select around the water area like you did for the Flood effect/right click to close rectangle. See example below for red oval and for selection area.
3. Click on the three blue waves at the top tool bar. Another box will appear. Click on Water Color/Darkness at the top and when another box appears, leave all settings as they are except click on No Coloring, then OK.
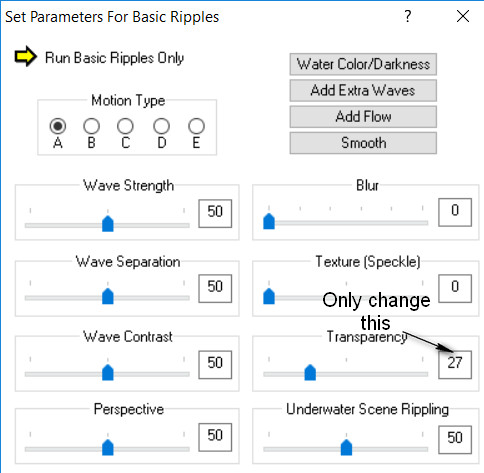
4. Leave all settings to Set Parameters For Basic Ripples as they are except for Transparency. Set that to 27. Close box out by clicking in upper right corner on the X. Your Parameters for the water is now set.
5. Click on the big Yellow arrow at the top tool bar to check your animation. If you are pleased with it, then now we will save your work.
6. Click on the red gif in the top tool bar. When the first box appears, it will tell you that you have chosen basic ripples only. Click OK.
7. Now the Save As box appears and you will name the folder where the work will be saved, fill in the File Name (Swan Princess) and leave the file type as is. Click Save.
8. The Frame Rate box will now appear. Leave it set to 15 and click OK.
9. Now you can watch as your animation is being saved. Wait for it to finish. When it tells you the sequence has been saved, you will see the size of your image. Click OK to finish.
10. Your image named Swan Princess is now in your working folder as a .gif file. You are done. Congratulations on creating your animation using Sqirlz. I hope you have enjoyed it!
This tutorial was tested by PamelaD and Evatexas. Thanks ladies!
If you are going to use this tutorial for stationery, cards or place the tutorial/tag on another site, I would appreciate you contacting me for permission, giving Arasimages credit for the original tutorial and if possible, a link back to my site. Thank you.
Copyright © Arasimages All Rights Reserved