
Wear Red
For an Italian, Danish, Dutch, Spanish, Turkish, German and French translation, click on the flags.


For this tutorial you will need the materials in the zip file below.

Unzip the materials into a working folder you have created on your desktop named Wear Red. Please duplicate and close original tubes. Use the copies for your work so you will not lose the originals. Place the Selections in your Selections folder. Place the Pattern goldbeads in your PSP Files/Patterns folder. I have used only the effects of PSPX8 in this tutorial. To work this tutorial, it is assumed you have some working knowledge of Paint Shop Pro.
Use the Shoe below to mark your place along the way.

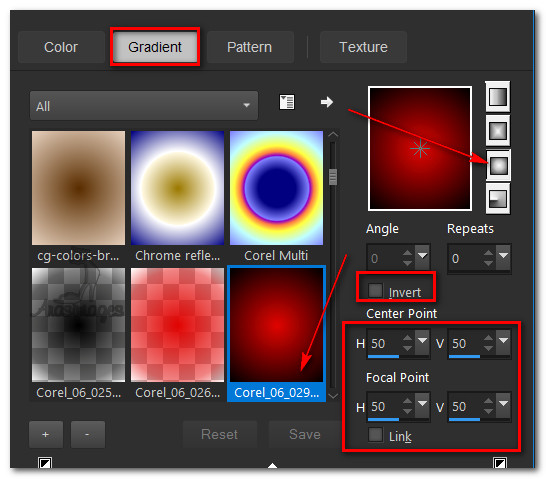
1. In Materials Palette, set Foreground to #e00503, Background to #000000. Create a Gradient using these colors, Gradient Corel_06_029 (foreground/background), Style Sunburst, Angle 0, Repeats 0, Invert unchecked, Center Points H 50/V 50/ Focal Points H 50, V 50.
2. New/New Image 950px by 780px. Flood fill with #000000.
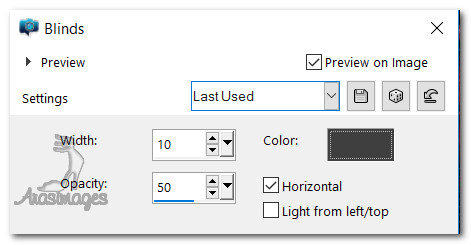
3. Effects/Texture Effects/Blinds. Use color #404040.
4. Effects/Edge Effects/Enhance.
5. Layers/New Raster Layer.
6. Selections/Load/Save Selection. Load Selection from Disk. Choose ArasimagesWearRedRectangle selection from drop down. Load.

7. Flood fill selection with Gradient.
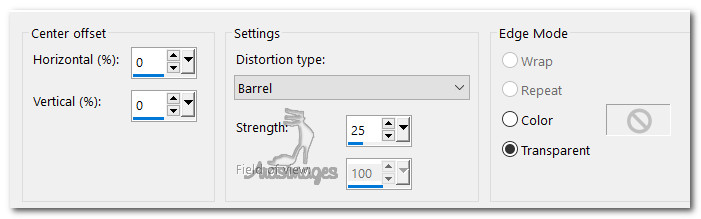
8. Effects/Distortion Effects/Lens Distortion.
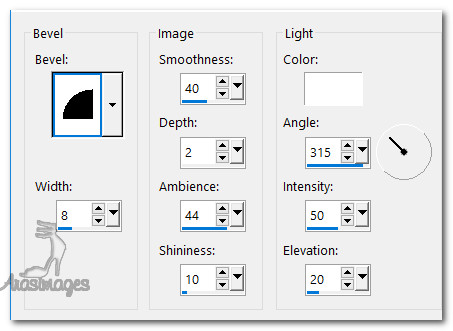
9. Effects/3D Effects/Inner Bevel.
10. Effects/3D Effects/Drop Shadow. Vertical 6, Horizontal 22, Opacity 68, Blur 38, color #000000.
11. Selections/Select None.
12. Layers/New Raster Layer.
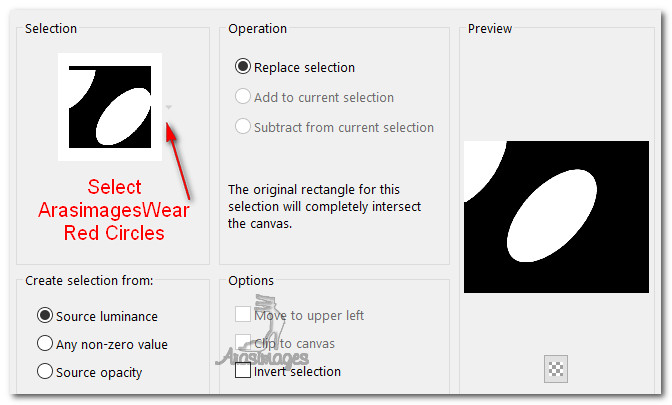
13. Selections/Load/Save Selection. Load Selection from Disk. Choose ArasimagesWearRedCircles selection from drop down. Load.
14. Flood fill center selected circle with #000000, top left selection with Gradient. Deselect.
15. Using Magic Wand, Mode set to Add (Shift), Match mode None, Tolerance n/a, Feather 0, click on center circle to activate it.
16. Open Face in Red.png. Copy/Paste into Selection.
17. Effects/3D Effects/Inner Bevel.
18. Selections/Select None.
19. Using Magic Wand settings as in Step #15, click on top left partial circle to activate it.
20. Open Red Ruffles Back.png. Copy/Paste into Selection.
21. Repeat the Inner Bevel as in Step #17.
22. Using Magic Wand set as in Step #15, click on center filled circle to activate it.
23. Effects/3D Effects/Drop Shadow. Vertical 6, Horizontal 22, Opacity 68, Blur 38, color #000000.
24. Repeat and deselect.
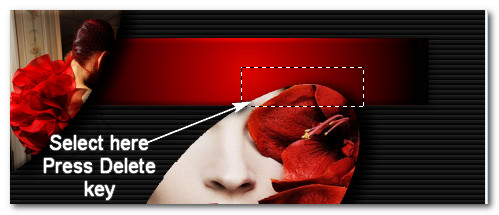
25. Using Selections tool set to Rectangle, Feather 0, select top portion of center lady which is over the text rectangle. Press Delete key.
26. Selections/Select None.
27. Open Red Dress.png. Copy/Paste as New Layer.
28. Place woman in Red Dress into bottom left corner.
29. Lower Opacity down to 60.
30. Paste Red Dress.png as New Layer again. Place woman a little to the right of the first one and slightly higher.
31. Open Red Spike Heels.png. Copy/Paste as New Layer.
32. Effects/3D Effects/Drop Shadow. Vertical 6, Horizontal 22, Opacity 68, Blur 38, color #000000.
33. Adjust/Sharpness/Sharpen.
34. Place so top of heels tube meets bottom of rectangle at top of image a little left of center.
35. Open red Dress Back.png. Copy/Paste as New Layer.
36. Using the Pick tool set to Mode: Free (Shift+), using top/bottom center Nodes, pull upward/downward until she fits from top to bottom of image.
37. Set Pick tool back to Move tool. Place lady to the right side of image so right shoulder is no longer showing.
38. Change Background color in Materials Palette to #f2e4e6.
39. From Text tool, select Font Harrington and settings Size 30, Stroke 0.0, Line Style Solid, Kerning at 25.

40. Type out the words "When I am old I shall yet". Convert to Raster Layer.
41. Change Size to 48 and type the words "Wear Red!". Convert to Raster Layer.
42. Objects/Align/Horizontal Center. Do this alignment step on both layers of the text. Adjust layers if needed so text fits well.
43. Merge/Merge Down.
44. Effects/3D Effects/Drop Shadow. Vertical 6, Horizontal 6, Opacity 68, Blur 12, color #000000.
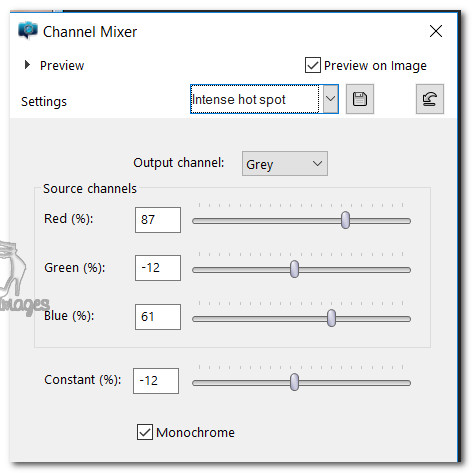
45. Adjust/Color/Channel Mixer.
46. Image/Add Borders/Add 3px border, color #000000, Symmetric checked.
47. Image/Add Borders/Add 1px border, color #e00503, Symmetric checked.
48. Image/Add Borders/Add 5px border, color #f2e4e6.
49. Select 5px border with Magic Wand set to default.
50. In Materials Palette, change from Gradient to Pattern and select the pattern goldbeads.
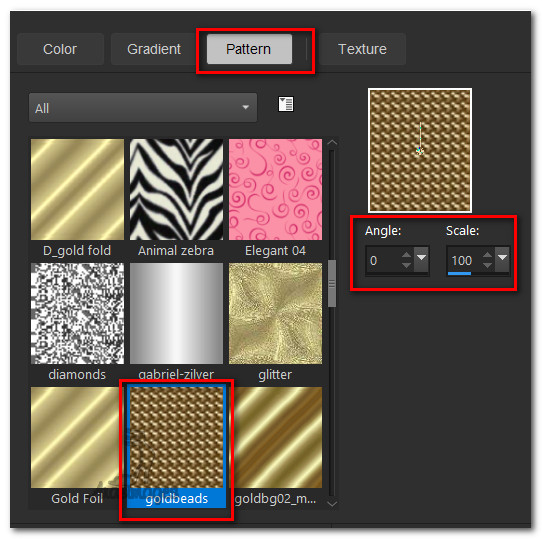
51. Flood fill 5px border with Pattern goldbeads.
52. Effects/Edge Effects/Enhance.
53. Selections/Select None.
54. Image/Add Borders/Add 1px border, color #000000, Symmetric checked.
55. Image/Add Borders/Add 3px border, color #e00503, Symmetric checked.
56. Place your watermark or name here if you wish. If you placed it on a New Layer, then Merge/Merge Visible.
57. You may resize your image at this point if it is too large for your liking.
58. I hope you like the color RED as much as I do and when/if you are old you will wear it with wild abandon! Never let age hold you back on something you love.
This tutorial was tested August 2016 by PamelaD and Evatexas. Thanks ladies!
If you are going to use this tutorial for stationery, cards or place the tutorial/tag on another site, I would appreciate you contacting me for permission, giving Arasimages credit for the original tutorial and if possible, a link back to my site. Thank you.
Copyright © Arasimages All Rights Reserved