
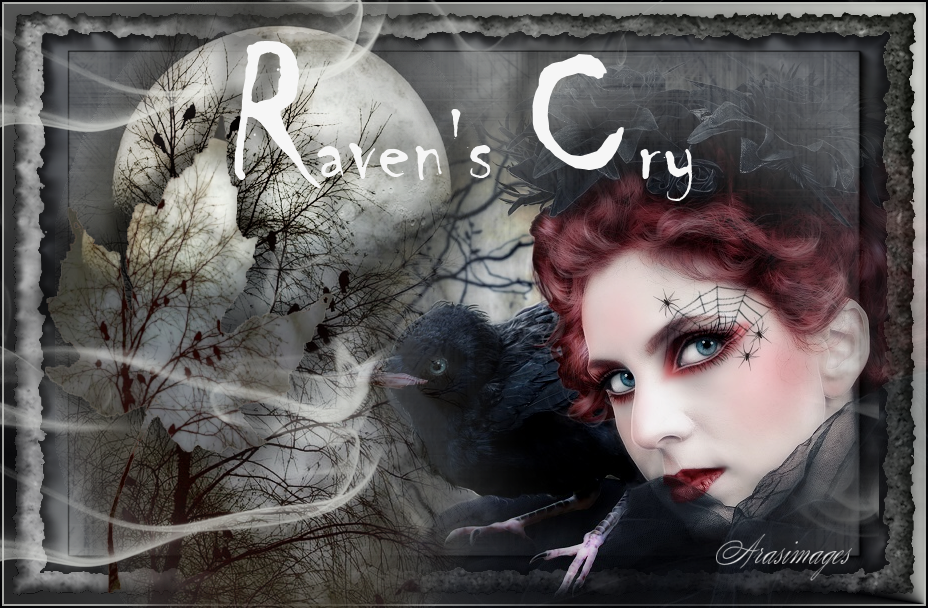
Raven's Cry
For this tutorial you will need the materials in the zip file below.

For Italian, French, Spanish, Dutch, Danish and German translation, click on the flags.


Thanks go to K@rine for the lovely woman used in this tutorial.
Unzip the materials into a working folder you have created on your desktop named Raven's Cry. Please duplicate and close original tubes. Use the copies for your work so you will not lose the originals. I have used the plugins Xero/Porcelain and Alien Skin Xenofex 2/Burnt Edges. Place the brush in the PSP/Brushes folder, the Selection in your PSP Selections folder, the Pattern in your PSP/Patterns folder and the Mask in your PSP/Masks folder. I have used PSPX7 for this tutorial but other versions may be used. To work this tutorial, it is assumed you have some working knowledge of Paint Shop Pro.
Use the bird below to mark your place along the way.

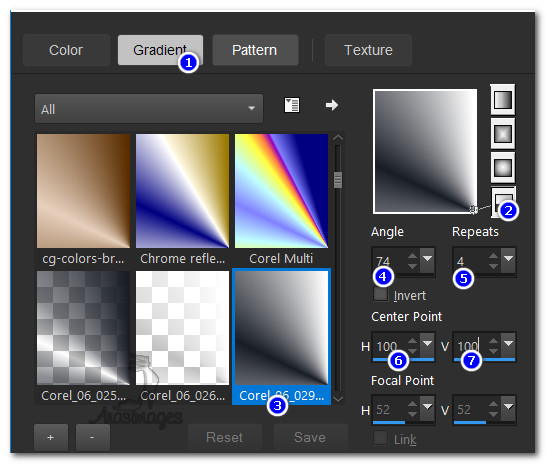
1. In Materials Palette, set Foreground to #eef0ea, Background to #020204. Create a Gradient using these colors, Gradient Corel_06_029 (foreground/background), Style Radial, Angle 74, Repeats 4, Invert unchecked, Center Points H 100/V 100/ Focal Points H 50, V 50 (grayed out).
2. New/New Image 920px by 600px. Flood fill with Gradient.
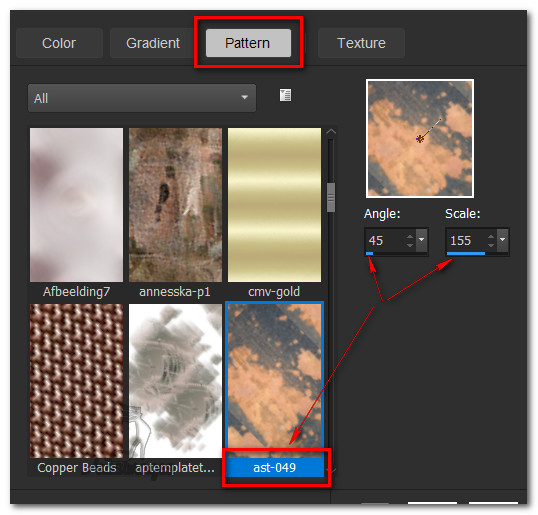
3. Layers/New Raster Layer. Select Pattern ast-049 from Patterns. Angle: 45/Scale: 155.
4. Flood fill with Pattern. Set Blend Mode to Luminance (Legacy).
5. Image/Mirror.
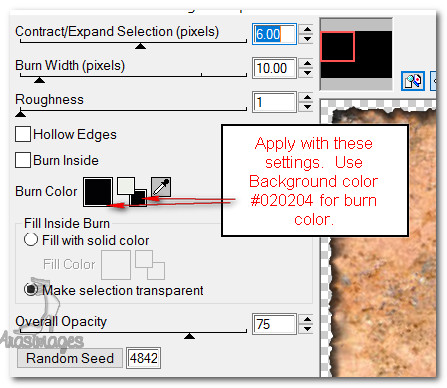
6. Effects/Alien Skin Xenofex 2/Burnt Edges. Apply as below.
7. Layers/Add New Layer. Selections/Select All.
8. Open Karine_dreams_Misted_Lady_Spider_3572_Septembre_2016.pspimage. Copy bottom Raster 4 layer/Paste into Selection.
9. Selections/Select None.
10. Image/Resize/Resize by 96%/Resize all layers unchecked.
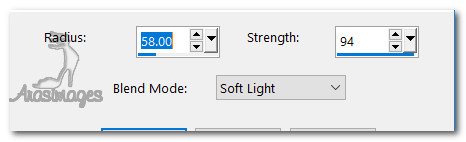
11. Effects/AlienSkin Xenofex2/Burnt Edges. Apply as seen below.

12. Image/Add Borders/Add 2px border, Symmetric checked, color #eef0ea.
Add another 2px border in color #020204.13. Open 60624b4eaa3cb53ba3434e9087984135.png. Copy/Paste as New Image. Close original.
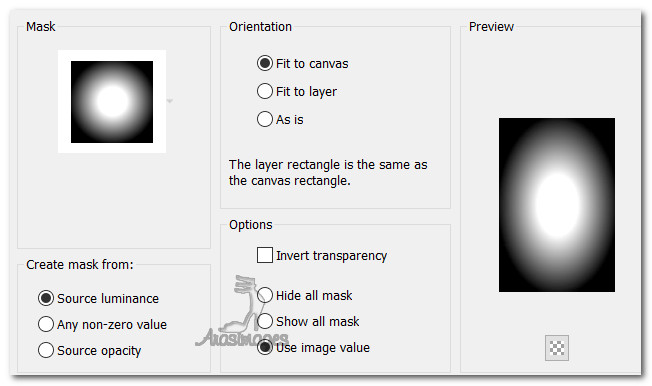
14. Using copy, Layers/Load/Save Mask. Load Mask from Disk. Select Mask 20-20. Load.
15. Merge/Merge Group. Duplicate twice having three layers in all. Merge/Merge Visible. Copy/Paste as New Layer.
16. Image/Resize/Resize by 80%/Resize all layers unchecked.
17. Adjust/Sharpness/High Pass Sharpen. Move trees to the left of image.
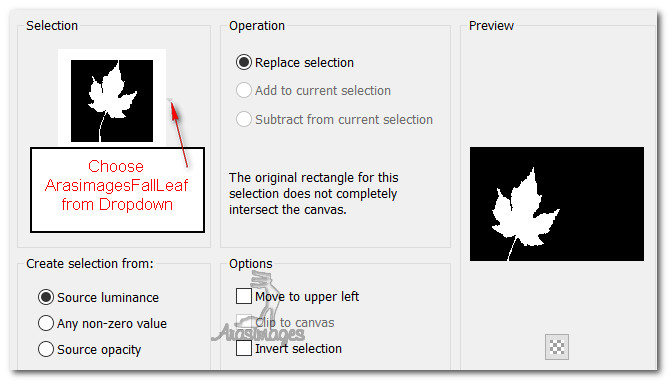
18. Selections/Load/Save Selection/Load Selection from Disk. Find ArasimagesFallLeaf/Load.
19. Layers/New Raster.
20. Open 60624b4eaa3cb53ba3434e9087984135.png. Copy/Paste into Selection. Selections/Select None.
21. Image/Resize/Resize by 80%/Resize all layers unchecked.
22. Effects/3D Effects/Drop Shadow. Vertical -10, Horizontal -21, Opacity 58, Blur 29, color #000000.
23. Effects/3D Effects/Drop Shadow. Vertical 10, Horizontal 21, Opacity 58, Blur 40, color #000000.
24. Layers/New Raster Layer.
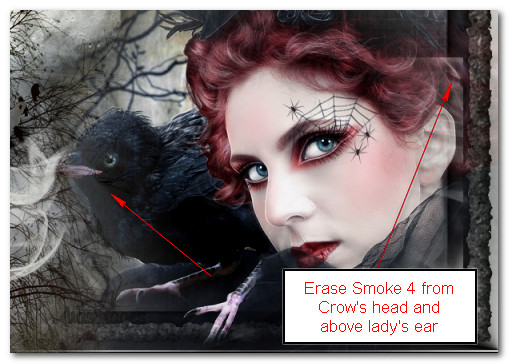
25. From tool bar select Paint Brush tool. Select Brush Smoke 4 and using settings as below with Foreground color set to #eef0ea, left click toward bottom center of image to place the first smoke. Left click again toward the top center near right side of moon.

26. Lower Opacity down to 90.
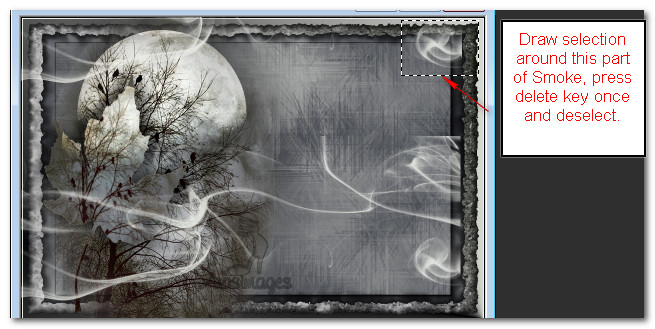
27. Using Selection Tool set to Rectangle, select around smoke on top right corner, press Delete key once. Deselect.
28. Open K@rine_dreams_Misted_Lady_Spider_3572_Septembre_2016.pspimage. Copy/Paste as New Layer.
29. Move lady with crow into bottom right corner.
30. Highlight the smoke layer and using Eraser tool, erase any excess off the Crow's head and the right side above the ear of the woman.
31. Merge/Merge Visible.
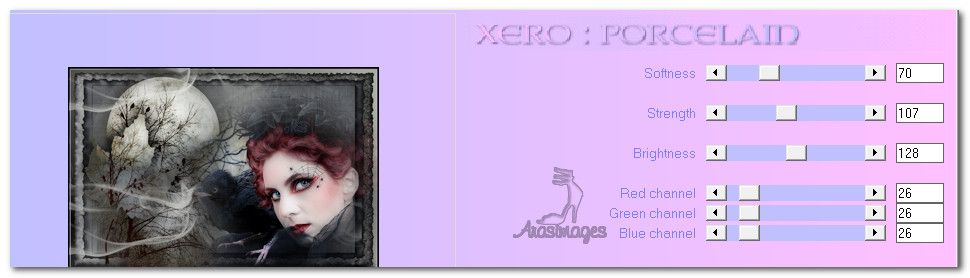
32. Effects/Xero/Porcelain. Settings as seen below.
33. From the tool bar select the Text tool. Choose Font Chiller, Size 96, Stroke 0.0, Kerning 25.

34. Set the bottom Background color to #f6f6f6. Type out the words "Raven's Cry". Highlight the "R" and reset the size to 200. Highlight the C and reset the size to 200. Convert to Raster Layer.
35. Objects/Align/Horizonal Center. Place the text toward the top of the image keeping centered horizontal.
36. Effects/3D Effects/Drop Shadow. Vertical -10, Horizontal -20, Opacity 60, Blur 30, color #000000.
37. Sign your name or leave your watermark if you wish.
38. Merge/Merge Visible.
This tutorial was tested by PamelaD, Evatexas. Thanks ladies!
If you are going to use this tutorial for stationery, cards or place the tutorial/tag on another site, I would appreciate you contacting me for permission, giving Arasimages credit for the original tutorial and if possible, a link back to my site. Thank you.
Copyright © Arasimages All Rights Reserved