
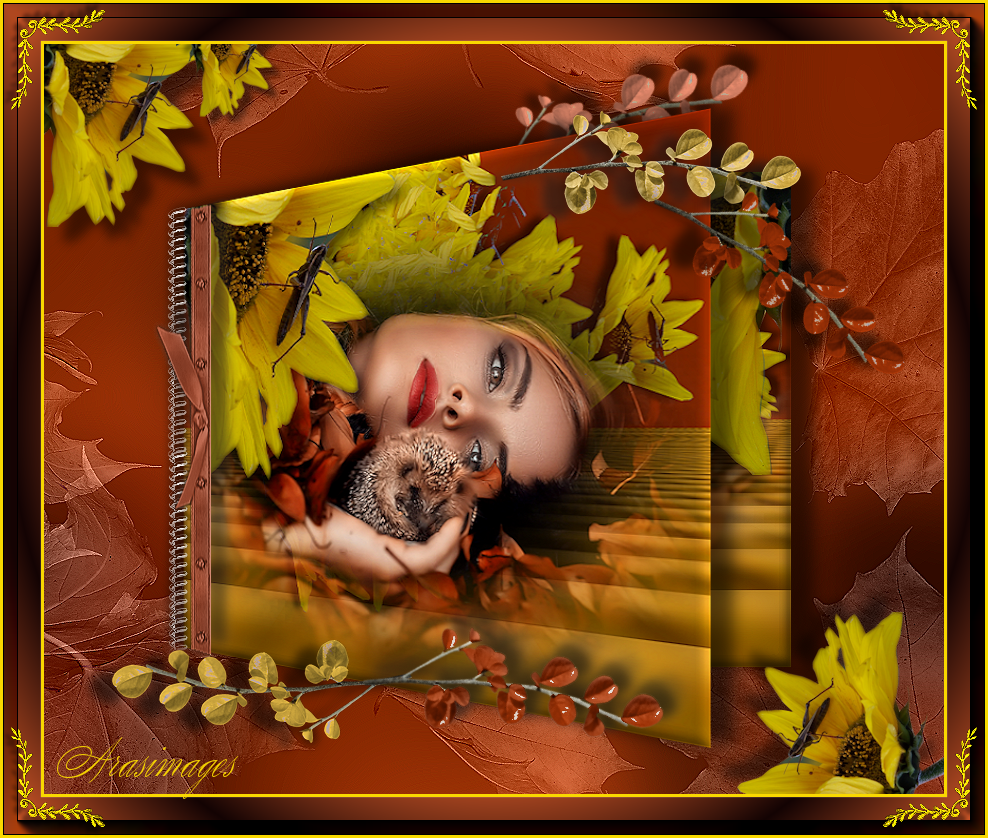
Resting Place
For an Italian, French, Dutch, Spanish and Danish translation, click on the flags.


For this tutorial you will need the materials in the zip file below.

Thanks go to K@rine for the lovely lady tube used in this tutorial. The sunflower is a photograph taken at my brother's sunflower field. This tutorial is in loving memory of him who passed a month ago.
Unzip the materials into a working folder you have created on your desktop named Resting Place. Please duplicate and close original tubes. Use the copies for your work so you will not lose the originals. I have used the plugins Andromeda/Perspective, AAA Frames/Foto Frame, Simple/TopLeftMirror, Mura's Meister/Copies and Perspective and Creativity/Splatter. Place the Preset.pfp in your PSP/Plugins/Andromeda/Perspective Presets/Andromeda/02Full Canvas/22SideWalls. Place the Gradient jb-g371 in your PSP/Gradients folder. I have used PSPX9 for this tutorial but other versions may be used. To work this tutorial, it is assumed you have some working knowledge of Paint Shop Pro.
Use the leaves below to mark your place along the way.

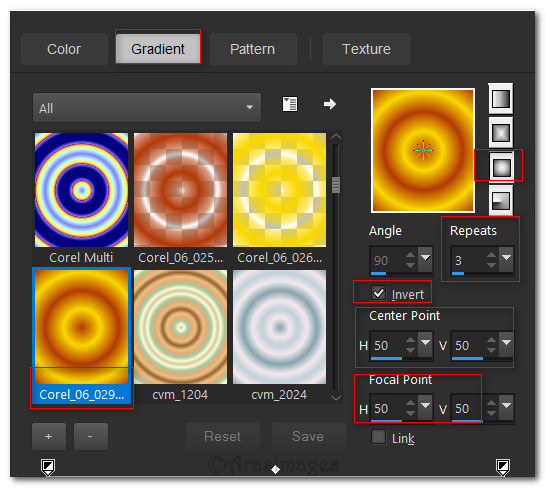
1. In Materials Palette, set Foreground color to #f9d800/Background color to #b13a09. Create a Gradient using the Foreground/Background colors, Style to Sunburst, Angle null/Repeats 3. Invert checked. Center Point/Focal Point all set to 50.
2. New/New Image 900px by 750px. Flood fill with Background color.
3. Layers/New Raster Layer. Selections/Select All.
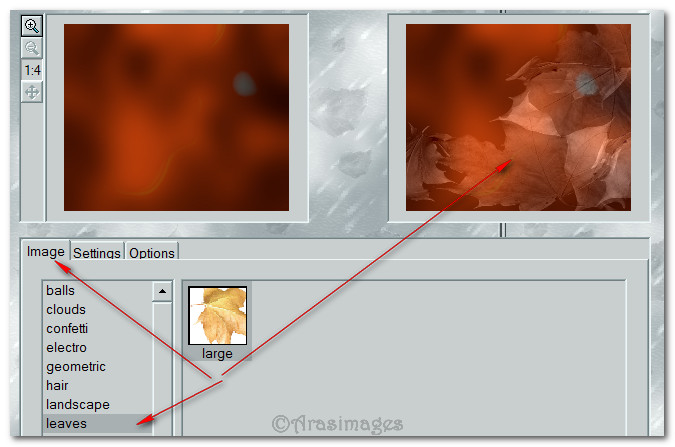
4. Open Golden Resting Place.png. Copy/Paste into Selection. Deselect.
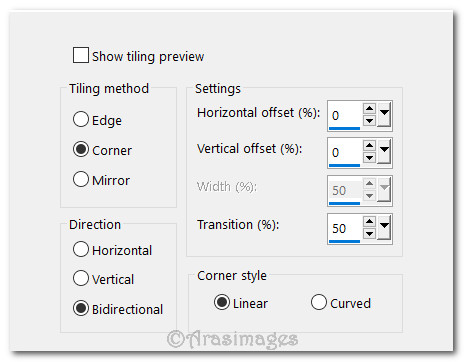
5. Effects/Image Effects/Seamless Tiling.
6. Adjust/Blur/Gaussian Blur. Radius at 55.
7. Set Blend Mode to Multiply. Merge/Merge Down.
8. Duplicate. Go down to Raster 1 layer renaming it Background.
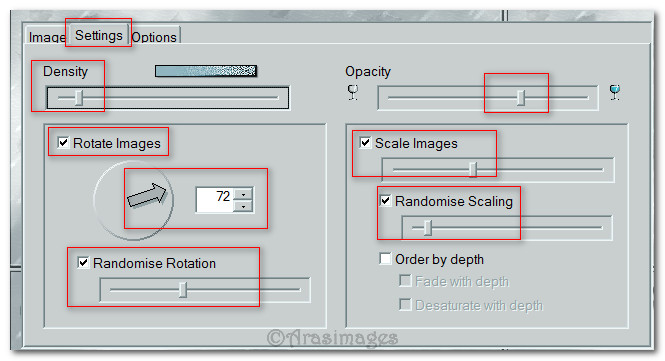
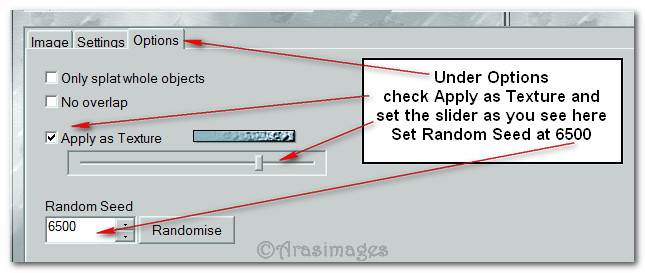
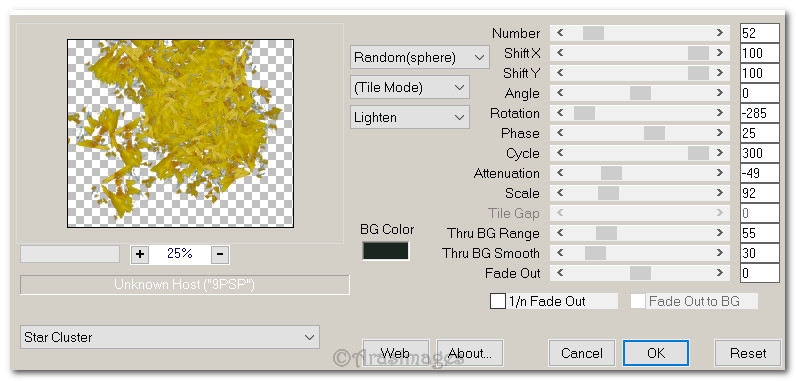
9. Effects/Creativity/Splatter. Try to set your settings as I have mine although I got different results each time I tried it. Adjust settings to get leaves that please you.
10. Effects/Edge Effects/Enhance. Close off bottom layer. Go back to top layer to continue.
11. Layers/New Raster Layer. Flood fill with Gradient.
12. Adjust/Blur/Gaussian Blur. Radius set to 55.
13. Layers/New Raster Layer. Selections/Select All.
14. Open Flower and Dew Drop.jpg. Using Selections tool set to Rectangle, Feather 1, select image inside the white border. Copy.
15. Go back to main image and Paste Into Selection. Deselect.
16. Duplicate. Image/Mirror/Mirror Horizontal.
17. Drop Opacity down to 61. Merge/Merge Down.
18. Set to Luminance (Legacy). Merge/Merge Down again.
19. Adjust/Blur/Gaussian Blur, Radius set to 55.
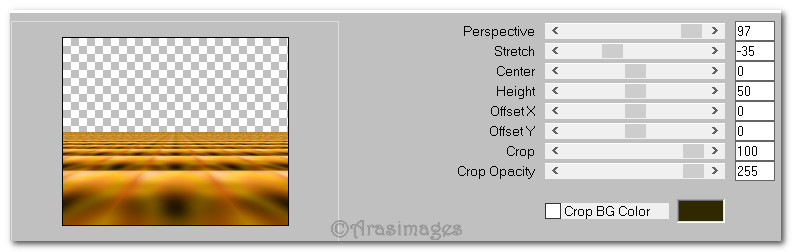
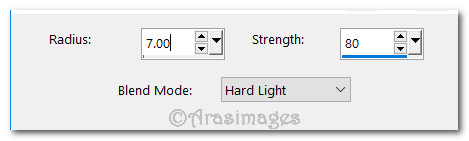
20. Effects/Mura's Meister/Perspective. (color #000000). Apply as seen below.
21. Repeat Gaussian blur as in Step 19. Repeat Mura's Meister/Perspective as in Step 20.
22. Open Golden Resting Place.png. Copy/Paste as New Layer.
23. Image/Resize/Resize by 12%/Resize all layers unchecked.
24. Move Golden Resting Place so it touches perspective horizon.
25. Effects/Mura's Meiser/Copies/Color #000000. Use settings below but if you retry a few times, do not expect to get the same results every time you apply them. Move image around after application if necessary.
26. Effects/3D Effects/Drop Shadow. Vertical -3, Horizontal 16, Opacity 56, Blur 15, color #000000.
27. Open K@rine_dreams_Misted_Woman_3550_Septembre_2016.pspimage. Copy/Paste as New Layer.
28. Pull downward a little. Duplicate twice. Merge/Merge Down. Repeat Merge Down.
29. Merge Raster 1 and Raster 2 and highlight them. Using the Eraser tool set to Size 50, all other settings at default, erase over the lady's head to remove the background showing through. Go back to top layer to continue.
30. Adjust/Sharpeness/Sharpen.
31. Open Golden Resting Place.Png. Copy/Paste as New Layer.
32. Image/Resize/Resize by 30%/Resize all layers unchecked.
33. Image/Mirror/Mirror Horizontal.
34. Effects/3D Effects/Drop Shadow. Vertical 16, Horizontal -16, Opacity 45, Blur 26, color #000000.
35. Adjust/Sharpness/Sharpen. Pull into upper right corner.
36. Merge/Merge Visible.
37. Image/Resize/Resize by 66%/Resize all layers unchecked.
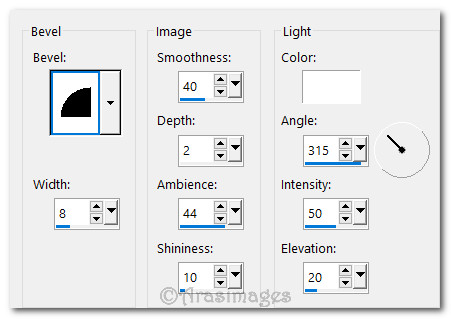
38. Effects/3D Effects/Inner Bevel. Use settings below.
39. Effects/3D Effects/Drop Shadow. Vertical -3, Horizontal 23, Opacity 56, Blur 24, color #000000.
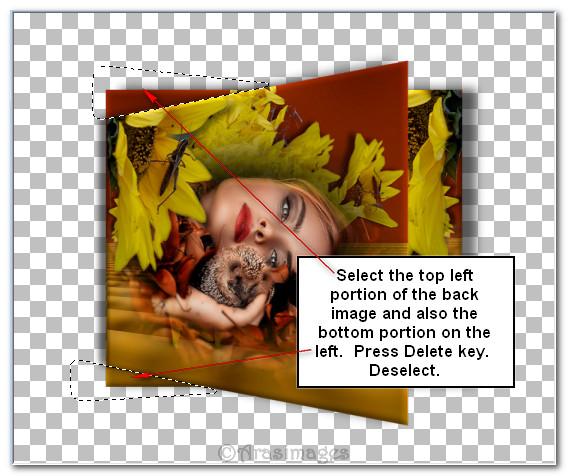
40. Adjust/Sharpness/Sharpen.
41. Duplicate and highlight.
42. Image/Mirror/Mirror Horizontal.
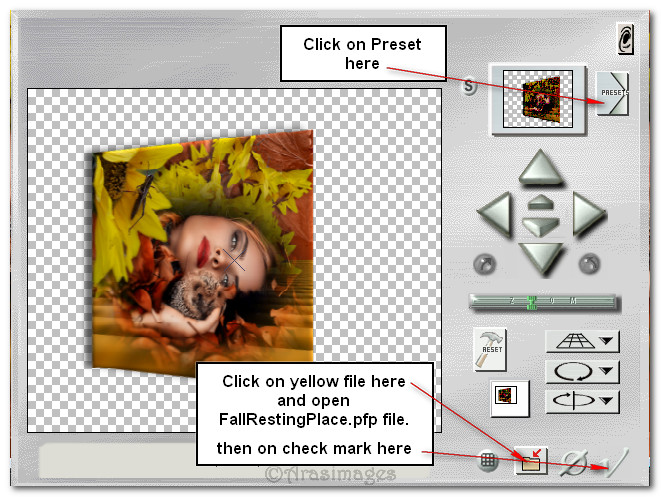
43. Effects/Andromeda/Perspective. Click on Presets at the top right, then on the yellow envelope at the bottom right. Once it opens to the Presets, choose the FallRestingPlace.psp file. Click on the check mark at the bottom right. When the next box appears showing the image in a perspective shape, click the check mark again.
44. Pull the front perspective image to the left to meet the left edge of the image behind it. Using the Pick tool, pull the perspective image to the right to cover more of the image behind it. The images should resemble a book that is opened a bit.
45. Drop down to the Merged layer and highlight it. Using your Selections tool set to Freehand Selection, Point to Point, Mode: (Add Shift), Feather 0, select around the top and bottom left that is showing and press delete key once to eliminate them. Selections/Select None.
46. Effects/3D Effects/Drop Shadow. Vertical -3, Horizontal 23, Opacity 56, Blur 24, color #000000.
47. Go back to the top. Merge/Merge Down and resize by 105%, all layers unchecked.
48. Adjust/Sharpness/Sharpen.
49. Open Background layer.
50. Layers/New Raster Layer.
51. Change background color to c0c0c0.
52. Open BC-brush 10/Export it to Custom Brush. From the tool bar select the Paint Brush tool. Find BC-brush 10. Use settings below and stamp by right clicking on the left edge of perspective center image. Stamp twice for spiral binding along left edge.

53. Using Eraser tool or Selections tool, erase the excess off the bottom.
54. Effects/Edge Effects/Enhance.
55. Open Ribbon.png. Copy/Paste as New Layer.
56. Place to the right of the stamped spiral binding.
57. Adjust/Sharpness/High Pass Sharpen. (All High Pass Sharpen steps will use these settings).
58. Open Leaves 1.png. Copy/Paste as New Layer.
59. Image/Mirror/Mirror Horizontal. Mirror/Flip. Place at the left bottom of perspective image.
60. Effects/3D Effects/Drop Shadow. Veritcal 6, Horizontal -23, Opacity 56, blur 15, Color #000000.
61. Adjust/Sharpness/High Pass Sharpen.
62. Paste as New Layer again. Apply Drop Shadow as in Step 60.
63. Adjust/Sharpness/High Pass Sharpen. Place at the top right of the image.
64. Duplicate. Recolor using Color Changer by the Flood fill tool. Use color #b13a09.
65. Image/Free Rotate/Rotate Right by 35. Place beneath first leaves in top right corner.
66. Paste as New Layer again. Image/Free Rotate/Rotate Left by 23.
67. Effects/3D Effects/Drop Shadow. Vertical -14, Horizontal 9, Opacity 56, blur 15, Color #000000.
68. Recolor using #f89676. Image/Sharpness/High Pass Sharpen.
69. Place at top of perspective image, then pull down between the two perspective image layers. Return to top layer to continue.
70. Duplicate. Image/Free Rotate/Rotate right by 30%. Pull downward to the right of lower leaves.
71. Effects/3D Effects/Drop Shadow. Vertical -14, Horizontal 9, Opacity 56, blur 15, Color #000000.
72. Recolor using color #b13a09. Adjust/Sharpness/High Pass Sharpen.
73. Open Golden Resting Place.png. Copy/Paste as New Layer.
74. Image/Resize/Resize by 12%/Resize all layers unchecked.
75. Effects/3D Effects/Drop Shadow. Vertical 16, Horizontal 16, Opacity 50, blur 16, Color #000000.
76. Adjust/Sharpness/Sharpen. Move into upper left corner.
77. Duplicate. Image/Resize/Resize by 50%/Resize all layers unchecked.
78. Move into upper left corner over larger sunflower with grasshopper.
79. Duplicate the larger sunflower in upper left corner. Image/Mirror/Mirror Horizontal. Image/Flip/Flip Vertical.
80. Place in bottom right corner.
81. Image/Add Borders/Add 3px border, Symmetric unchecked, color #f9b800.
82. Image/Add Borders/Add 38px border, Symmetric unchecked, color #ffffff.
83. Apply the Magic Wand on the 38px border to activate it.
84. Layers/New Raster Layer. In Materials Palette foreground select jb-g371 gradient. Flood fill with gradient. Selections/Select None.
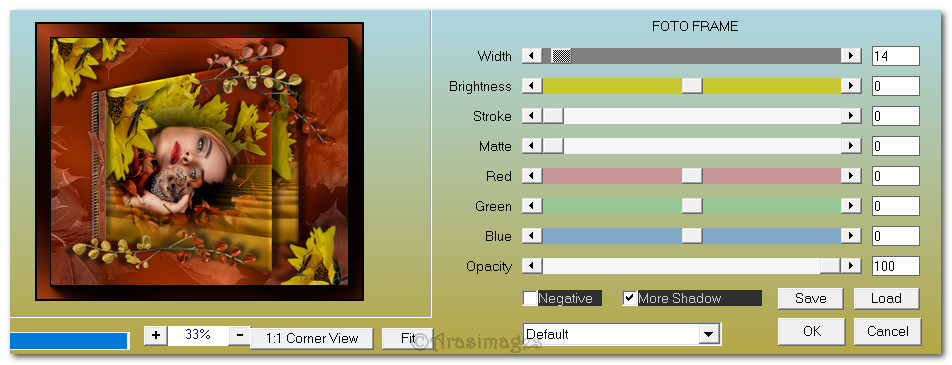
85. Effects/AAA Frame/Foto Frame.
86. Image/Add Borders/Add 3px border, Symmetric checked, color #f9b800.
87. Open Corner.png. Copy/Paste as New Layer.
88. Place in upper left corner. Simple/Top Left Mirror.
89. Effects/Edge Effects/Enhance. Merge/Merge Visible.
This tutorial was checked by Evatexas and PamelaD. Thank you ladies for your kindness in helping make my tutorials as presented.
If you are going to use this tutorial for stationery, cards or place the tutorial/tag on another site, I would appreciate you contacting me for permission, giving Arasimages credit for the original tutorial and if possible, a link back to my site. Thank you.
Copyright © Arasimages All Rights Reserved