
Time for Skating
For this tutorial you will need the materials in the zip file below.

For an Italian, French, Dutch, Danish, Spanish and German translations click on the flags.


Thanks go to JHanna, FranieMargo and Arasimages for the tubes used in this tutorial.
Unzip the materials into a working folder you have created on your desktop named Time for Skating. Please duplicate and close original tubes. Use the copies for your work so you will not lose the originals. I have used the plugins Filter Forge 2/Blur Wave, Graphics Plus/Cross Shadow and Mura Meister's/Perspective. Place the Silverpunk Pattern in your PSP Files/Patterns folder. Place the Selection in your PSP Files/Selections folder. Place the Vyp_point styled line into your PSP Files/Styled Lines folder. I have used PSPX9 for this tutorial but other versions may be used. To work this tutorial, it is assumed you have some working knowledge of Paint Shop Pro.
Use the snowflake below to mark your place along the way.

1. In Materials Palette, set Foreground color to #d4e8f6/Background color to #2c435e. Create a Gradient using the Foreground/Background colors, Style set to Radial, Angle 90/Repeats 0. Invert checked. Center Point/Horizontal set to 100, Vertical 0, and Focal Point both set to 50.

2. New/New Image 860px by 720px. Flood fill with Gradient.
3. Open JHanna_548 background.jpg. Copy/Paste as New Layer.
4. Set Blend Mode to Luminance (Legacy).
5. Effects/Edge Effects/Enhance More. Drop Opacity down to 70.
6. Effects/3D Effects/Drop Shadow. Vertical -16, Horizontal 0, Opacity 60, Blur 16, color #000000.
7. Effects/3D Effects/Drop Shadow. Vertical 16, Horizontal 0, Opacity 60, Blur 16, color #000000.
8. Layers/New Raster Layer. Selections/Select All.
9. Open Abstract Colorful Background Vector Graphic.pspimage. Copy/Paste into Selection. Deselect.
10. Set Blend Mode to Luminance (Legacy).
11. Effects/Edge Effects/Enhance.
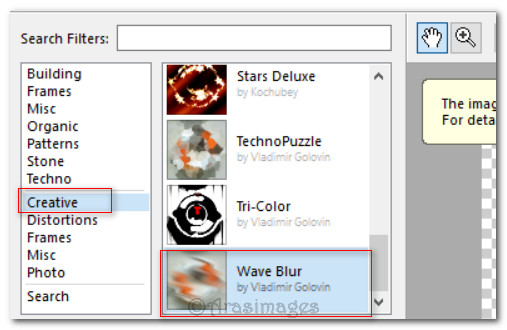
12. Effects/Filter Forge 2. Set Filter to Creative/Wave Blur.
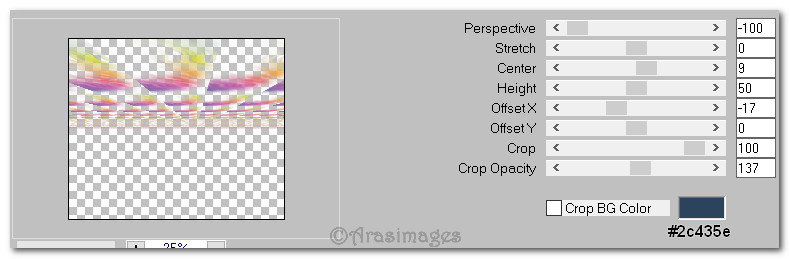
13. Effects/Mura Meister's/Perspective Tiling.
14. Image/Flip/(Flip Vertical. Pull down so it covers bottom half of image).
15. Adjust/Blur/Guassian Blur, Radius set to 5.
16. Effects/Edge Effects/Enhance.
17. Duplicate. Merge/Merge Down.
18. Layers/New Raster Layer.
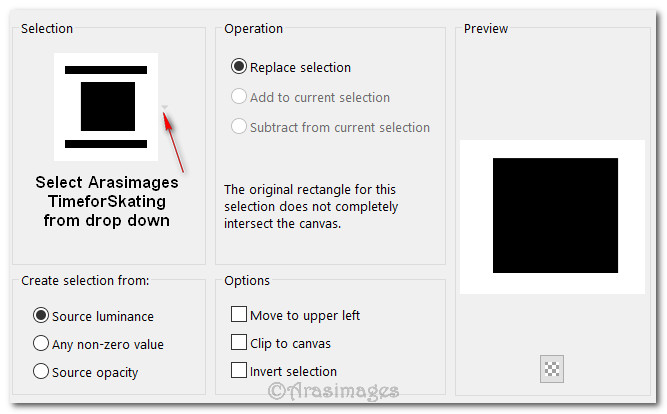
19. Selections/Load/Save Selection. Load Selection from Disk. Choose ArasimagesTimeforSkating from drop down. Load.
20. Open SnowyBG.png. Copy/Paste into Selection.
21. Lower Opacity down to 70.
22. Effects/Edge Effects/Enhance More. Deselect.
23. Image/Add Borders/Add 3px border, Symmetric Checked, color #ffffff.
24. Image/Add Borders/Add 5px border, Symmetric checked, color #000000.
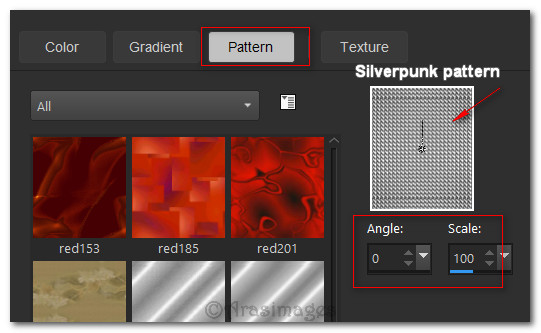
25. With Magic Wand, click to activate the 5px border. In Materials Palette, change foreground to Silverpunk pattern. Flood fill 5px border.
26. Effects/Edge Effects/Enhance. Deselect.
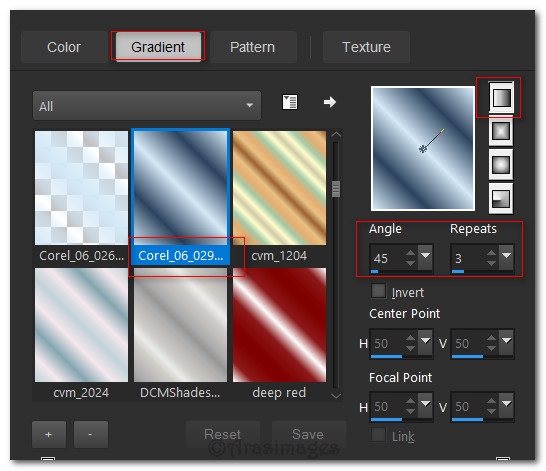
27. In Materials Palette, create a gradient using the Foreground color #d4e8f6/Background color #2c435e, Style Linear, Invert unchecked, Angle 45, Repeats 3, Center Point/Focal Point grayed out.
28. Image/Add Borders/Add 30px border, Symmetric checked, color #ffff00.
29. Using Magic Wand, click to activate the 30px border. Change to the Gradient you just made and flood fill.
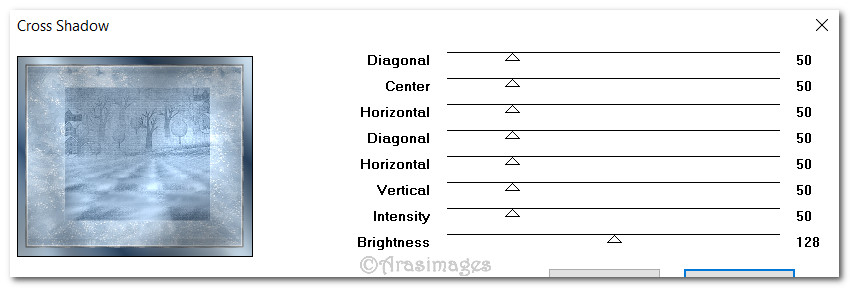
30. Effects/Graphics Plus/Cross Shadow.
31. Selections/Select None.
32. Image/Add Borders/Add 5px border, Symmetric checked, color #ffffff.
33. With Magic Wand, click to activate the 5px border. In Materials Palette, change foreground to Silverpunk pattern. Flood fill 5px border.
34. Effects/Edge Effects/Enhance. Deselect.
35. Image/Add Borders/Add 3px border, Symmetric checked, color #ffffff.
36. Add your name or watermark here if you wish.
37. Merge/Merge Visible. Save as Background.png.
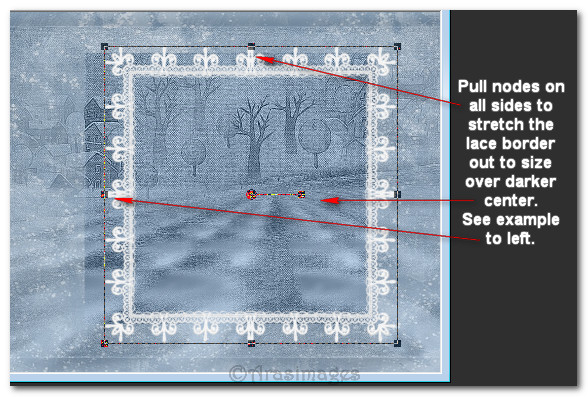
38. Open 0_70w74_a01dd0a5L.png. Copy/Paste as New Layer.
39. Using the Pick Tool pull on nodes on all four sides to enlarge the lace border.
40. Objects/Align/Center in Canvas. Go back to the Move Tool.
41. Effects/Edge Effects/Enhance.
42. Effects/3D Effects/Drop Shadow. Vertical -12, Horizontal -12, Opacity 75, Blur 15, color #2c435e.
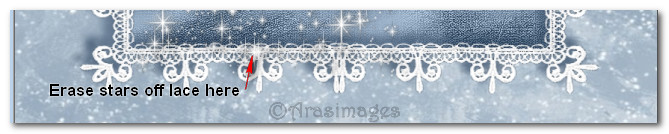
43. Open Star Tree.pspimage. Copy/Paste as New Layer.
44. Move to left side within the lace frame. Erase excess off lace at the bottom.
45. Adjust/Sharpen/Sharpen More.
46. Open Skates.png image. Copy/Paste as New Layer.
47. Move skates to the bottom left corner inside the lace border.
48. Layers/New Raster Layer.
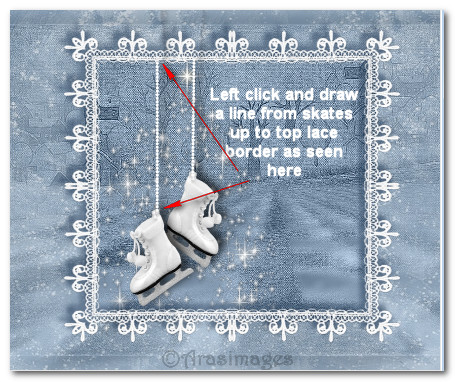
49. Using the Pen tool set to Line style: Vyp_point/Width 2.00, and the Foreground set to #ffffff (white), draw a line starting at the top of left skate up to the lace top border. Left click to start and end. Do the same with the right skate.

50. Effects/3D Effects/Drop Shadow. Vertical 0, Horizontal 10, Opacity 60, Blur 15, color #000000.
51. Open SkateBows.png. Copy/Paste as New Layer.
52. Move the bows over the tops of the dotted lines.
53. Open woman_832_franiemargot.pspimage. Copy/Paste as New Layer.
54. Move lady to right side of image. Adjust/Sharpness/Sharpen.
55. Using the Color Changer tool and having the Foreground color set to #ffffff, left click once on her coat to change its color.
56. Effects/3D Effects/Drop Shadow. Vertical -16, Horizontal 35, Opacity 40, Blur 24, color #000000.
57. Open SCR57.png. Copy/Paste as New Layer.
58. Place ribbon in top left corner. Adjust/Sharpness/Sharpen.
59. Effects/3D Effects/Drop Shadow. Vertical -16, Horizontal 35, Opacity 40, Blur 24, color #000000.
60. Close off bottom Merged Background layer.
61. Highlight the top layer and Merge/Merge Visible. Save it as a .png file naming it Top Layer.
62. Open the Animation Shop program.
63. File/Open. Open big BG snow.gif. Click on first frame. Edit/Select All. Right click on top/Copy.
64. File/Open. Open Background.png file. Duplicate it 35 times so you have 36 frames in all.

65. Click in first frame. Edit/Select All.
66. Right click in first frame. Paste/Into Selected Frame. Left click to set snow in place. Here you will carefully place the snowfall within the image frame several times until you have the snowfall you desire. I pasted snow in 5 times.
67. File/Open/open the Top Layer.png file. Edit/Propagate Paste.
68. Right click on top/Copy. Go back to your snowfall/Background image. Right click in first frame/Paste/Into Selection. Carefully place the Top Layer within the image frame and left click to set it in place, making sure the lady's legs are at the bottom touching the inner frame.
69. To check your animation, click on the View Animation tab in the top tool bar. If it is not what you want you can click the back arrow to undo your work and redo until you are satisfied.
70. File/Save As. When the Save As box appears, name where you will be saving it in the Save in: space. Place in the File name: Time for Skating. Leave Save as type as is. Click Save. Then as the boxes change, click Next three times and finally click Finish. Your image is now saved in your working folder.
Note: If this file is too large you may click Animation/Cull Animation and state how many frames you wish to have removed. This will make your file smaller for use in posting on Forums if there is a limit. Resave after resizing.
All done! I hope you enjoyed creating your snowfall tag.
This tutorial was checked by Evatexas and PamelaD. Thank you ladies for all of the work you do for this site.
If you are going to use this tutorial for stationery, cards or place the tutorial/tag on another site, I would appreciate you contacting me for permission, giving Arasimages credit for the original tutorial and if possible, a link back to my site. Thank you.
Copyright © Arasimages All Rights Reserved