
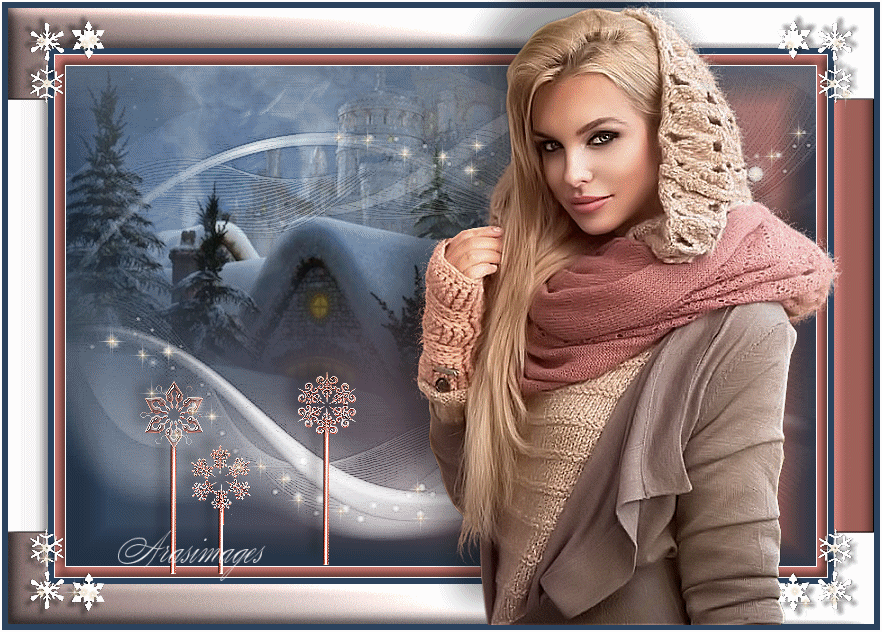
Baby it's Cold Outside
For an Italian, French, Dutch, Danish, Spanish and German translation, click on the flags.


For this tutorial you will need the materials in the zip file below.

Thank you to Nikita, Charliegraph, and Maryse for the lovely tubes used in this tutorial.
Unzip the materials into a working folder you have created on your desktop named Baby it's Cold Outside. Please duplicate and close original tubes. Use the copies for your work so you will not lose the originals. I have used the plugins Filter/Attacks, Flaming Pear/Flexify2, Simple/Top Left Mirror and ColorEfexPro3.0 for this tutorial. Export the Star Tube into your PSP/Picture Tubes folder. To work this tutorial, it is assumed you have some working knowledge of Paint Shop Pro.
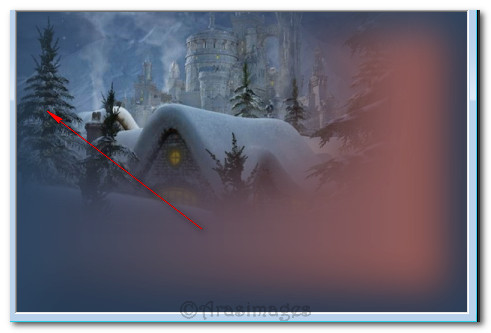
Use the snowflake below to mark your place along the way.

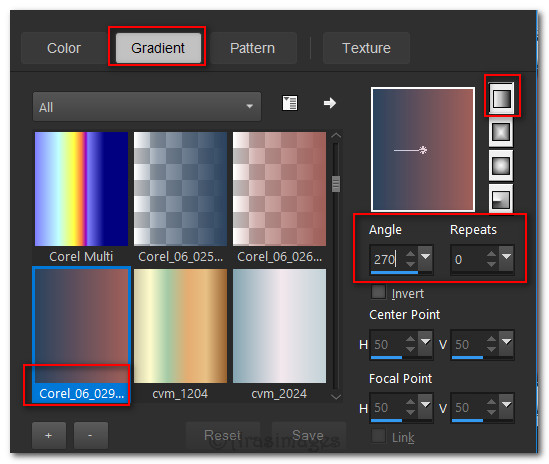
1. In Materials Palette, set Foreground to #a05f59, Background to #2c435e. Create a Gradient with these colors using Linear, Corel_06_029 Foreground/Background, Angle 270, Repeats 0, Invert unchecked, Center Point/Focal Point set to null.
2. New/New Image 750px by 500px. Flood fill with Background color.
3. Layers/New Raster Layer. Flood fill with Gradient.
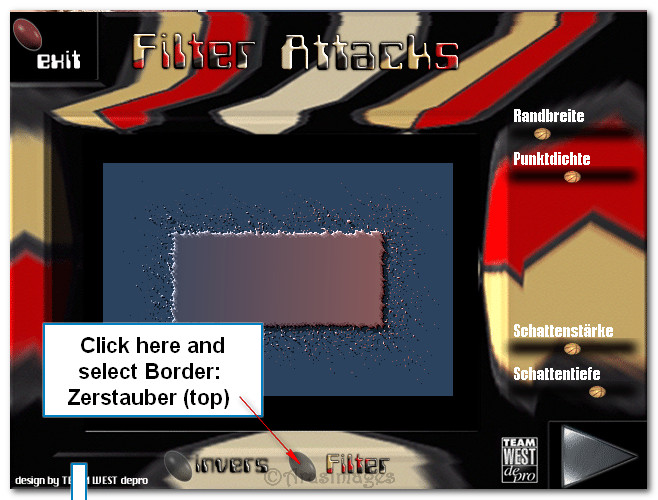
4. Effects/Filter Attacks/Border: Zerstauber. Click on top choice.
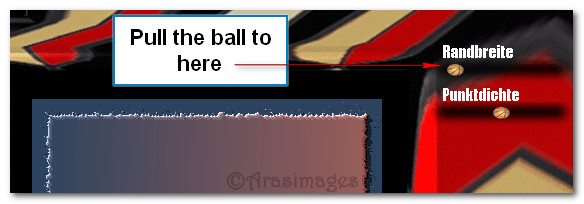
5. With mouse pull the ball under Randbreite to the left to make the center section larger.
6. Click on the large arrow on bottom right to apply.
7. Adjust/Blur/Gaussian Blur. Radius set to 33.
8. Open 13508436234_noel_nikita.png of background. Using Selection tool, select around watermark. Delete. Deselect.
9. Copy/Paste as New Layer.
10. Image/Resize/Resize by 110%/Resize all layers unchecked.
11. Adjust/Sharpness/Sharpen.
12. Move up and to left side so left pine tree is inside the border a bit.
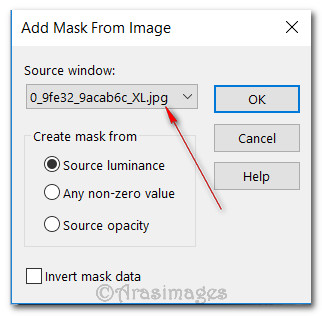
13. Open 0_9fe32_9acab6c_XL.jpg (Mask). Leave open on workspace. Highlight the working image.
14. Layers/New Raster Layer. Flood fill layer with #ffffff.
15. Layers/New Mask Layer/From Image. When the box opens, find the Mask name and click on it. Click OK.
16. Merge/Merge Group.
17. Image/Add Borders/Add 1px border, Symmetric checked, Color #ffffff.
18. Image/Add Borders/Add 10px border, Symmetric checked, Color #a05f59.
19. Using Magic Wand, select the 10px border.
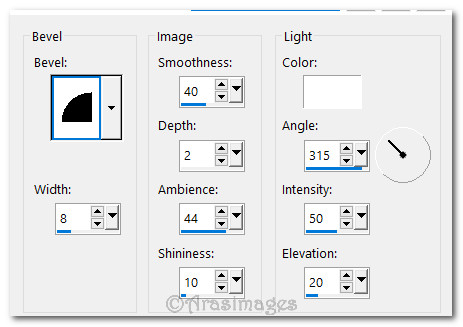
20. Effects/3D Effects/Inner Bevel.
21. Selections/Select None.
22. Image/Add Borders/Add 1px border, Symmetric checked, Color #ffffff.
23. Image/Add Borders/Add 5px border, Symmetric checked, Color #2c435e.
24. Image/Add Borders/Add 40px border, Symmetric checked, Color #ffffff.
25. Select 40px Border with Magic Wand.
26. In Materials Palette, change the Background color to #ffffff.
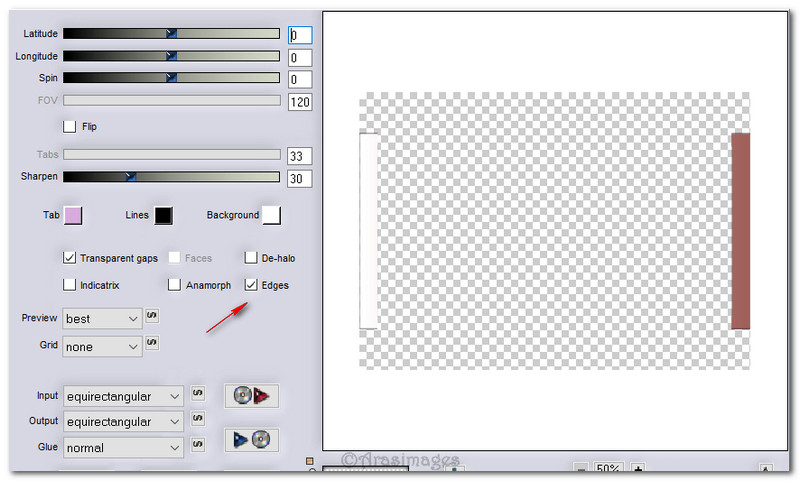
27. Flood fill with Gradient made. Image/Mirror. (Mirror/Horizontal).
28. Effects/3D Effects/Inner Bevel. Use same settings as in Step #20.
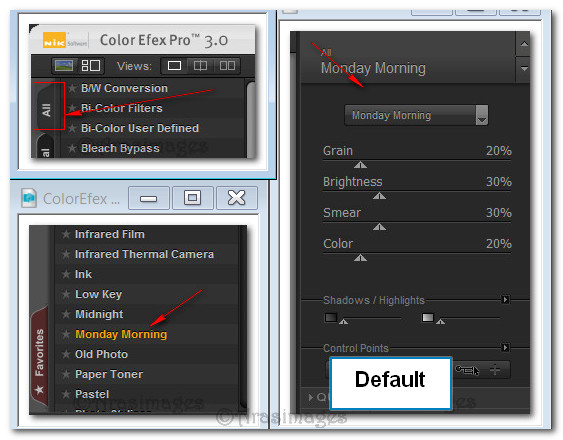
29. Effects/Nik Software/Color Efex Pro 3.0 Complete. Select All tab on left top side. In the list, select Monday Morning with default settings on right. Click OK to apply.
30. Selections/Defloat.
31. Layers/New Raster Layer. Flood fill with Gradient.
32. Effects/Flaming Pear/Flexify2.
33. Effects/3D Effects/Inner Bevel. Use same settings as in Step #20.
34. Selections/Select None.
35. Image/Add Borders/Add 6px border, Symmetric checked, Color #2c435e.
36. Image/Add Borders/Add 2px border, Symmetric checked, Color #ffffff.
37. Open ch_XmanSnowFlakes_pins.png. Using Selections/Freehand Selections tool set Point to Point, Feather 0, select around two snowflakes on left. Copy/Paste as New Layer on main image. Deselect.

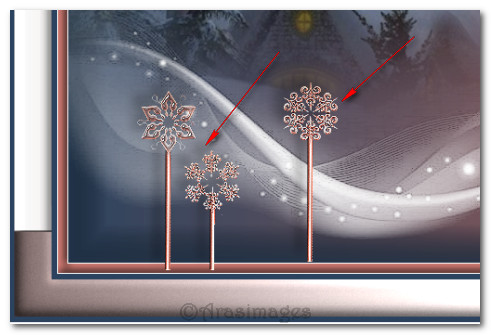
38. Select around snowflake on right. Copy/Paste as New Layer on main image.
39. Place snowflakes in the left bottom corner as seen in example below.
40. Merge/Merge Down. Effects/Edge Effects/Enhance.
41. Effects/3D Effects/Drop Shadow. Vertical -11, Horizontal -11, Opacity 40, Blur 15, color #000000.
42. Open MR_Autum Portrait by Artur K.pspimage. Using Selections tool, select around the watermark. Delete. Deselect.
43. Image/Mirror. (Mirror/Horizontal). Copy/Paste as New Layer.
44. Image/Resize/Resize by 90%/Resize all layers unchecked.
45. Effects/3D Effects/Drop Shadow. Vertical -24, Horizontal -26, Opacity 40, Blur 44, color #000000.
46. Adjust/Sharpness/Sharpen. Sharpness/Sharpen More.
47. Place lady down to the bottom blue 6px border and to the left into 40px border.
48. Sign your name or leave your watermark. Merge/Merge Visible.
49. Open ch-snowflakes2.pspimages. Select a snowflake of your choice/Copy/Paste as New Layer. Repeat with two more snowflake of your choice.
50. Place the three snowflakes in the top left corner similar to mine.
51. Merge/Merge Down twice so snowflakes are on one layer.
52. Effects/3D Effects/Drop Shadow. Vertical -5, Horizontal -5, Opacity 40, Blur 5, color #000000.
53. Effects/Simple/Top Left Mirror.
54. Merge/Merge Visible.
55. Duplicate twice having three layers in all. Close off bottom and middle layer.
56. Make certain top layer is highlighted.
57. From tool bar select the Tube tool. Choose Star Tube/Scale 15.

58. Using Size 15, left click on numerous stars in the Mask area, snowflakes and in her eye (scroll image larger to get it in the eye's white spot).
59. Change Scale to 20. Close off top layer. Open middle layer/highlight it and click in several places on stars and snowflakes again and once more in her eye.
60. Change Scale to 25. Close off middle layer. Open bottom layer/highlight it and click in several places on stars and snowflakes again.
61. Open all layers and File/Save as PSP Animation Shop (*psp) file giving it a name.
62. Open Animation Shop program. File/Open the file you just saved.
63. Edit/Select All. Click on View Animation to check how fast the stars are sparkling. Click on Animation/Frame Properties and set Display time to 20. The higher the number, to slower the stars will sparkle so set it differently if you wish.
64. Now we will save the work. File/Save As. Save in: Baby its Cold Outside folder, File name: Baby its Cold Outside and leave Save as type as is. Click Save.

65. Another box will come up and you will click Next. Two more times and then Finish.
This tutorial was tested December 28, 2016 by Evatexas. Thanks dear friend!
If you are going to use this tutorial for stationery, cards or place the tutorial/tag on another site, I would appreciate you contacting me for permission, giving Arasimages credit for the original tutorial and if possible, a link back to my site. Thank you.
Copyright © Arasimages All Rights Reserved