
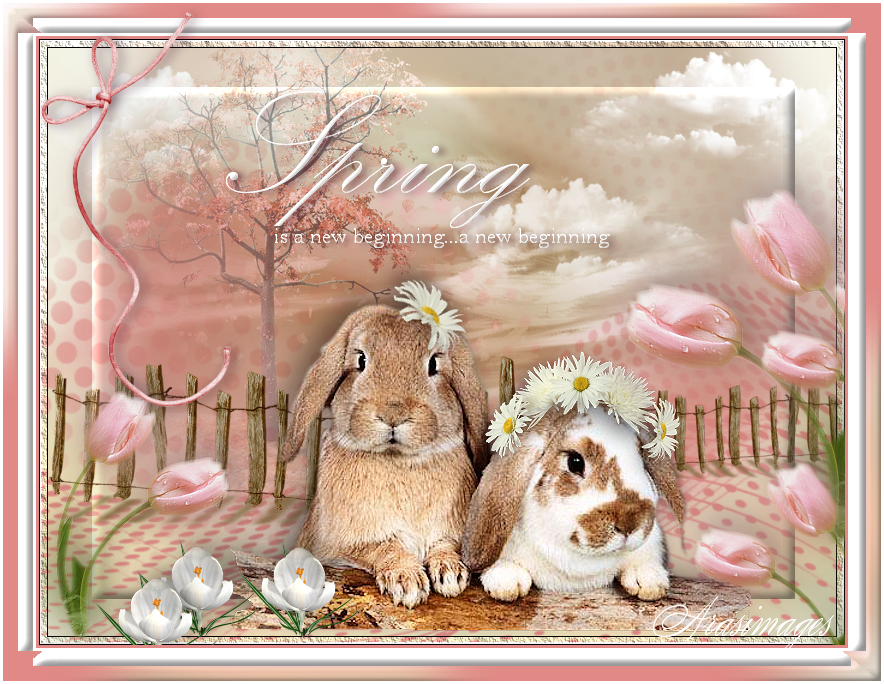
Spring
For translation, click on the flags.


For this tutorial you will need the materials in the zip file below.

Thank you to Yunadesign.com, Prestige Tubes/Tube par T chounette and the unknown tubers for the beautiful tubes and scrap tubes used in this tutorial.
Unzip the materials into a working folder you have created on your desktop named Spring. Please duplicate and close original tubes. Use the copies for your work so you will not lose the originals. Place the Selection in your PSP/Selections folder. Place Gradient in your PSP/Gradients folder. I have used the plugins Filters Unlimited 2.0/AFS IMPORT/MIRRBEVL, Eye Candy 3.1/Perspective Shadow, AAA Frames/Texture Frames and Neology/Transparent Pizza for this tutorial. Note that all Inner Bevel settings are the same as in Step #28 throughout tutorial.
Use the pin below to mark your place along the way.
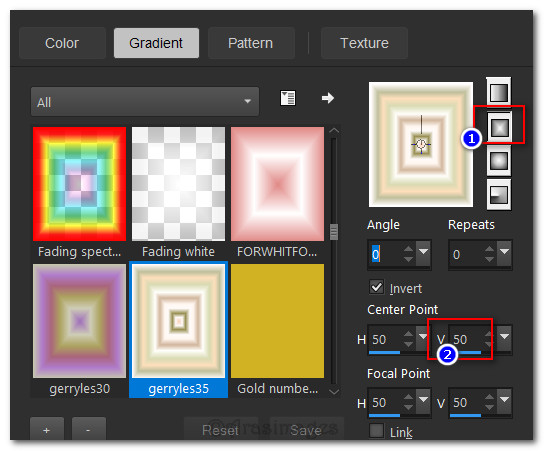
1. In Materials Palette, set Foreground to Gradient/gerryles35, Background to #e08986. Have the Gradient set to Style Sunburst, Angle 0, Repeats 0, Invert checked, Center Points H 50/V 0/ Focal Points H 50, V 50.
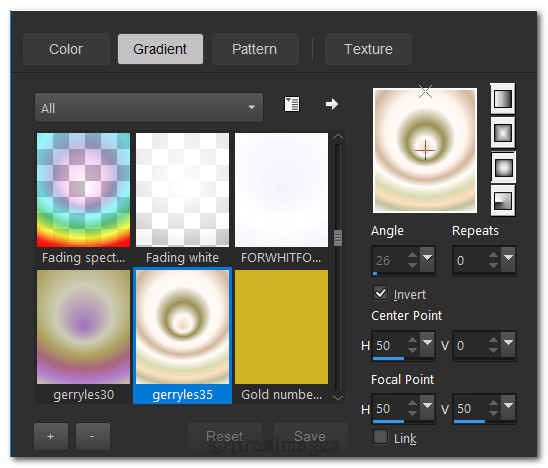
2. New/New Image 800px by 600px. Flood fill with gerryles35 Gradient.
3. Adjust/Blur/Gaussian Blur. Radius set to 30.
4. Layers/New Raster Layer.
5. Flood fill with background color #e08986.
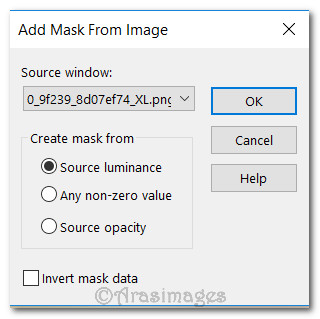
6. Open 0_9f239_8d07ef74_XL.png Mask. Highlight the working image.
7. Layers/New Mask Layer/From Image. Select the Mask that you opened and click OK.
8. In Layers Palette right click on Mask layer/Merge/Merge Group.
9. Layers/New Raster Layer. Flood fill with background color #e08986.
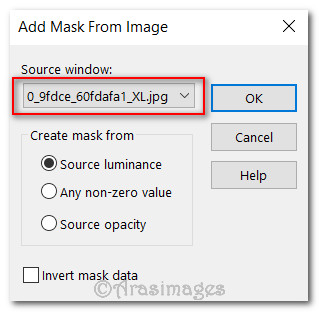
10. Open 0_9fdce_60fdafa1_XL.png Mask. Highlight the working image. Layers/New Mask Layer/From Image. Select the Mask that is now open and click OK.
11. In Layers Palette right click Mask layer/Merge/Merge Group.
12. Open 0-9c3c4-fb9ba295-XXL.png of tree. Copy/Paste as New Layer.
13. Image/Resize/Resize by 80%/Resize all layers unchecked.
14. Drop Opacity down to 50%. Move the tree scene upwards a bit.
15. Open 0_8f753_9d2686e9_XXL.png of fence. Copy/Paste as New Layer.
16. Image/Resize/Resize by 48%/Resize all layers unchecked.
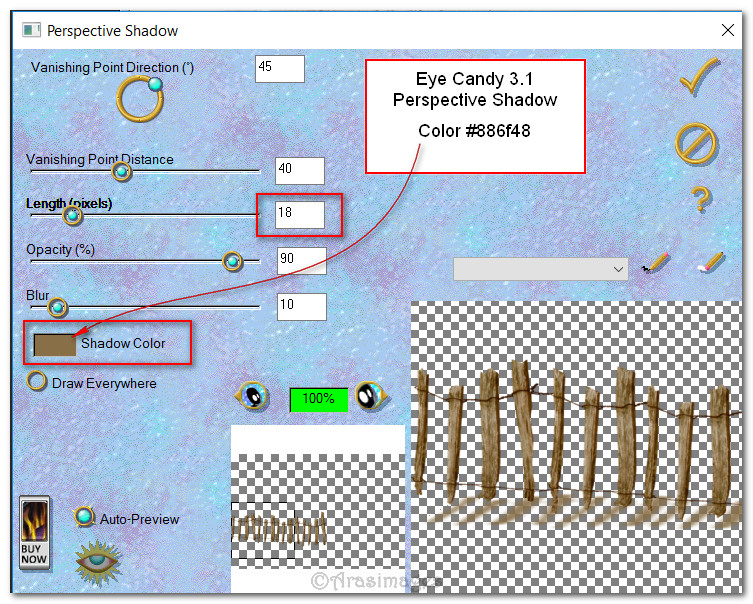
17. Effects/Eye Candy 3.1/Perspective Shadow. Use setting as seen below.
18. Adjust/Sharpness/Sharpen.
19. Duplicate. Image/Mirror.
20. Image/Resize/Resize by 60%/Resize all layers unchecked.
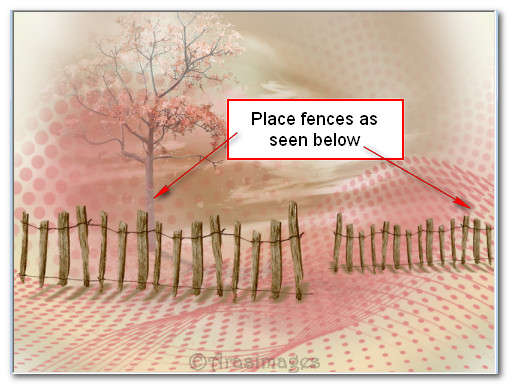
21. Move fences so they are as seen below.
22. Open 0_88145_63e194ec_M.png of clouds. Copy/Paste as New layer.
23. Place first cloud in upper right corner. Duplicate. Image/Mirror. Place second cloud in center of image.
24. Drop Opacity down to 75% on second cloud in center.
25. Duplicate. Raise Opacity to 100%. Move third cloud to left side of image.
26. Pull third cloud below Raster 2 layer of tree scene. Go back to top layer to continue.
27. Image/Add Borders/Add 3px border, Symmetric checked, color #ffffff.
28. Select the 3px border with the Magic Wand to activate it. Effects/3D Effects/Inner Bevel. Selections/Select None.

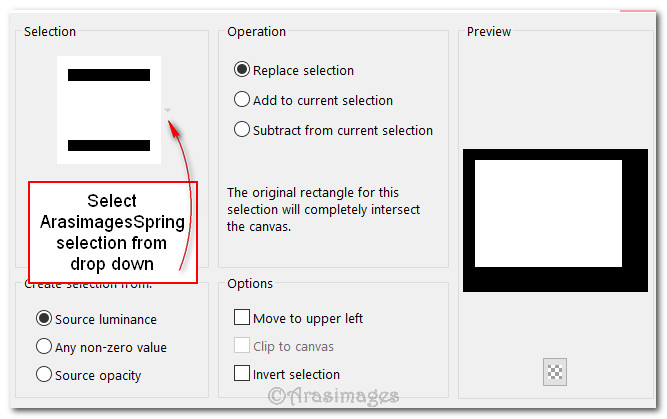
29. Selections/Load/Save Selection/Load Selection from Disk. Choose ArasimagesSpring selection from drop down. Load.
30. Effects/3D Effects/Inner Bevel.
31. Selections/Select None.
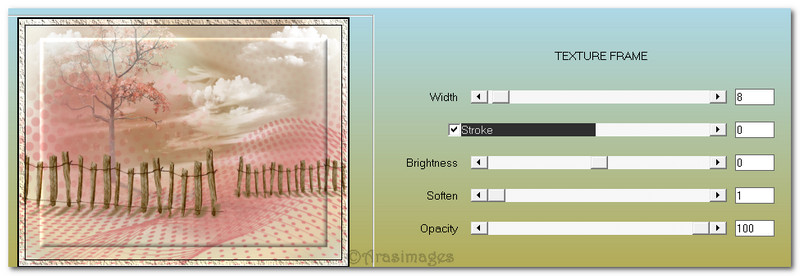
32. Effects/AAA Frames/Texture Frames. Change Width to 8 leaving all other settings at default.
33. Open TCH-Ferme_004.pspimage of rabbits. Copy/Paste as New Layer.
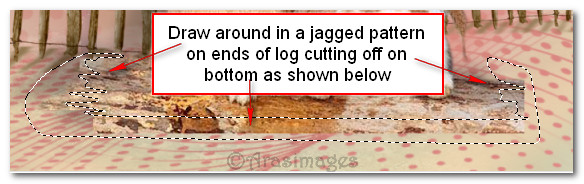
34. Scroll the image larger for easier selection. Using the Freehand Selections tool set Point to Point, Feather 0, select in a jagged pattern on both ends of log and taking off part of the log on the bottom. Press Delete key. If you are satisfied that the log looks natural then Deselect. If you need to do it over press CTRL+D and start over with selection, then Delete. Deselect.

35. Effects/3D Effects/Drop Shadow. Vertical -10, Horizontal -8, Opacity 40, Blur 30, color #000000.
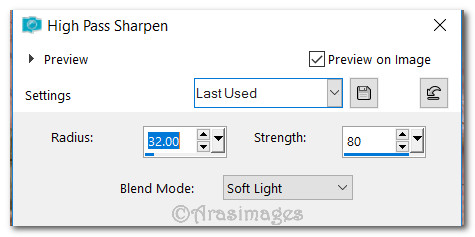
36. Adjust/Sharpness/High Pass Sharpen.
37. Image/Resize/Resize by 120%/Resize all layers unchecked. Move the rabbits to the bottom texture border a little to center right.
38. Adjust/Sharpness/Sharpen.
39. Open Single Daisy.png. Copy/Paste as New Layer.
40. Using the Pick tool, grab the outer node when it shows double arrows and turn upward to the left until the daisy is turned so it sets on the rabbit's head nicely. Set Pick tool back to Move tool.

41. Effects/3D Effects/Drop Shadow. Vertical -10, Horizontal -8, Opacity 50, Blur 30, color #000000.
42. Adjust/Sharpness/Sharpen. Move single daisy so it sets on right side of left rabbit's head.
43. Open 0_479ed_fecb79cd_XL.pspimage of daisy crown. Copy/Paste as New Layer.
44. Image/Resize/Resize by 30%/Resize all layers unchecked.
45. Effects/3D Effects/Drop Shadow. Vertical 10, Horizontal -8, Opacity 50, Blur 30, color #000000.
46. Adjust/Sharpness/Sharpen. Move daisy crown on top of the right side rabbit's head.
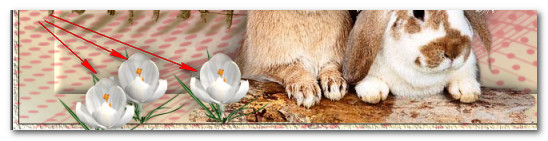
47. Open 0_52584_56e3a29b_L.pspimage of white Crocus. Copy/Paste as New Layer.
48. Image/Resize/Resize by 25%/Resize all layers unchecked.
49. Effects/3D Effects/Drop Shadow. Vertical -10, Horizontal 8, Opacity 30, Blur 30, color #000000.
50. Duplicate twice having three Crocus in all. Move them to the bottom left side of image as seen below.
51. Open Tube_Yuma_Fleur33.pspimage of tulips. Copy/Paste as New Layer.
52. Image/Resize/Resize by 70%/Resize all layers unchecked.
53. Effects/3D Effects/Drop Shadow. Vertical -10, Horizontal 8, Opacity 30, Blur 30, color #000000.
54. Move pink tulips into bottom left corner.
55. Paste tulips as New Layer again. Image/Mirror. Repeat drop shadow.
56. Move into center right side of image so only part of the tulips are showing.
57. Paste tulips as New Layer again. Image/Mirror. Repeat drop shadow.
58. Image/Resize/Resize by 70%/Resize all layers unchecked.
59. Move to bottom right corner.
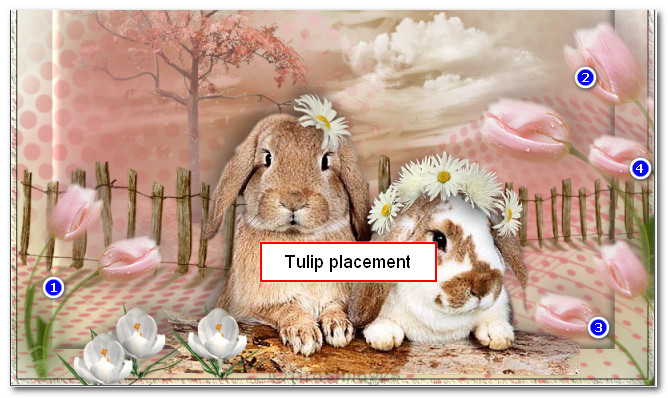
60. Duplicate. Move so only one tulip is showing between the two larger ones in right middle side of image. See below for tulip placement.
61. Click on Text tool and select Font Kunstler Script, Size 150px, color #ffffff, Stroke width 0.0 and type out the word "Spring". Convert to Raster Layer.

62. Select Font Bell MT, Size 22, Font color #ffffff, Sharp/Anti-alias, Stroke width: 0.0. Type out the words "is a new beginning...is a new beginning". Convert to Raster Layer.
63. Place "is a new beginning text in center and the word "Spring" above them. Merge/Merge Down.
64. Selections/Select All. Selections/Float. Selections/Defloat.
65. Effects/3D Effects/Inner Bevel. Use same inner bevel as you did earlier in this tutorial. Selections/Select None.
66. Effects/3D Effects/Drop Shadow. Vertical 2, Horizontal 5, Opacity 71, Blur 12, color #3c081b.
67. Image/Add Borders/Add 3px border, Symmetric checked, color #e08986.
68. Image/Add Borders/Add 3px border, Symmetric checked, color #ffffff.
69. Image/Add Borders/Add 30px border, Symmetric checked, color #e08986.
70. With Magic Wand, select the 30px border to activate it.
71. Layers/New Raster Layer. Flood fill with Gradient foreground.
72. Effects/Neology/Transparent Pizza.
![]()
73. Adjust/Blur/Gaussian Blur. Radius 25.
74. Effects/3D Effects/Inner Bevel. Use same inner bevel as you did earlier in this tutorial. Leave selected.
75. Image/Add Borders/Add 3px border, Symmetric checked, color #ffffff.
76. In Materials Palette change gradient Center Point Vertical to 50, Style to Rectangular.
77. Layers/New Raster Layer. Flood fill with new gradient setting. Selections/Select None.
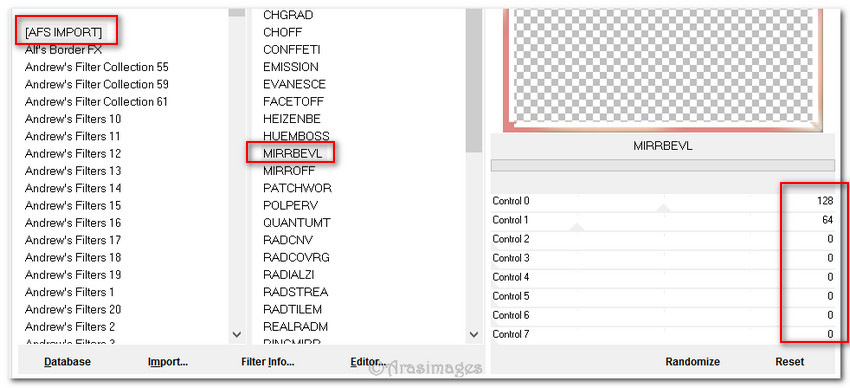
78. Effects/Filters Unlimited 2.0/AFS IMPORT/MIRRBEVL.
79. Using Magic Wand, select all four sides of the inner white border.
80. Effects/3D Effects/Inner Bevel. Use same inner bevel as you did earlier in this tutorial.
81. Selections/Invert. Press Delete key. Deselect.
82. Open 0_73b51_c5a86d2e_XL.png of bow. Copy/Paste as New Layer.
83. Adjust/Sharpness/High Pass Sharpen. Place bow in upper left corner.
84. Effects/3D Effects/Drop Shadow. Vertical 2, Horizontal 5, Opacity 71, Blur 12, color #3c081b.
85. Merge/Merge Visible. Add your name or watermark if you wish and save your file.
This tutorial was tested March 17 2017 by PamelaD and Evatexas. Thanks ladies!
If you are going to use this tutorial for stationery, cards or place the tutorial/tag on another site, I would appreciate you contacting me for permission, giving Arasimages credit for the original tutorial and if possible, a link back to my site. Thank you.
Copyright © Arasimages All Rights Reserved