Woodland Magic
For a French, Spanish, Italian, German, Dutch and Danish translation, click on the flags.


For this tutorial you will need the materials in the zip file below.

Thanks go to PamelaD and EvaTexas of Arasimages for their lovely tubes used in this tutorial. You can find them and more new tubes on my Tubes link on this site. Thanks also to Simone for her beautiful animations.
Unzip the materials into a working folder you have created on your desktop named Woodland Magic. Please duplicate and close original tubes. Use the copies for your work so you will not lose the originals. Place the Woodland Magic Backlight.f1s preset in your PSP/AlienSkin/Eye Candy 5/Impact/Settings folder/Backlight. (It will then automatically show up in the Impact effects list). Place the White Beads Pattern in your PSP/Patterns folder. I have used the plugins AAA Frames/Frameworks, Andromeda/Perspective, Flaming Pear/Flexify2 and the program Animation Shop in this tutorial. It is assumed you have a working knowledge of PSP to follow these directions. I have used PSPX9 for this tutorial but other versions may be used.
Use the rabbit below to mark your place along the way.
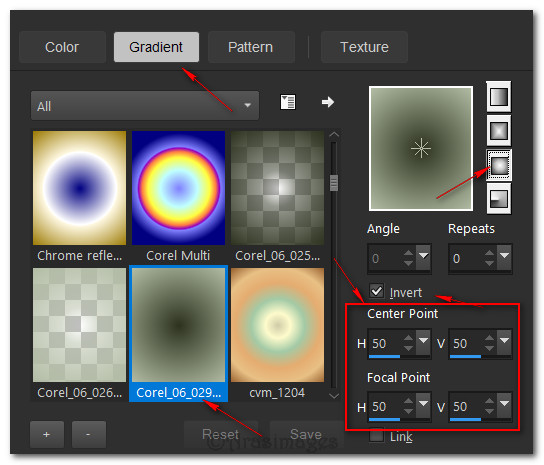
1. In Materials Palette, set Foreground to #b2bca4, Background to #2c321e. Create a Gradient using these colors, Gradient Corel_06_029 (foreground/background), Style Sunburst, Angle 0, Repeats 0, Invert checked, Center Points/ Focal Points all set at 50.
2. New/New Image 850px by 700px. Flood fill with Gradient.
3. Open Woodpath_CourtesyofPDPhoto.org.pspimage. Copy/Paste as New Layer. Lower Opacity down to 75. Pull to right side of image.
4. Duplicate. Image/Mirror/Mirror Horizontal. Pull to the left as seen here. Merge/Merge Down and close off the layer.
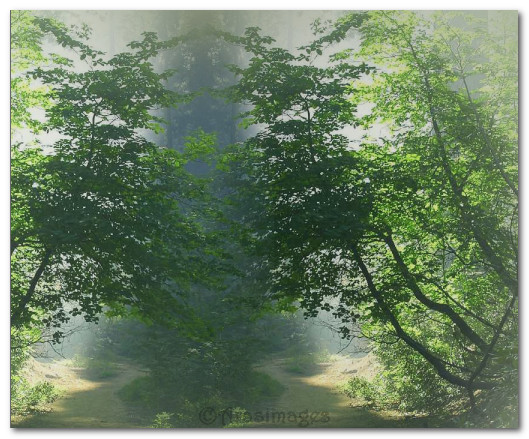
5. Open GirlFairy.pspimage. Copy Blur of Background.
6. Layers/New Raster Layer. Selections/Select All. Paste into Selection. Deselect.
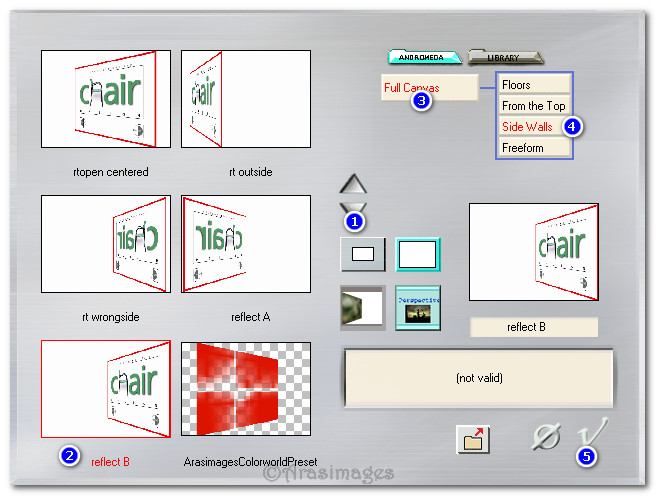
7. Effects/Andromeda/Perspective. Click on Presets in top right corner. When the next box and below images show, click on the center down arrow (1), then on reflect B, (2)/Full Canvas (3)/Side Walls (4), then click on the check mark (5) at bottom right. When a second box appears, click on the check mark again to apply.
8. Duplicate. Image/Mirror/Mirror Horizontal.
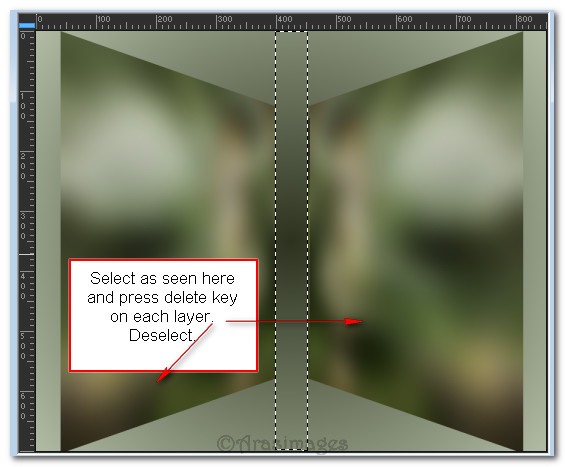
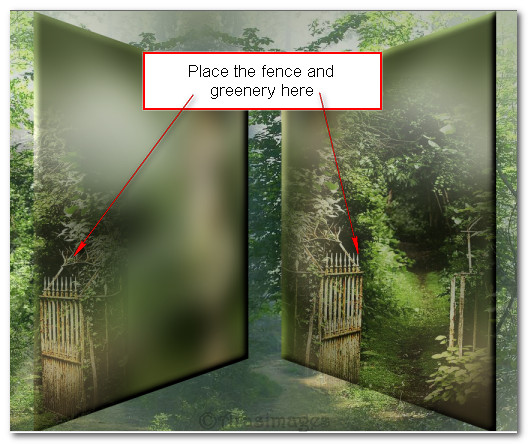
9. Move each perspective rectangle inward by 40px. Using Selection tool set to rectangle, on Copy of Raster 3, select the center from 400px to 450px. Press Delete key once. Move down to Raster 3 and press Delete key once. Deselect.
10. Effects/3D Effects/Inner Bevel.
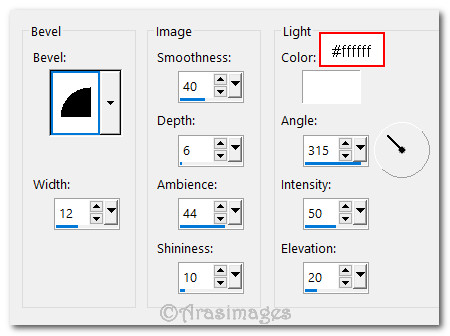
11. Move up to Copy of Raster 3 (top layer) and repeat the Inner Bevel.
12. Open the layer of the background trees at this step.
13. Open TrollPathway.pspimage. Copy/Paste as New Layer.
14. Drop Opacity down to 61. Move to right side of image within the perspective rectangle.
15. Duplicate. Image/Mirror/Mirror Horizontal.
16. Move to left side of image within the perspective rectangle. Drop Opacity to 48.
17. Layers/New Raster Layer. In Materials Palette, unchecked the Invert. Flood fill the new raster layer with the gradient.
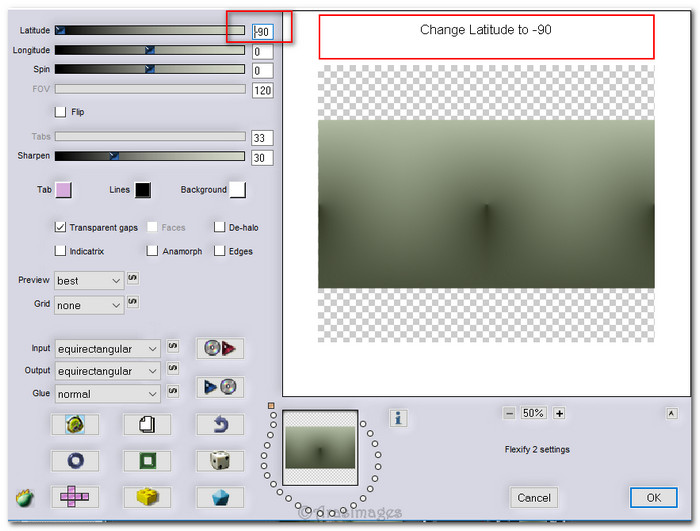
18. Effects/Flaming Pear/Flexify 2. Set Latitude to -90.
19. Effects/Geometric Effects/Circle.
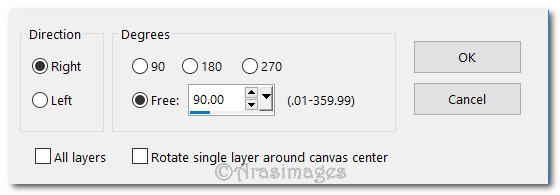
20. Image/Free Rotate. Rotate Right by 90 degrees.
21. Effects/3D Effects/Drop Shadow. Vertical 0, Horizontal 31, Opacity 40, Blur 40, color #000000.
22. Effects/3D Effects/Drop Shadow. Vertical -31, Horizontal 0, Opacity 40, Blur 40, color #000000.
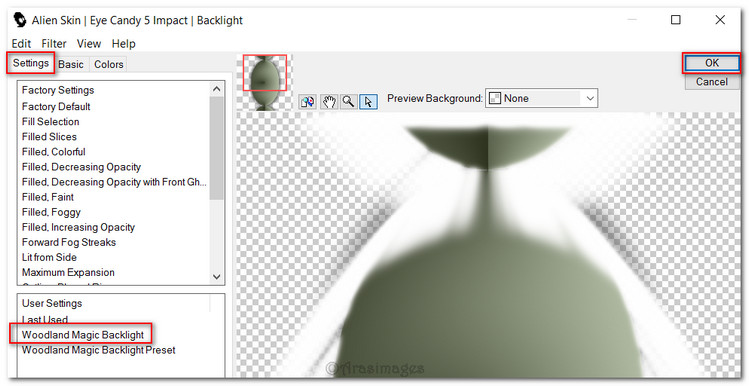
23. Duplicate. Working on first layer of Geometric circle: Effects/AlienSkin/Eye Candy 5/Impact/Backlight. Click Settings and choose Woodland Magic Backlight. Click OK.
24. Drop the Opacity of the backlight down to 65.
25. The backlight is only behind the first layer of the geometric circle. The duplicated layer does not have the backlight. Go up to the duplicated top layer to continue.
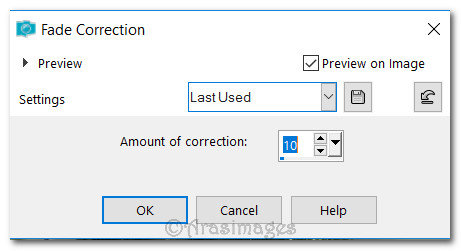
26. Adjust/Color/Fade Correction on duplicated layer.
27. Open GirlFairy.pspimage. Copy/Paste as New layer.
28. Image/Resize/Resize by 110%/Resize all layers unchecked.
29. Adjust/Sharpness/Sharpen. Duplicate.
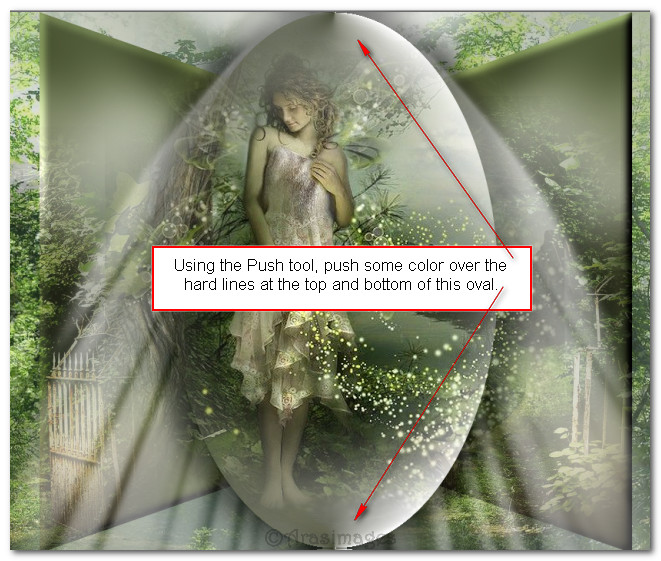
30. Using the Push tool, push some color over the hard lines at the top and bottom of this oval.
31. Open Doll_215.psp image. Copy/Paste as New Layer.
32. Image/Resize/Resize by 37%/Resize all layers unchecked.
33. Adjust/Sharpness/Sharpen. Lower Opacity down to 87. Place rabbit in lower left corner near the fairy's feet.
34. Effects/3D Effects/Drop Shadow. Vertical 0, Horizontal -31, Opacity 46, Blur 21, color #000000.
35. Image/Add Borders/Add 3px border, Symmetric checked, color #2c321e.
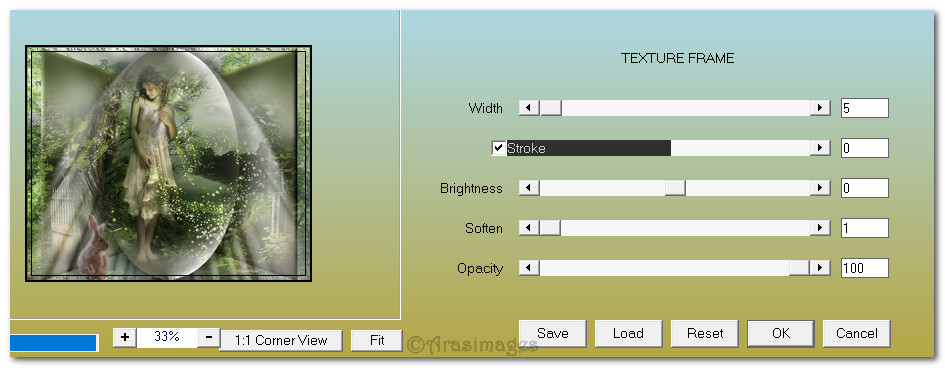
36. Effects/AAA Frames/Texture Frame.
37. Image/Add Borders/Add 5px border, Symmetric checked, color #b2bca4.
38. Image/Add Borders/Add 3px border, Symmetric checked, color #2c321e.
39. Image/Add Borders/Add 10px border, Symmetric checked, color #ffffff.
40. Activate the 10px frame using the Magic Wand by clicking on it.
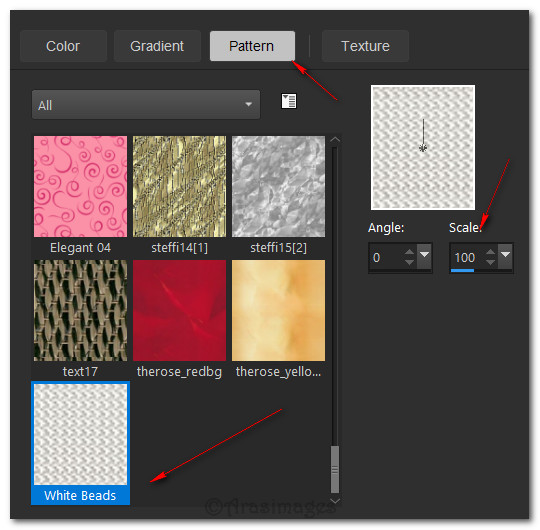
41. In Materials Palette, select Pattern/White Beads. Angle 0, Scale 100. Flood 10px border with Pattern.
42. Effects/Edge Effects/Enhance. Deselect.
43. Image/Add Borders/Add 3px border, Symmetric checked, color #2c321e.
44. Image/Add Borders/Add 5px border, Symmetric checked, color #b2bca4.
45. Image/Add Borders/Add 3px border, Symmetric checked, color #2c321e.
46. Open Deco_35.pspimage. Copy/Paste as New Layer.
47. Effects/3D Effects/Drop Shadow. Vertical 0, Horizontal -16, Opacity 46, Blur 16, color #000000.
48. Place Deco in upper left corner.
49. Layers/New Raster Layer. Apply your name or watermark if you wish and Merge/Merge Visible.
50. Save your work as a .jpg file, giving it the name of Woodland Magic.
OPTIONAL ANIMATION DIRECTIONS BELOW.
51. Open Animation Shop. File/Open. Go to where you saved your Woodland Magic.jpg file and open it.
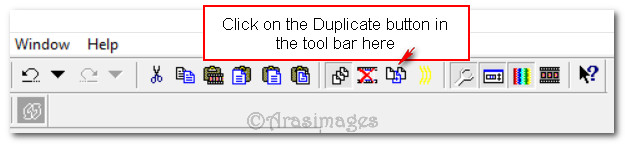
52. From the top tool bar, click on the Duplicate button until you have 18 frames in all. Highlight the first frame. Edit/Select All.
53. Open SimoneAni514_MNG file. Highlight first frame. Edit/Select All.
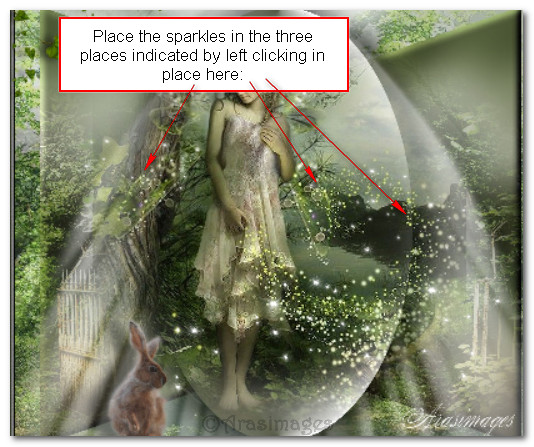
54. Right click on the top of the MNG frame/Copy. Go to the Woodland Magic first frame and right click/Paste/Into Selected Frame. Place the sparkles to the right of the rabbit. Left click to set them in place.
55. Open SimoneAni515_MNG file. Highlight first frame. Edit/Select All.
56. Right click on the top of the MNG frame/Copy. Go to the Woodland Magic first frame and right click/Paste/Into Selected Frame. Place the sparkles to the right of the fairy. Left click into place.
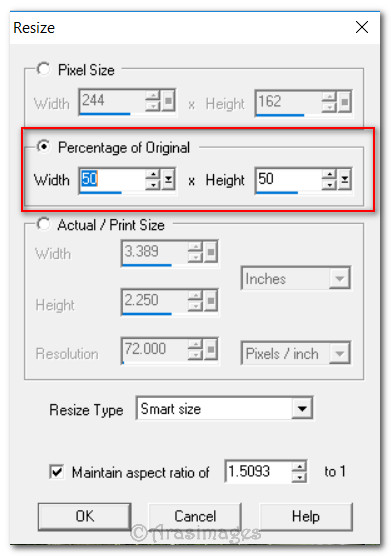
57. Highlight the first frame of SimoneAni515_MNG file. Edit/Select All. From the top tool bar click on Animation/Resize Animation. Click on the Percentage of Original and make it 50%. OK.
58. Make sure all frames are highlighted and right click the top bar/Copy. Go to the Woodland Magic first frame, right click/Paste/Into Selected Frame. Place approximately where indicated.
59. Click on the View Animation button in the top tool bar to check your work. If you are satisfied, then we will now save it.
60. File/Save As. When the box appears asking you to name where to save it, give it a name and keep the .gif type, fill in as seen below. Click Save.
61. As the boxes appear, continue clicking Next, Next, Next then Finish. Your image is now saved as a .gif file in the folder you indicated (as in my case, Woodland Magic folder).
This tutorial was tested by PamelaD and Bikerchick (Sonjia) June 2017. Thanks ladies!
If you are going to use this tutorial for stationery, cards or place the tutorial/tag on another site, I would appreciate you contacting me for permission, giving Arasimages credit for the original tutorial and if possible, a link back to my site. Thank you.
Copyright © Arasimages All Rights Reserved