Entrapped
For a Danish, Dutch, Italian, French and Spanish translation, click on the flags.


For this tutorial you will need the materials in the zip file below.

Thank you Nikita for the lovely tube and the unknown tubers of the scraps used in this tutorial.
Unzip the materials into a new working folder you have created on your desktop named Entrapped. Duplicate and close original tubes. Use the copies for your work so you will not lose the originals. Place the Selection Joyce46 into your PSP Selections folder. Place the krisbigdot.sld into your PSP Files/Styled Lines folder and the Preset Shape 1209803261Psp.Shape into the PSP Files/Preset Shapes folder. (There are a lot of preset shapes in this file). I have used the Plugins dsb flux/radial, Simple/Top Left Mirror, Filters Unlimited 2.0/VM Instant Art/Spider Web, Vizros 4/Box, AFS IMPORT/sqborder2 and effects of PSP for this tutorial. I have used PSPX9 for this tutorial but other versions may be used.
Use the arrow below to mark your place along the way.

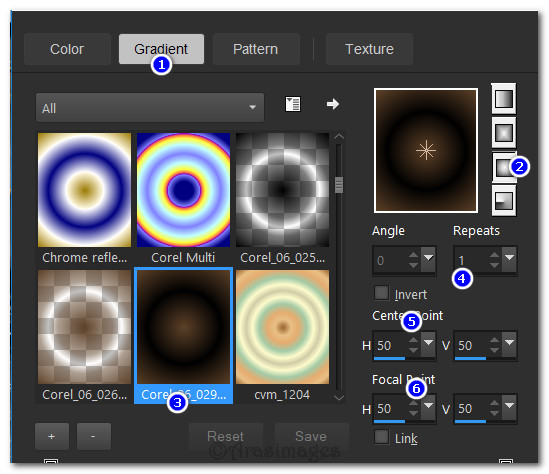
1. In Materials Palette, set Foreground to #5d4128 Background to #000000. Create a Gradient using these colors, Gradient Corel_06_029 (foreground/background), Style Sunburst, Angle 0, Repeats 1, Invert unchecked, Center Points/Focal Points all set to 50.
2. New/New Image 900px by 800px. Flood fill with Gradient.
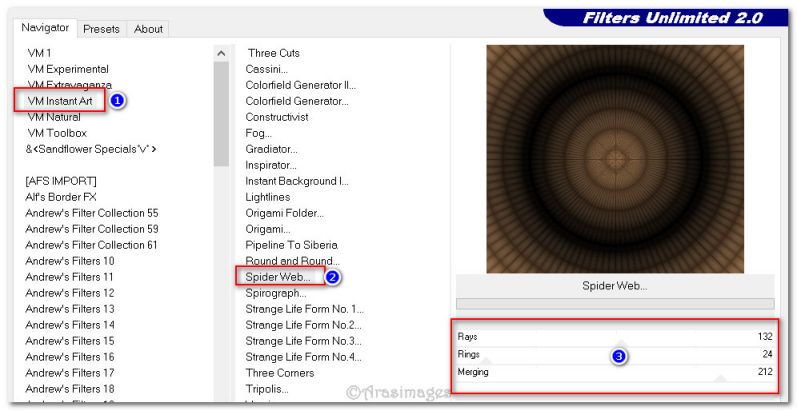
3. Effects/Filters Unlimited 2.0/VM Instant Art/Spider Web.
4. Effects/Edge Effects/Enhance.
5. Layers/New Raster Layer.
6. Selections/Load/Save Selection/Load Selection from Disk. From dropdown, choose Joyce46. Load.
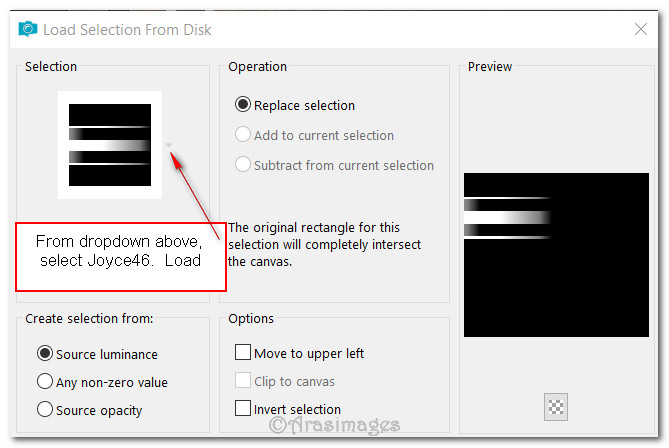
7. Flood fill with color #c29974. Selections/Select None.
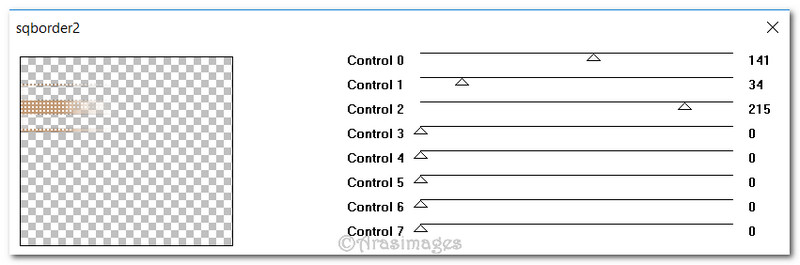
8. Effects/AFS IMPORT/sqborder2.
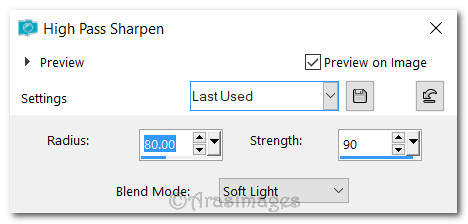
9. Adjust/Sharpness/High Pass Sharpen.
10. Duplicate. Image/Mirror/Mirror Horizontal. Image/Mirror/Mirror Vertical.
11. Merge/Merge Down. Repeat.
12. Layers/New Raster Layer. Flood fill with #000000 background color.
13. Layers/New Raster Layer. Selections/Select All.
14. Open 0_955f6_20c2944_XXL.jpg file of box. Copy/Paste into Selection. Selections/Select None.
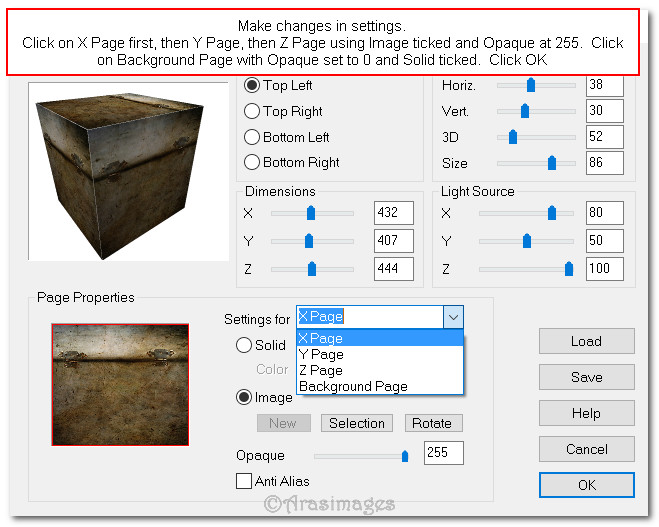
15. Effects/Vizros 4/Box. Use settings below. Click first on X Page, then Y Page, then Z Page using Image ticked and Opaque at 255. Click on Background Page with Opaque set to 0 with Solid ticked. Click OK.
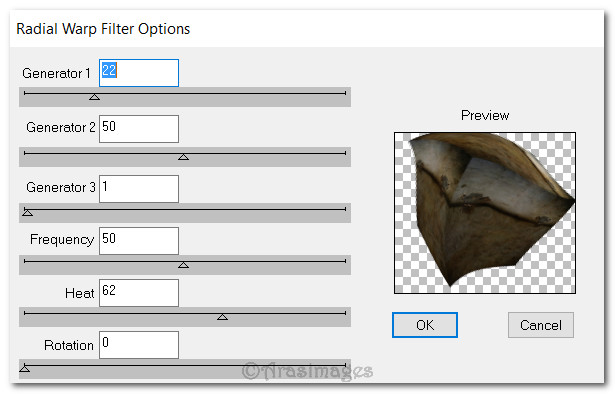
16. Effects/dsb flux/Radial Warp.
17. Effects/Edge Effects/Enhance.
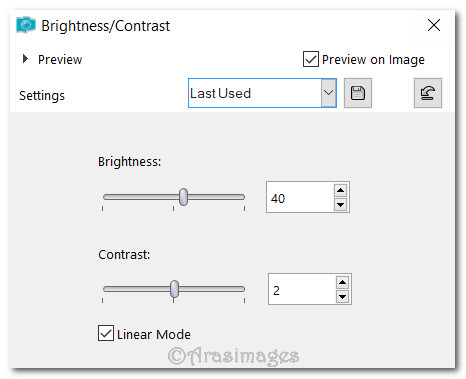
18. Adjust/Brightness and Contrast/Brightness/Contrast.
19. Open 13458166688_femmes.pspimage of woman. Copy/Paste as New Layer. Move to right by pressing the right arrow key 6 times.
20. Adjust/Sharpness/Sharpen.
21. Effects/3D Effects/Drop Shadow. Vertical -17, Horizontal -14, Opacity 43, Blur 21, color #000000.
22. Open 0_9a5e1_59c11b3f_XL.jpg of branches. Copy/Paste as New Layer.
23. Effects/3D Effects/Drop Shadow. Vertical -5, Horizontal -5, Opacity 40, Blur 8, color #000000.
24. Adjust/Sharpness/Sharpen. Place branches in upper left corner.
25. Layers/New Raster Layer. Selections/Select All. Selections/Modify/Contract by 1px.
26. Selections/Invert. Flood fill with color #f8f7f2. Selections/Select None.
27. Close off bottom layer. Merge/Merge Visible.
28. Open bottom layer. Image/Resize/Resize by 81%/Resize all layers unchecked.
29. Open Side Bar.pspimage. Copy/Paste as New Layer.
30. Move to center in left side of image.
31. Duplicate. Image/Mirror/Mirror Horizontal.
32. From tool bar select the Preset Shapes. Set the Line Style to krisbigdot/Width: 1.00.

33. From the Preset list select gethtrien08 (found in 1209803261.PspShape file). In the Materials palette, foreground set to #c29974/Background set to #000000.
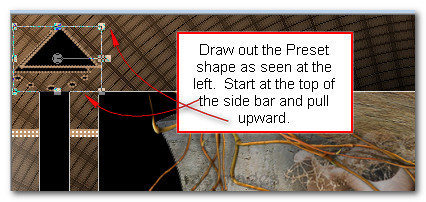
34. Using the Preset tool with settings above, draw out the shape as seen below using approximately 76px H and 76px W starting at the top of the side bar and pull upward. NOTE: Keep Vector Layer active.
35. Image/Mirror/Mirror Horizontal. Image/Flip/Flip Vertical.
36. Adjust position/size using the move tool and vector nodes if necessary above the left side bar.
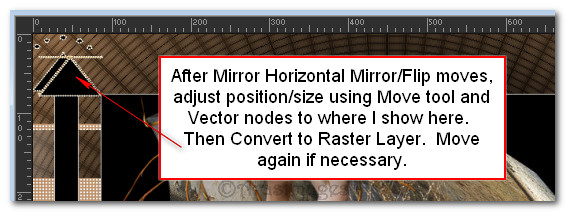
37. Convert to Raster Layer.
38. Effects/Edge Effects/Enhance.
39. Effects/Simple/Top Left Mirror.
40. Open 0_9a5e1_59c11b3f_XL.png of branches. Copy/Paste as New Layer.
41. Image/Resize/Resize by 80%/Resize all layers unchecked.
42. Image/Flip/Flip/Vertical. Adjust/Sharpness/Sharpen.
43. Effects/3D Effects/Drop Shadow. Vertical -5, Horizontal -5, Opacity 40, Blur 8, color #000000.
44. Move to the bottom center right/setting on bottom inner frame.
45. Image/Add Borders/Add 1px border, Symmetric checked, color #c29974.
46. Image/Add Borders/Add 10px border, Symmetric checked, color #000000.
47. Image/Add Borders/Add 1px border, Symmetric checked, color #c29974.
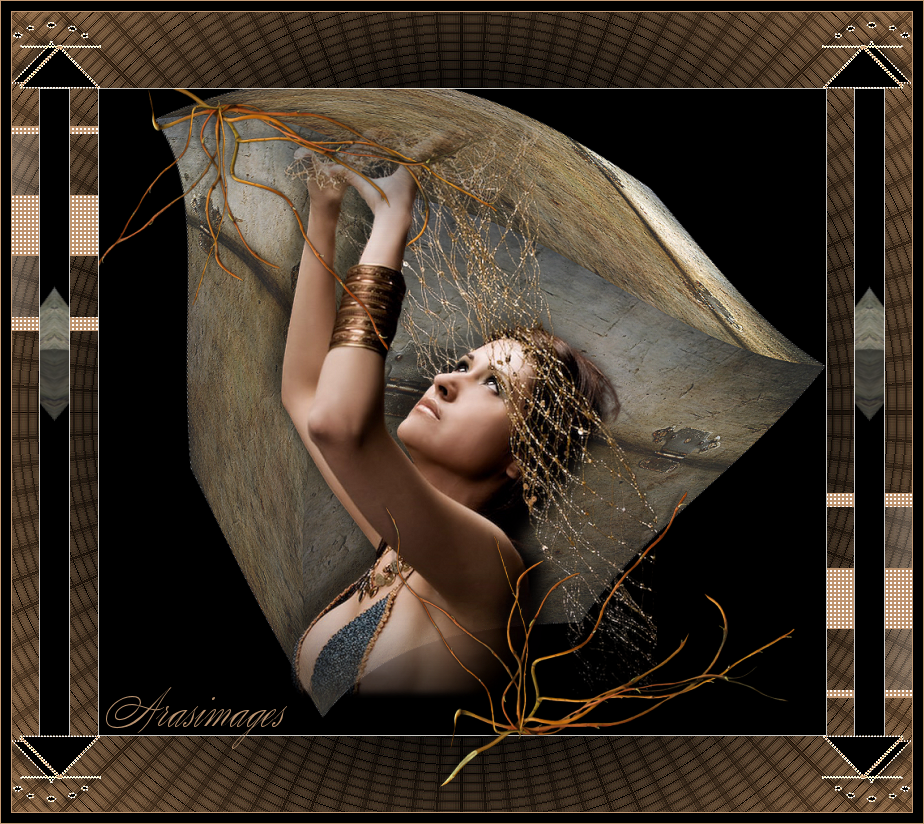
48. Sign your name or leave your watermark if you wish. Finished!
Thank you for working my tutorial.
This tutorial was tested by PamelaD and Evatexas. Thanks ladies!
If you are going to use this tutorial for stationery, cards or place the tutorial/tag on another site, I would appreciate you contacting me for permission, giving Arasimages credit for the original tutorial and if possible, a link back to my site. Thank you.
Copyright © Arasimages All Rights Reserved