

So Lonely and Cold
For Danish, Italian, German, Spanish, French and Portuguese translations, click on the flags.


For this tutorial you will need the materials in the zip file below.

Thanks go to Marif and to Margo and Wieskes for their lovely tubes used in this tutorial.
Unzip the materials into a working folder you have created on your desktop named So Lonely and Cold. Please duplicate and close original tubes. Use the copies for your work so you will not lose the originals. Export agi_leaves1 into your Paint Brush folder. Place the CF-Sinedots.cfg file into your Dragonfly/SinedotsII/Presets folder if it is not already in there. I have used the plugins VM Distortion/Tilomat 2000, Dragonfly/SinedotsII and PSP effects in this tutorial. It is assumed you have a working knowledge of PSP to follow these directions. I have used PSP2018 but most PSP programs can be used.
Use the leaves below to mark your place along the way.

1. In Materials Palette, set Foreground to #be4545, Background to #030303.
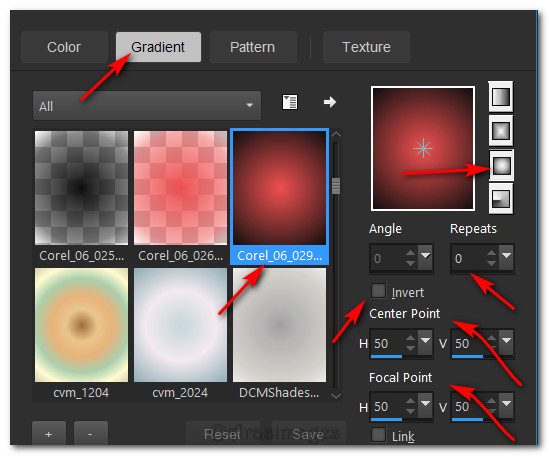
2. Create a gradient using Foreground/Background colors, Style Sunburst, Angle and Repeats at 0, Center Points/Focal Points all set to 50. Invert unchecked.
3. New/New Image 900px by 700px. Flood fill with Background #030303.
4. Layers/New Raster Layer. Flood fill with Gradient.
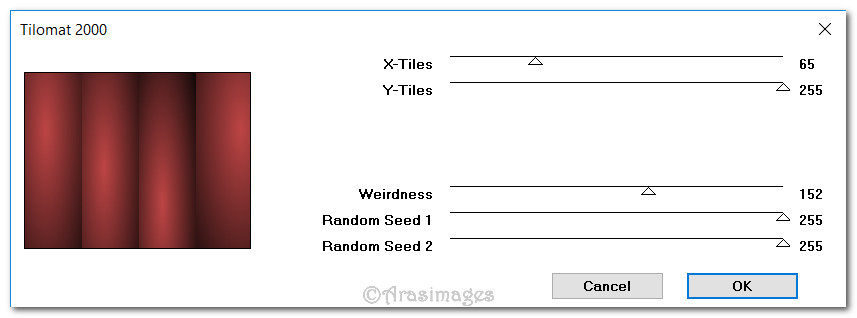
5. Effects/VM Distortion/Tilomat 2000.
6. Effects/Distortion Effects/Lens Distortion. Repeat.

7. Open margit_Autumn_leaves2_AO_1.pspimage. Copy/Paste as New Layer.
8. Adjust/Hue and Saturation/Colorize. Hue 0/saturation 128.
9. Effects/3D Effects/Drop Shadow. Vertical -15, Horizontal -15, Opacity 50, Blur 30, color #000000.
10. Drop Opacity to 38. Move to the right side of image.
11. Effects/Edge Effects/Enhance.
12. Open Marif_2007_08Aout_decor09.pspimage. Copy/Paste as New Layer.
13. Position in bottom right corner.
14. Open the wieskes tube 448.png recolored for tutorial tube. (Wieskes original tube is in the materials). Copy/Paste as New Layer.
15. Image/Resize/Resize by 130/Resize all layers unchecked.
16. Image/Mirror/Mirror Horizontal. Pull downward and to the right side a little.
17. Lower Opacity to 24. Effects/Edge Effects/Enhance.
18. Layers/New Raster Layer.
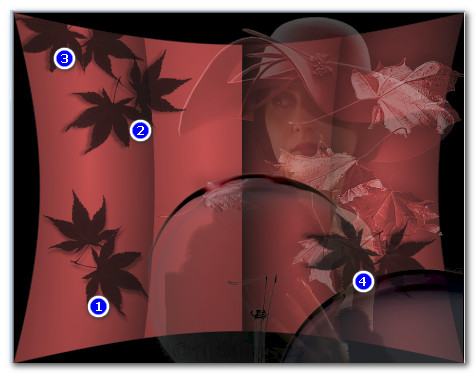
19. From Tool bar, select Paint Brush tool agi_leaves1. Size 271 with all other settings as seen below.

20. Right click with color #030303 in bottom left corner. Change Rotation to 90. Right click with color #030303 toward top left corner. Change Rotation to 130 and repeat stamp in upper left corner and again in bottom right corner. See placements below.
21. Layers/New Raster Layer.
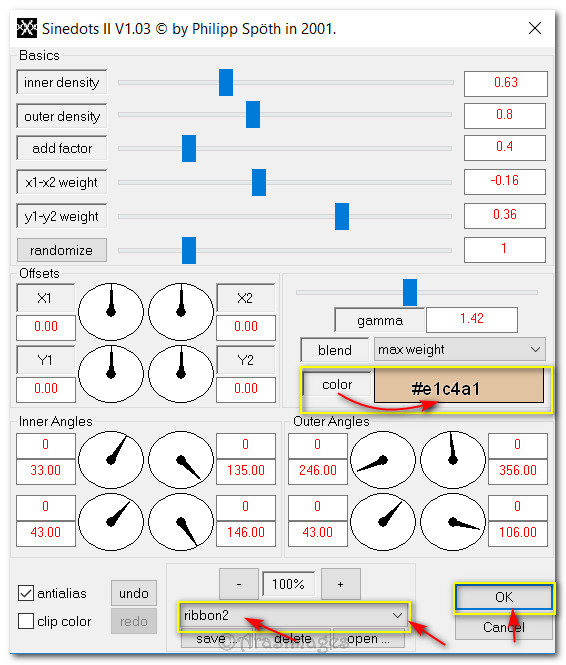
22. Effects/Dragonfly/SinedotsII. From the dropdown in the bottom center, select ribbon2. Set the color to #e1c4a1. Use settings below.
23. Open wieskes tube 448.png recolored for tutorial again. Copy/Paste as New Layer.
24. Effects/3D Effects/Drop Shadow. Vertical -15, Horizontal -15, Opacity 50, Blur 30, color #000000.
25. Adjust/Sharpness/Sharpen.
26. Move lady so her fur is along line at the center bottom of image.
27. Image/Add Borders/Add 2px border, color #be4545, Symmetric checked.
28. Image/Add Borders/Add 70px border, color #030303, Symmetric checked.
29. Open Lace Border.pspimage. Copy/Paste as New Layer.
30. Center outside of 2px border.
31. Image/Add Borders/Add 15px border, color #be4545, Symmetric checked.
32. Activate 15px border with Magic Wand.
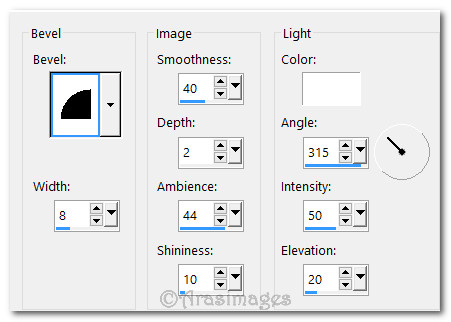
33. Effects/3D Effects/Inner Bevel. Deselect.
34. From Tool bar, select Font Copper Alt Caps Expert.ttf, Size 110, font color #f6ede2 and other settings as seen below.

35. Type out the word "Lonely". Convert to Raster Layer.
36. Selections/Select All. Selections/Float. Selections/Defloat.
37. Apply an Inner Bevel as seen in Step #33. Deselect.
38. Change font to Gabriola, Size 38 and type out the word "so", Convert to Raster Layer. Type out the words "and cold", convert to Raster Layer. Type "the days grow short", Convert to Raster Layer. Type "and the leaves fall", Convert to Raster Layer. Type "around", Convert to Raster Layer. Type "me", Convert to Raster Layer. Arrange words as seen below.

39. Merge/Merge Visible. (I resized my image by 90% and you may wish to do the same).
40. Sign your name or leave your watermark if you wish. Save as a .jpg or .png file.
This tutorial was tested by PamelaD and Evatexas 11-01-17. Thanks ladies!
If you are going to use this tutorial for stationery, cards or place the tutorial/tag on another site, I would appreciate you contacting me for permission, giving Arasimages credit for the original tutorial and if possible, a link back to my site. Thank you.
Copyright © Arasimages All Rights Reserved