

The Flake Family
For an Italian, Danish, French, German, Spanish, Portuguese and Dutch translation, click on the flags.


For this tutorial you will need the materials in the zip file below.

Thanks go to PamelaD for tubing the snowmen family for Arasimages and to Nikita for the nature tubes.
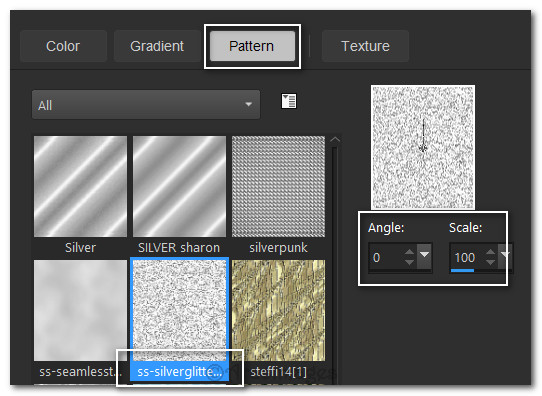
Unzip the materials into a working folder you have created on your desktop named The Flake Family. Export the two Snowflake brushes into your PSP/Brush folder. Place the Pattern ss-silverglitter4 in to your PSP/Patterns folder. Please duplicate and close original tubes using the copies for your work so you will not lose the originals. I have used the plugin Simple/Top Left Mirror in this tutorial. It is assumed you have a working knowledge of PSP to follow these directions. I have used PSP2018 for this tutorial but other versions may be used.
Use the little snowflake below to mark your place along the way.

1. In Materials Palette, set Foreground to #d6e4fa, Background to #555550.
2. New/New Image 960px by 600px. Flood fill with Foreground.
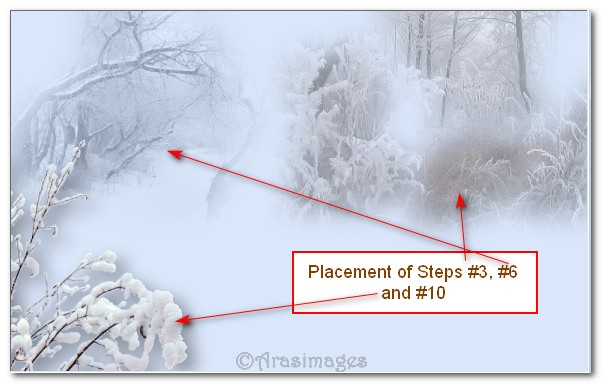
3. Open 1293040230_paysages_nikita.pspimage. Copy paysage-nikita layer/Paste as New Layer. Place winter scene in upper right corner. (See below Step #10).
4. Drop Opacity down to 51.
5. Open 1250147613_paysages_nikita.pspimage. Close off Nikita's watermark layer. Copy calque/Paste as New Layer.
6. Place image in upper left corner. (See below Step #10).
7. Set Mode to Luminance (L). Lower Opacity down to 41.
8. Open 12930417598_fleurs_nikita.png. Copy/Paste as New Layer.
9. Using Selections tool, select around Nikita's watermark and press delete key. Deselect.
10. Place in bottom left corner. Your working image should now look like this.
11. Effects/3D Effects/Drop Shadow. Vertical 15, Horizontal 15, Opacity 45, Blur 40, color #000000.
12. Open Snowmen.pspimage. Copy 3_SNOWMEN layer/Paste as New Layer.
13. Move snowmen down to bottom and to the left a little.
14. Effects/3D Effects/Drop Shadow. Vertical -6, Horizontal 15, Opacity 45, Blur 40, color #000000.
15. Open 12930417598_fleurs_nikita.png. Copy/Paste as New Layer.
16. Using Selections tool, select around Nikita's watermark and press delete key. Deselect.
17. Place in bottom right corner.
18. Effects/3D Effects/Drop Shadow. Vertical -6, Horizontal -15, Opacity 45, Blur 40, color #000000.
19. Open Snowmen.pspimage. Copy BRANCH layer/Paste as New layer.
20. Move branch to upper right corner.
21. Effects/3D Effects/Drop Shadow. Vertical -6, Horizontal -15, Opacity 45, Blur 40, color #000000.
22. Image/Add Borders/Add 3px border, Symmetric checked, color #555550.
23. Select 3px border with Magic Wand to activate it.
24. Set Foreground to Pattern/ss-silverglitter4. Flood fill 3px border with pattern.
25. Effects/Edge Effects/Enhance. Deselect.
26. Image/Add Borders/Add 50px border, Symmetric checked, color #d6e4fa.
27. Image/Add Borders/Add 3px border, Symmetric checked, color #555550.
28. Select 3px border with Magic Wand to activate it.
29. Set Foreground to Pattern/ss-silverglitter4. Flood fill 3px border with pattern.
30. Effects/Edge Effects/Enhance. Deslect.
31. Layers/New Raster Layer.
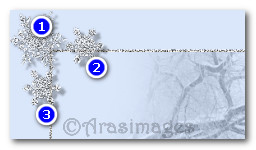
32. From tool bar, select Paint Brush tool. Choose Snowflake31/set Size to 80. Using the Pattern in the Foreground, left click snowflake in upper left corner.

33. Change to Snowflake33/set Size to 50. Using the Pattern in Foreground, left click snowflake in upper left corner on both sides of the larger snowflake. (See placement below).

34. Effects/3D Effects/Drop Shadow. Vertical 5, Horizontal 6, Opacity 40, Blur 3, color #000000.
35. Effects/Simple/Top Left Mirror.
36. Effects/Edge Effects/Enhance.
37. Merge/Merge Visible. Stamp your name or watermark at this point.
38. Save image as The Flake Family.jpg.
39. Open Animation Shop. File/Open Snow2.gif file.
40. Highlight the first frame. Edit/Select All. Copy.
41. Open The Flake Family.jpg file. Duplicate it 34 times having 35 frames in all.
42. Highlight first frame. Edit/Select All. Right click/Paste/Into Selected Frame making sure the snowflakes are within the image and not the frame of the image. Left click to set in place. Repeat until you have the amount of snowflakes you wish. I have pasted 8 times. Just enjoy placing the snowflakes and checking them by clicking on View Animation button in the top task bar.
43. Now we will save our work. File/Save As. When the first box appears, give your work a name (The Flake Family), designate where it will be saved and leave the file as .gif. Save. As the boxes appear, click Next, Next, Next and Finish.
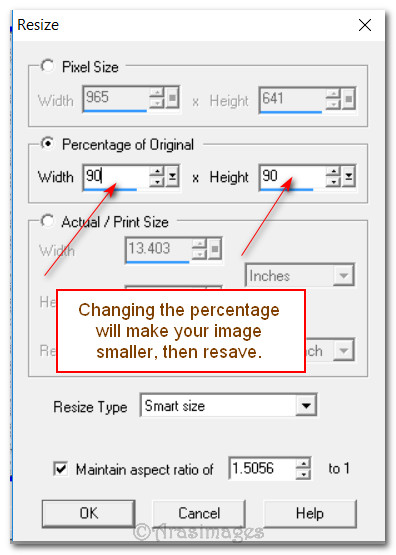
44. If your image is too large for what you wish it to be, click on Animation/Resize Animation. Change the size by percentage and then save as in Step #43.
This tutorial was tested by PamelaD and Evatexas December 2017. Thanks ladies!
If you are going to use this tutorial for stationery, cards or place the tutorial/tag on another site, I would appreciate you contacting me for permission, giving Arasimages credit for the original tutorial and if possible, a link back to my site. Thank you.
Copyright © Arasimages All Rights Reserved