
Shattered World
For Danish, Spanish, German, Italian, French and Dutch translation, click on the flags.


For this tutorial you will need the materials in the zip file below.

Thanks go to Peter Bialobrzeski artist for the shack photograph and to the unknown photographer of the waterfall. Thank you Silvie for the lovely tube of the woman I have used.
Unzip the materials into a working folder you have created on your desktop named Shattered World. Please duplicate and close original tubes using the copies for your work so you will not lose the originals. Export brush into PSP Files/Brushes. Place Mask 20-20 in your PSP Files/Masks. Click on the ShatteredWorld.f1s and it automatically goes into your Eye Candy 5 plugin. It is assumed you have a working knowledge of PSP to follow these directions. The plugins used in this tutorial are Filters Unlimited 2/Sandflower Specials/Page Curl Top Vertical and Eye Candy 4000/Jiggle. I have also used Animation Shop program. I have used PSP2018 for this tutorial but other versions may be used.
Use the tear drop below to mark your place along the way.

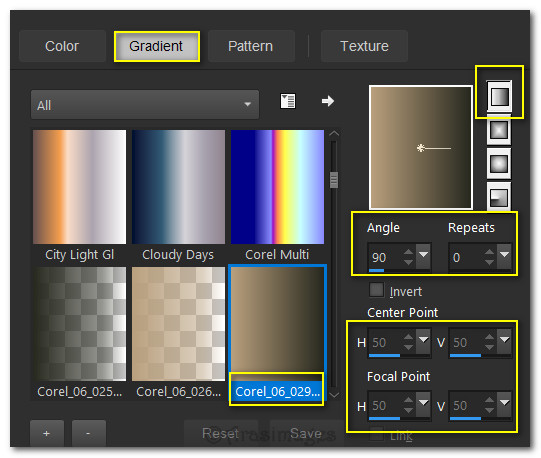
1. In Materials Palette, set Foreground to #b29773, Background to #1b1c12. Create a Gradient using Corel_06_029_foreground/background,Linear, Angle 90/Repeats 0/Invert Null, Center Point/Focal Point all null.
2. New/New Image 975px by 560px. Selections/Select All.
3. Open Waterfall.jpg image. Copy/Paste into Selection. Selections/Select None.
4. Layers/New Raster Layer. Flood fill with Gradient.
5. Lower Opacity down to 30.
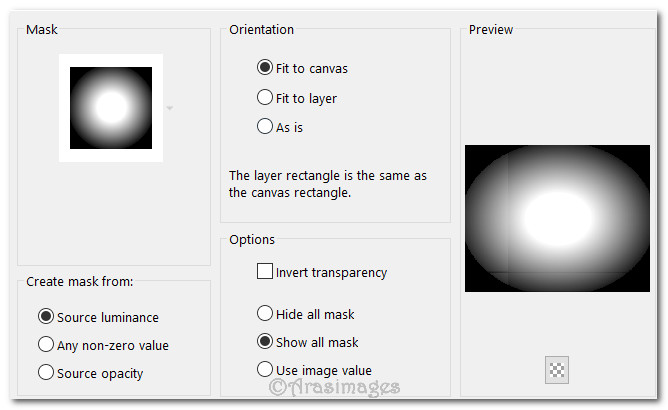
6. Open the shack image. Layers/Load/Save Mask. Load Mask from Disk. Select Mask 20-20. Load.
7. Merge/Merge Group.
8. Copy/Paste as New Layer. Duplicate/Merge/Merge Down.
9. Resize/Resize by 63%/Resize all layers unchecked.
10. Move shack to left side of image.
11. Layers/New Raster Layer.
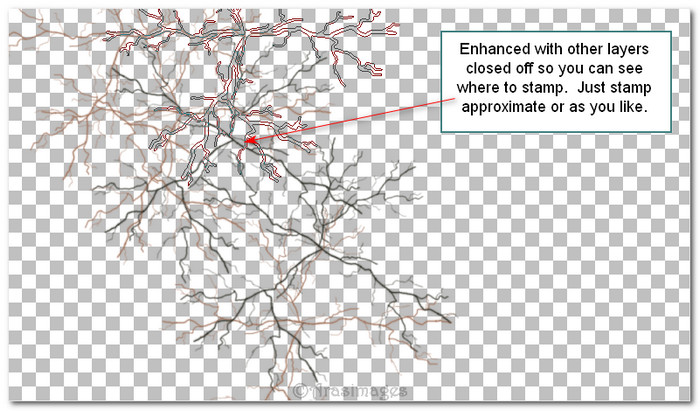
12. From tool bar Paint Brush, select brush Cracks 100. Change Background color to #99664e in Materials Palette, Size 450, right click stamping three times across left half of image, top/middle/bottom.

13. Change background color back to #1b1c12, Rotation to 30 and stamp twice more in between the three cracks you just stamped.
14. Duplicate. Merge/Merge Down.
15. Sharpness/Sharpen. Sharpness/Sharpen More. Layers/New Raster Layer.
16. Effects/Filters Unlimited2/&Sandflower Specials*v*/Page Curl Top Vertical.
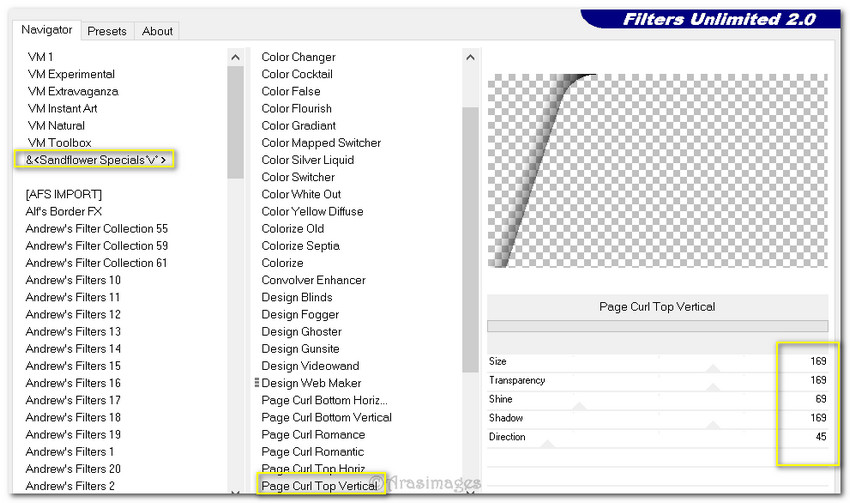
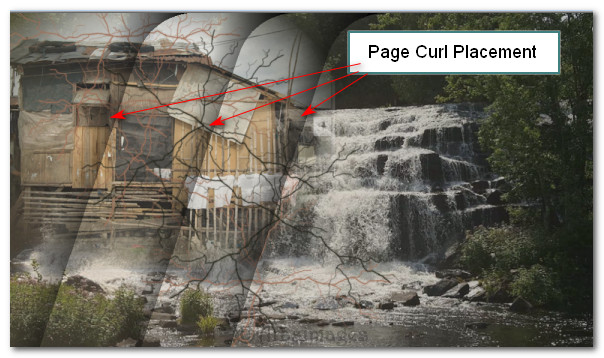
17. Using the arrow key, click twice upward. Duplicate. Move to right. Repeat. See image below for placement.
18. Image/Add Borders. Symmetric checked. Borders 5px all sides, color #1b1c12.
19. Image/Add Borders. Symmetric unchecked. Top 60px, sides 10px, bottom 60px, color #ffffff.
20. Promote Background Layer. Activate by clicking border with Magic Wand. Layers/New Raster Layer. Flood fill with original gradient.
21. Image/Mirror/Mirror Horizontal. Promote selection to layer.
22. Effects/AlienSkin/Eye Candy 5: Textures/Swirl. Use these settings below.

23. Selections/Select None.
24. Drop down to Raster 2.
25. Effects/Geometric Effects/Circle.
26. Image/Mirror/Mirror Horizontal. Move Raster 2 to above top layer.
27. Effects/3D Effects/Drop Shadow. Vertical -21, Horizontal -21, Opacity 44, Blur 40, color #1b1c12.
28. Change Drop Shadow Vertical and Horizontal effects to 21. Apply.
29. Move circle to left edge of image.
30. Image/Add Borders. Add 5px borders, Symmetric checked. Color #1b1c12.
31. Image/Add Borders. Add 3px borders, Symmetric checked. Color #b29773.
32. Sign your name on left side if you wish. Save as Background.jpg file.
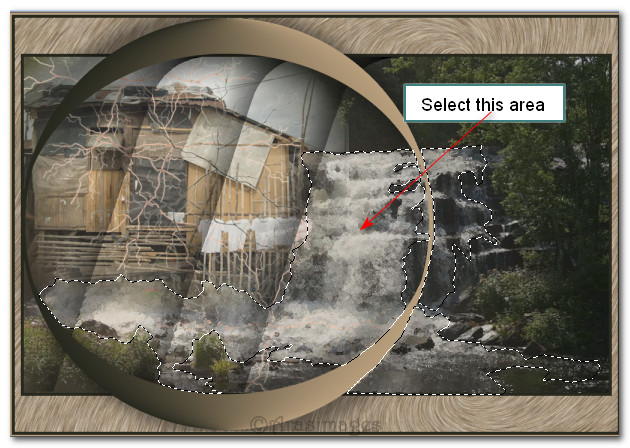
33. ANIMATION: Using the Selections/Freehand/Point to point tool set to Add (Shift), Feather 0, draw around the waterfall you wish to have animated. Duplicate 5 times, having 6 layers in all.

34. Close off all layers except the top layer.
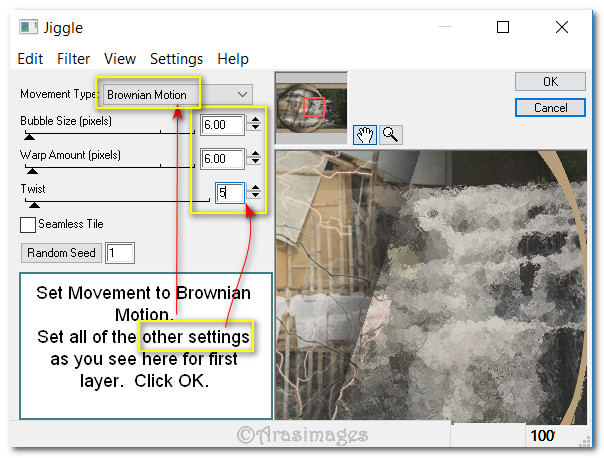
35. Effects/Eye Candy 4000/Jiggle. Set the Motion setting to Brownian Motion, all other settings as seen below. Click OK. Close off layer.
36. Move down to next layer, open and highlight it. EC 4000/Jiggle. (Leave all layers set to Brownian Motion.) Set Bubble size to 7, Warp size to 7, Twist size to 8. Close off layer.
37. Move down to next layer, open and highlight it. EC 4000/Jiggle. Set Bubble size to 5, Warp size to 6, Twist size to 3. Close off layer.
38. Move down to next layer, open and highlight it. EC 4000/Jiggle. Set Bubble size to 6, Warp size to 8, Twist size to 4. Close off layer.
39. Move down to next layer, open and highlight it. EC 4000/Jiggle. Set Bubble size to 8, Warp size to 2, Twist size to 5. Close off layer.
40. Move down to next layer, open and highlight it. EC 4000/Jiggle. Set Bubble size to 9, Warp size to 7, Twist size to 3.
41. Open all layers. File/Save As. Save as ShatteredWorld.PSP Animation Shop (*psp) file.
42. Open Animation Shop program. File/Open ShatteredWorld.PSP Animation Shop (*psp) file.
43. Edit/Select All. (All frames should now be blue on the top of its frame).
44. (This step is optional as I have included in the materials my finished altered lady so you may use that.) In your PSP program, open Lady1_07_2015.pspimage. Highlight the Tube layer of the lady, copy and paste as New Image and apply a Drop Shadow of Vertical -21, Horizontal -21, Opacity 44, Blur 40, color #1b1c12. Using Selection tool set to Rectangle, select and delete off a portion of the lady on the right (compare mine to original tube), CTRL+D. Close off background layer and Silvie's watermark and Save as Lady1_07.03.2015.psp. (Animation Shop (*psp) file).
45. Go back to Animation program. File/Open. Open Lady1_07_2015.psp Animation Shop (*psp) file . Edit/Select All. Edit/Propagate Paste. Right click on the top and Copy.
46. Go to Shattered World frames. Right click in the first frame. Paste/Paste into Selected Frame. Move woman to the right a bit into right side within black border and left click her into place.
47. Open TearAnimation.psp file. Edit/Select All. Animation/Reverse Frames. Copy.
48. Go to the main image, Edit/Select All. Right click within the first frame/Paste/Paste into Selected Frame and set the tear just under her eye. Left click to set into place. Click on Animation/Frame Proprties and set the frame rate to 25.
49. Using the View Animation icon, check the tears to make sure they are falling properly and if so, now we will save the work.
50. File/Save As. When the Save As box appears, give your work a File name of Shattered World. Direct where to save it (working folder). Save as type leave as .gif. Click Save.
51. As the boxes appear, click on Next, Next, Next and then Finish. Your work is now saved as a .gif file.
This tutorial was tested by PamelaD and Evatexas September 2018. Thanks ladies!
If you are going to use this tutorial for stationery, cards or place the tutorial/tag on another site, I would appreciate you contacting me for permission, giving Arasimages credit for the original tutorial and if possible, a link back to my site. Thank you.
Copyright © Arasimages All Rights Reserved