
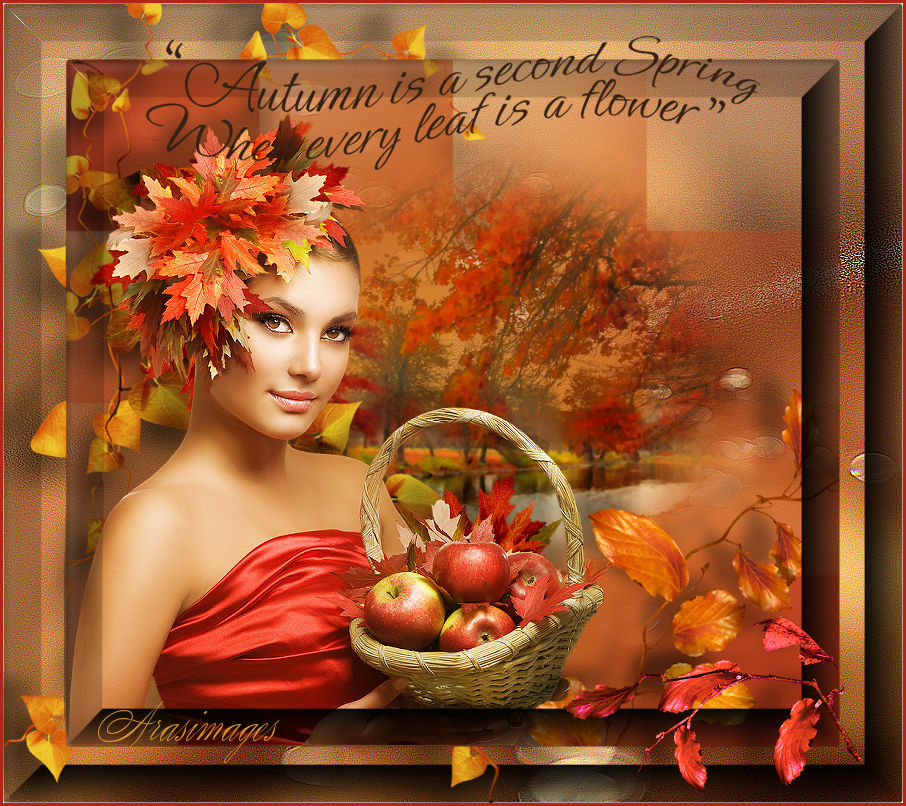
Autum Leaves
For a Danish, Spanish, German, Italian and French translation, click on the flags.


For this tutorial you will need the materials in the zip file below.

Thanks go to Maryse for the tube of the lady, to Sylvie for the trees tube and to the unknown tubers of the various leaf images.
Unzip the materials into a working folder you have created on your desktop named Autumn Leaves. Please duplicate and close original tubes using the copies for your work so you will not lose the originals. Click on the ArasimagesLeaves.f1s file and it automatically goes into your Eye Candy 5 plugin. Place Mask in your PSP Masks folder. I have used AlienSkin5/Impact/Bevel and AAA Filters/Blot and Smudge. It is assumed you have a working knowledge of PSP to follow these directions. I have used the new PSP2019 for this tutorial but other versions may be used.
Use the little leaf below to mark your place along the way.

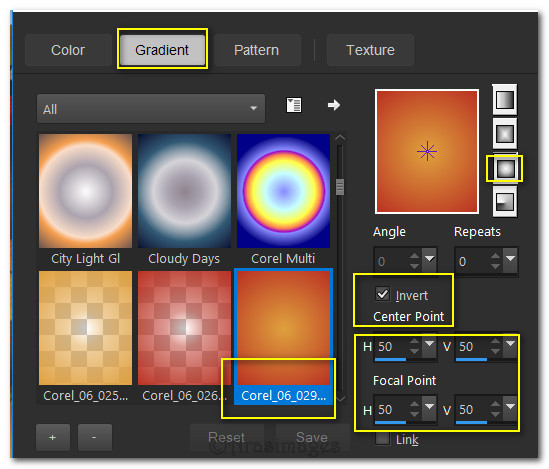
1. In Materials Palette, set Foreground to #b32516, Background to #dc9832. Create a Gradient using Corel_06_029_foreground/background, Sunburst, Angle Null/Repeats Null/Invert checked, Center Point/Focal Point all set to 50.
2. New/New Image 900px by 800px. Selections/Select All.
3. Open 0_9aef8_2dbd2538_XXL.png Background. Copy/Paste into Selection. Selections/Select None.
4. Effects/Edge Effects/Enhance. Edge Effects/Enhance More.
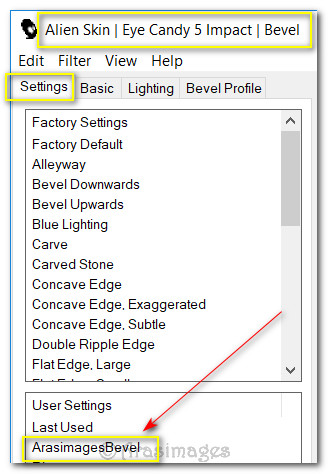
5. Effects/AlienSkin 5:Impact/Bevel.
6. Open 0_9b67b_157bdb23_XXL.pspimage of leaves. Copy/Paste as New Layer.
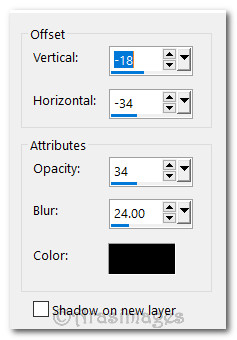
7. Effects/3D Effects/Drop Shadow. Vertical -18, Horizontal -34, Opacity 34, Blur 24, color #000000.
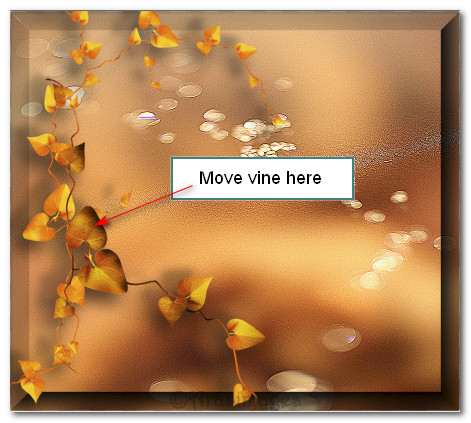
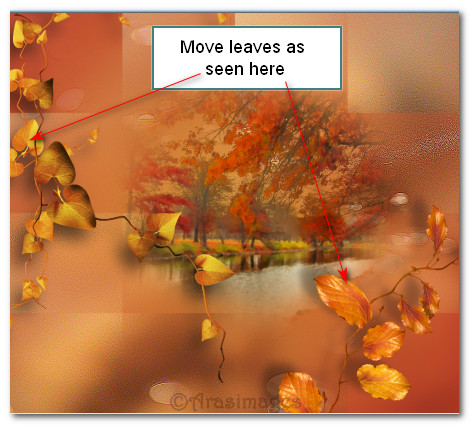
8. Move vine to left side of image. Merge/Merge Down. Close layer.
9. Layers/New Raster Layer. Selections/Select All. Repeat Steps #3 through #4.
10. Layers/New Raster Layer. Flood fill with Gradient.
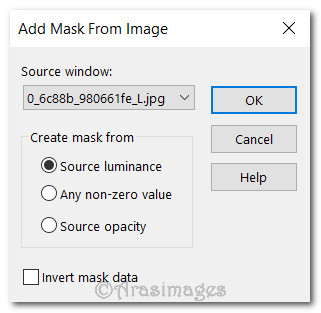
11. Open Mask 0_6c88b980661fe_L.jpg. Highlight the gradient layer.
12. Layers/New Mask Layer/From Image. When the window appears, select the Mask that is open from the dropdown and click OK. Merge/Merge Group.
13. Open IndianSummer2_03.09.0215.pspimage. Copy/Paste as New Layer.
14. Image/Resize/Resize by 76%/Resize all layers unchecked. Move toward right side a little.
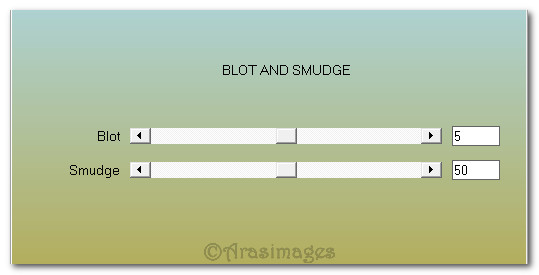
15. Effects/AAA Filters/Blot and Smudge.
16. Open 0_a754f_ffbf101e_L.pspimage of leaves. Copy/Paste as New Layer.
17. Image/Mirror/Mirror Vertical. Image/Mirror/Mirror Horizontal. Move to right side.
18. Effects/3D Effects/Drop Shadow. Vertical -18, Horizontal -34, Opacity 34, Blur 24, color #000000.
19. Open 0_9b67b_157bdb23_XXL.pspimage of leaves. Copy/Paste as New Layer.
20. Apply drop shadow as in Step #18. Move into left side.
21. Keeping Layer 1 closed off, Merge/Merge Visible.
22. Image/Resize/Resize by 86%/Resize all layers unchecked.
23. Open MR_Autumn Girl with Apples.pspimage. Using Select tool (or Erase tool and erase) select around Maryse watermark, press Delete key, Deselect. Copy/Paste as New Layer.
24. Effects/3D Effects/Drop Shadow. Vertical -18, Horizontal -34, Opacity 34, Blur 24, color #000000.
25. Adjust/Sharpness/Sharpen.
26. Move lady to bottom left side of image. Merge/Merge Down.
27. Effects/AlienSkin 5/Impact/Bevel.
28. Open bottom layer.
29. Open 0_bb530_50912449_M.pspimage of red leaves. Copy/Paste as New Layer.
30. Effects/3D Effects/Drop Shadow. Vertical -18, Horizontal -34, Opacity 34, Blur 24, color #000000.
31. Place in bottom right corner.
32. Open 0_9c3c0_fb053150_XXL.pspimage of text. Copy/Paste as New Layer.
33. Image/Resize/Resize by 60%/Resize all layers unchecked.
34. In Materials Palette change background color to #392416. Using Color Changer, right click on text to change color.
35. Effects/3D Effects/Drop Shadow. Vertical -18, Horizontal -34, Opacity 34, Blur 24, Color #dc9832.
36. Move to center top of image.
37. Stamp your name or watermark if you wish.
38. Image/Add Borders/Add 3px border, Symmetric checked, color #B32516.
39. Save as .png or .jpg file.
This tutorial was tested by PamelaD and Evatexas September 2018. Thanks ladies!
If you are going to use this tutorial for stationery, cards or place the tutorial/tag on another site, I would appreciate you contacting me for permission, giving Arasimages credit for the original tutorial and if possible, a link back to my site. Thank you.
Copyright © Arasimages All Rights Reserved