
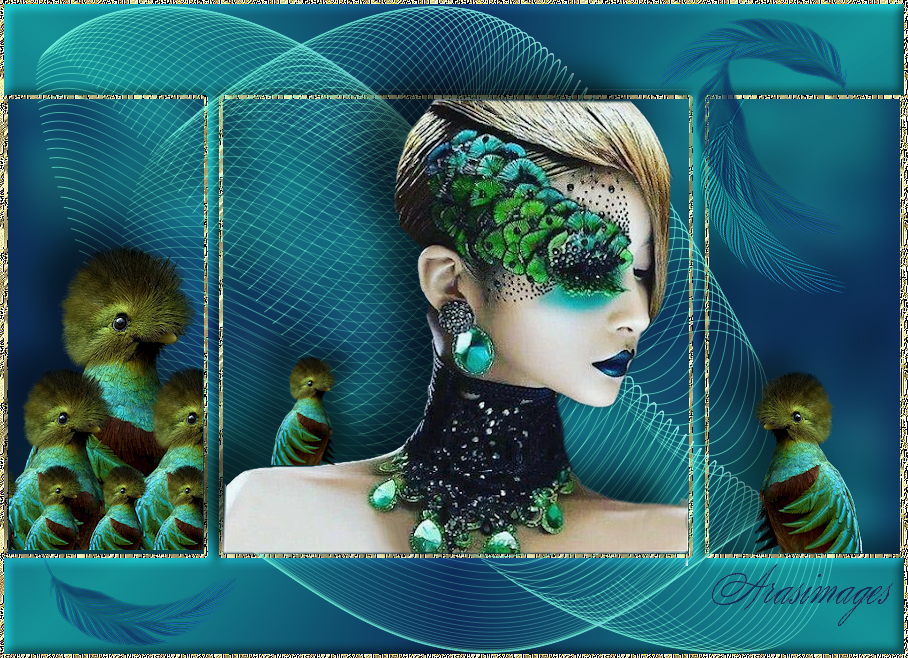
Birds of a Feather
For a Danish, Italian, Dutch and French, German and Spanish translation, click on the flags.
For this tutorial you will need the materials in the zip file below.Unzip the materials into a working folder you have created on your desktop named Birds of a Feather. Please duplicate and close original tubes using the copies for your work so you will not lose the originals. Export feather.PspBrush into your PSP Files/Brushes. Place the cathys_corner_white.cfg file in your Dragonfly/Sinedots II file if you don't have it. cc_16 will show up in the drop down space. Place Selection ArasLadyBird in your PSP/Selections folder. Place the pattern steffi14 into your PSP/Patterns folder. It is assumed you have a working knowledge of PSP to follow these directions. The plugins used in this tutorial are Mura'sMeister/Copies, Dragonfly/SinedotsII/cathys_corner_white.cfg/cc_16 and AlienSkin Xenofex2/Shatter and Crumple. I have used PSP2019 for this tutorial but other versions may be used.
Thanks go to Nikita and to Maryse for the lovely tubes used.
Use the feather below to mark your place along the way.

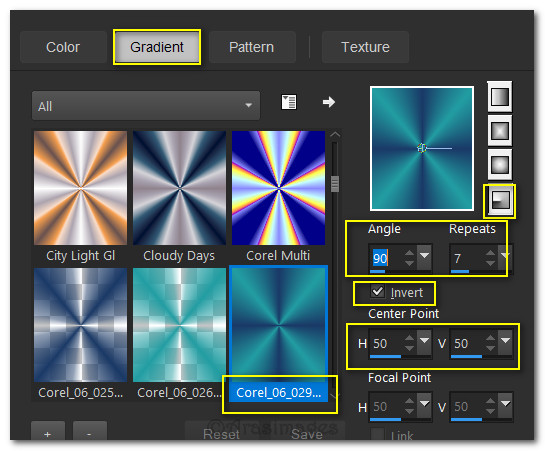
1. In Materials Palette, set Foreground to #15959a, Background to #0e2d5b. Create a Gradient using Corel_06_029_foreground/background, Radial, Angle 90/Repeats 7/Invert checked, Center Point H50/V50/Focal Point H and V Null.
2. New/New Image 900px by 650px. Flood fill with Background #0e2d5b.
3. Layers/New Raster Layer. Flood fill with Gradient.
4. Adjust/Blur/Gaussian Blur. Radius 20.
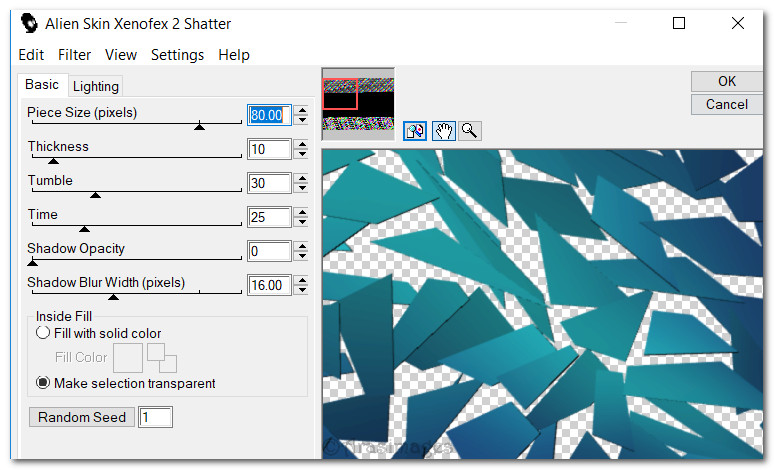
5. Effects/Alien Skin Xenofex 2/Shatter.
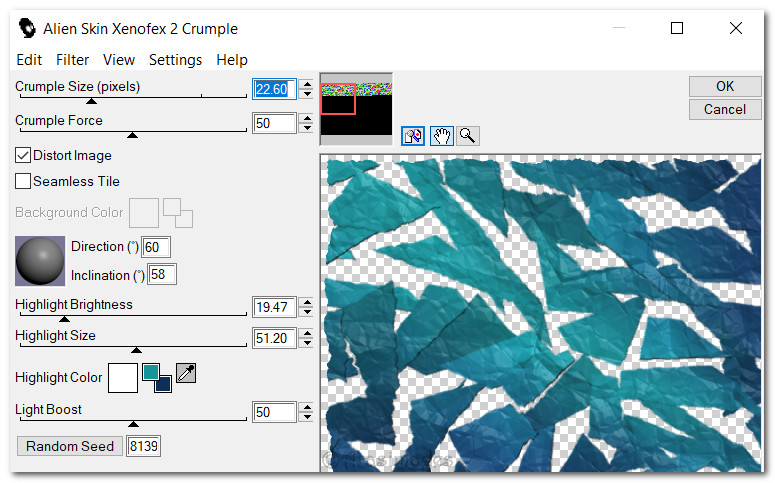
6. Effects/Alien Skin Xenofex 2/Crumple.
7. Adjust/Blur/Gaussian Blur. Radius 18.
8. Selections/Load/Save Selection/Load Selection from Disk. Choose ArasLadyBird selection. Apply.
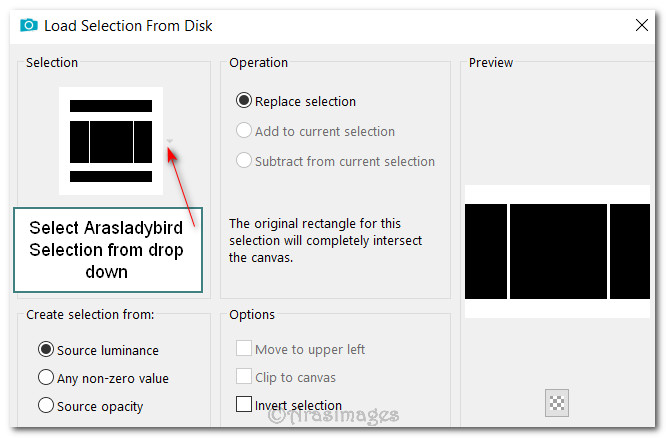
9. Layers/New Raster. Flood fill selection with Gradient.
10. Effects/3D Effects/Drop Shadow. Vertical -21, Horizontal 20, Opacity 50, Blur 44, color #000000.
11. Selections/Invert. Layers/New Raster Layer.
12. In Materials Palette, set to Pattern, Angle: 0, Scale: 100, steffi14. OK.
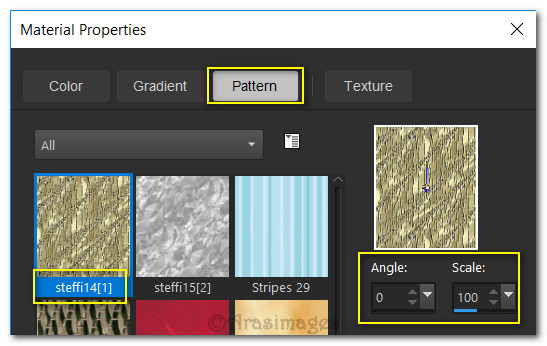
13. Flood fill three selection rectangles with Pattern.
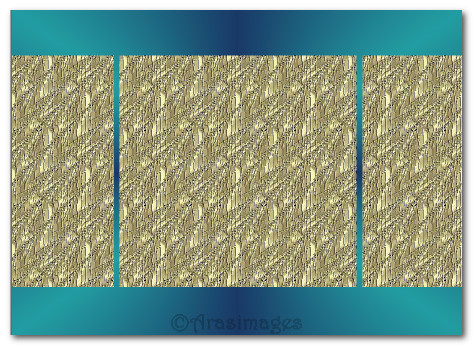
14. Selections/Modify/Contract by 4px. Delete.
15. Effects/Edge Effects/Enhance.
16. Selections/Modify/Expand by 4px.
17. Effects/3D Effects/Drop Shadow. Vertical -21, Horizontal 20, Opacity 50, Blur 44, color #000000.
18. Effects/3D Effects/Drop Shadow. Vertical 27, Horizontal 0, Opacity 50, Blur 44, color #000000.
19. Layers/New Raster Layer. Selections/Invert.
20. Change from Pattern back to Gradient in Materials Palette. Flood fill New Raster with gradient.
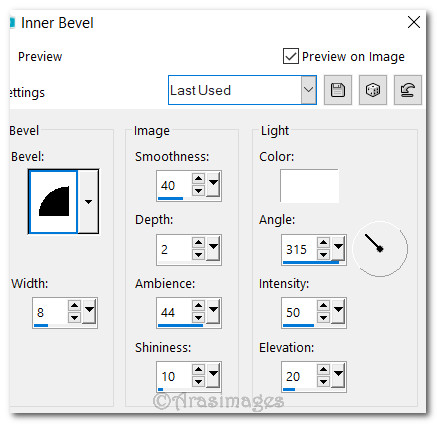
21. Effects/3D Effects/Inner Bevel.
22. Selections/Select None.
23. Layers/New Raster Layer.
24. Effects/Dragonfly/SinedotsII. Click on Open and click on cathys_corner_white.cfg. Then above Open, click on the drop down arrow. Find cc_16 and click to form Sinedot. Use settings below.
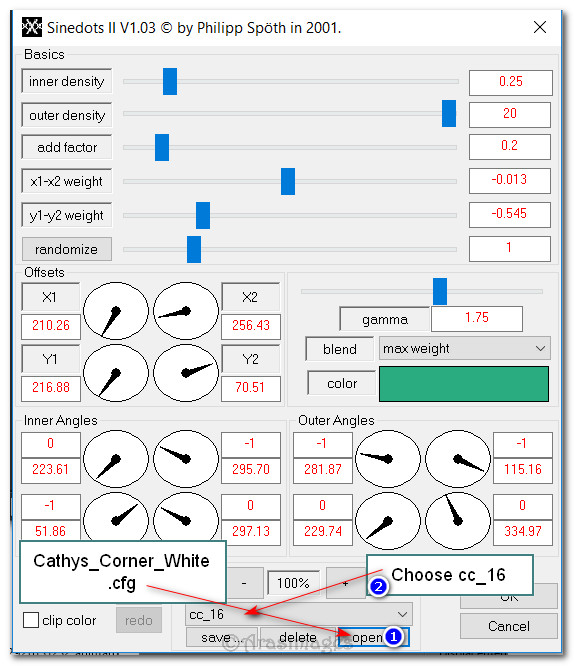
25. Drop Opacity down to 75.
26. Open LadyBird.pspimage. Copy/Paste as New Layer.
27. Effects/3D Effects/Drop Shadow. Vertical -21, Horizontal -27, Opacity 50, Blur 44, color #000000. Repeat.
28. Adjust/Sharpness/Sharpen.
29. Open 12926131232_animaux_nikitqa.pspimage of bird. Copy/Paste as New Image. Close out original.
30. Using copy erase Nikita's watermark.
31. Effects/MuRa's Filter Meister/Copies.
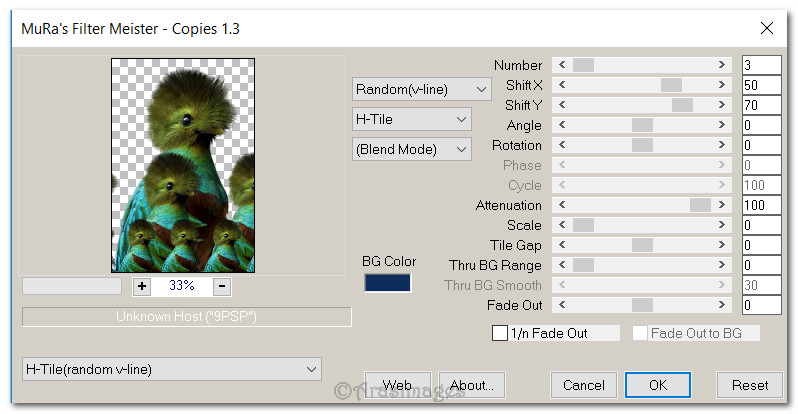
32. Image/Resize/Resize by 50%/Resize all layers unchecked.
33. Copy/Paste as New Layer on main image. Place birds at bottom of left side selection.
34. Effects/3D Effects/Drop Shadow. Vertical -21, Horizontal -27, Opacity 50, Blur 44, color #000000.
35. Adjust/Sharpness/Sharpen.
36. Repeat Steps #29 and #30. Image/Resize/Resize by 30%/all layers unchecked.
37. Image/Mirror/Mirror Horizontal. Copy/Paste as New Layer on main image. Place bird at the bottom of right side selection.
38. Effects/3D Effects/Drop Shadow. Vertical -21, Horizontal -27, Opacity 50, Blur 44, color #000000.
39. Adjust/Sharpness/Sharpen.
40. Duplicate copied new image of bird. Image/Resize/Resize by 60%/Resize all layers unchecked.
41. Image/Mirror/Mirror Horizontal. Place on woman's left shoulder as seen in finished image.
42. Effects/3D Effects/Drop Shadow. Vertical -21, Horizontal -27, Opacity 50, Blur 44, color #000000.
43. Layers/New Raster Layer.
44. From tool bar select Paint Brushes. Choose feather brush. Settings as seen below.

45. Stamp once using gradient and once using background color in upper right corner.
46. Change Rotation to 180 and Size to 200. Stamp once more with background color in upper right corner.
47. Change Rotation to 0 and leave size to 200. Stamp once in bottom left corner using background color.
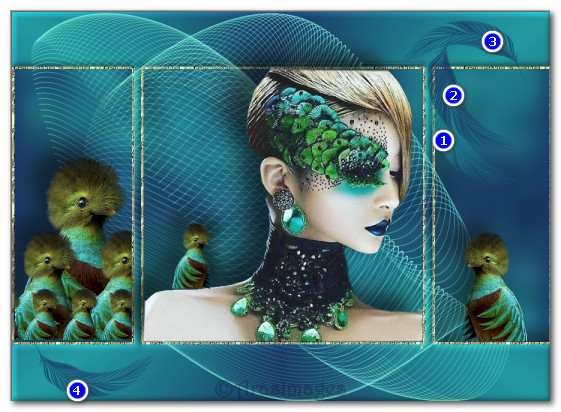
48. Adjust/Sharpness/Sharpen More.
49. Effects/3D Effects/Drop Shadow. Vertical -15, Horizontal -15, Opacity 50, Blur 15, color #15959a.
50. Adjust/Sharpness/Sharpen.
51. (Save your work in case you have to change a layer prior to saving the final time).
52. Image/Add Borders/Add 4px border, color #ffffff.
53. Using Magic Wand, activate 4px border.

54. In Materials Palette, select Pattern steffi14. Flood fill 4px border.
55. Effects/Edge Effects/Enhance. Deselect.
56. Add your name or watermark if you wish. Save as a .jpg or .png file named Birds of a Feather.
This tutorial was tested by PamelaD and Evatexas January 2019. Thanks ladies!
If you are going to use this tutorial for stationery, cards or place the tutorial/tag on another site, I would appreciate you contacting me for permission, giving Arasimages credit for the original tutorial and if possible, a link back to my site. Thank you.
Copyright © Arasimages All Rights Reserved


