
Winter Fairie
For a Dutch, Italian, Danish, French, Spanish and German translation, click on the flags.


For this tutorial you will need the materials in the zip file below.

Thanks go to Nikita for the lovely Fairie and background trees and to Silvie for the lovely corner tree tube used.
Unzip the materials into a working folder you have created on your desktop named Winter Fairie. Please duplicate and close original tubes. Use the copies for your work so you will not lose the originals. Place the White Beads.jpg pattern in your PSP Files/Pattern folder. Export the corner tree [Winter2_21_01.2018] to your PSP Files/Brushes. Place the Style line in your PSP Files/Styled Lines. I have used the plugins Filter Forge 6, Transparency/Eliminate Black and PSP effects in this tutorial. It is assumed you have a working knowledge of PSP to follow these directions. I have used PSP2019 for this tutorial but other versions may be used.
Use the snowflake below to mark your place along the way.

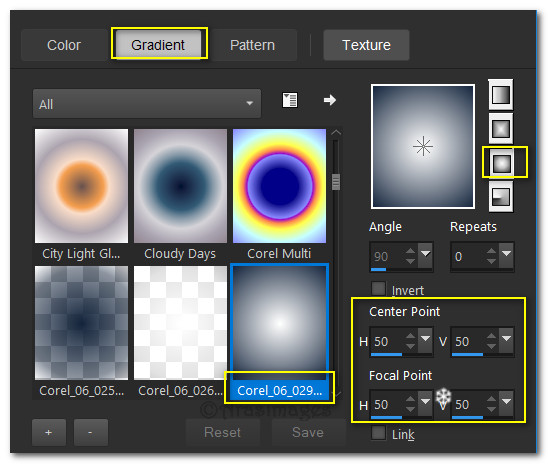
1. In Materials Palette, set Foreground to #ffffff, Background to #071831. In Material Properties, set to Gradient using the foreground/Background colors, Sunburst, Repeats 0, Center Point/Focal Point all to 50. Angle/Invert/Link null.
2. New/New Image 900px by 750px. Flood fill with Gradient.
3. Effects/Filter Forge/Filter Forge 6/Effects/Distortion/Bad Trip. Settings as seen below. Apply.

4. Open 38ca9ad8f2ed9e2212ca620f4591be00.png. In Layers Palette/Promote Background Layer.
5. Image/Resize/Resize by 80%/Resize all layers unchecked.
6. Effects/Transparency/Eliminate Black.
7. Using Magic Wand, click on all of the gold and blue lines; start by clicking the thickest part first and finding smaller lines that were missed. A bit of patience might be needed here. Copy.
8. Go back to main image. Paste as New Layer. Pull to bottom of image.
9. From Tool bar choose the Color Change tool. Left click on the middle and bottom lines with the foreground color.
10. Adjust/Sharpness/Sharpen.
11. Open 1381757226_hiver_nikita.pspimage of trees. Copy/Paste as New Layer.
12. Using Eraser tool or Selection tool, erase Nikita's watermark off image.
13. From Tool bar/Preset Shape Tool, select the Ellipse tool. Set the Line style to krisbigdot and the width to 3. Close off the background color in the Materials Palette and change foreground to #ffffff.

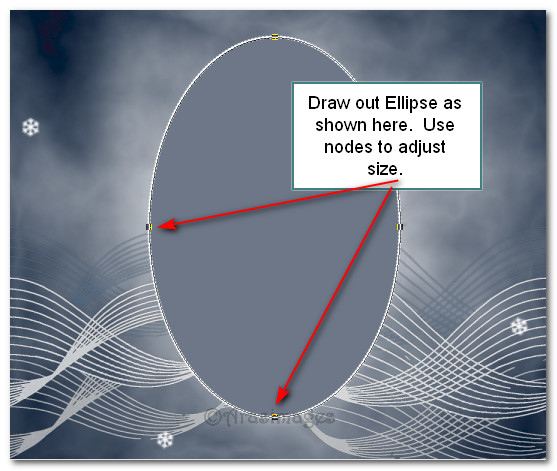
14. Using the Ellipse settings, start at top just to right of center trees and draw out an ellipse shape as I have done, encompassing the trees.
15. Convert Vector layer to Raster Layer. Pull down above Raster 2.
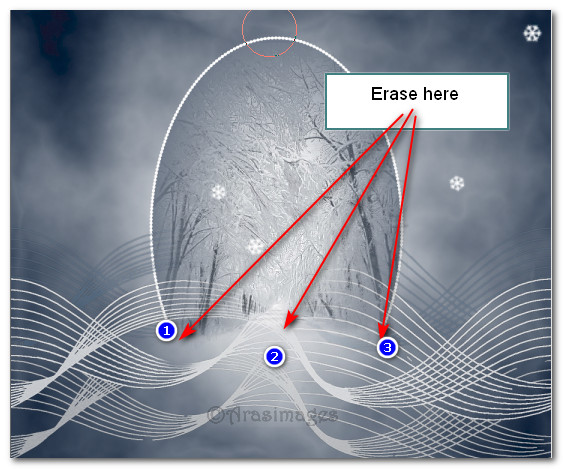
16. Using Eraser tool, erase the ellipse line below tree line and in center between bottom lines.
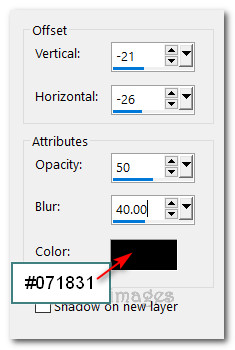
17. Effects/3D Effects/Drop Shadow. Vertical -21, Horizontal -26, Opacity 50, Blur 40, color #071831.
18. Move to Raster 2 and erase the lines from the trees.
19. Highlight/Activate top layer. Open 1381757226_hiver_nikita.pspimage of trees. Using Eraser tool or Selection tool, erase Nikita's watermark off image. Copy/Paste as New Layer.
20. Image/Resize/Resize by 78%/Resize all layers unchecked. Lower Opacity down to 51.
21. Image/Mirror/Mirror Horizontal. Move trees to left side of image.
22. Duplicate. Image/Resize/Resize by 78%/Resize all layers unchecked.
23. Image/Mirror/Mirror Horizontal. Move trees to right side of image leaving a litte space between middle trees and right side trees.
24. Layers/New Raster Layer. From Tool bar select Paint brushes. Choose Tree Brush exported earlier with settings as seen below.

25. Using Foreground color, left stamp brush in upper right corner.
26. Layers/New Raster Layer. Change Rotation to 0. Left stamp in upper left corner. Image/Mirror/Mirror Horizontal.
27. Duplicate. Image/Mirror/Mirror Horizontal. Image/Mirror/Mirror Vertical. Pull branch upward toward middle right side.
28. Merge/Merge Down. Merge/Merge Down again. Effects/Edge Effects/Enhance.
29. Open 13186826094_feerique_nikita.pspimage of fairie. Copy/Paste as New Layer.
30. Use Eraser tool to erase Nikita's watermark.
31. Image/Image Resize by 78%/Resize all layers unchecked.
32. Adjust/Sharpness/Sharpen.
33. Effects/3D Effects/Drop Shadow. Vertical -21, Horizontal -26, Opacity 50, Blur 40, color #ffffff.
34. Layers/New Raster Layer. Using Selections tool set to settings below, select a rectangle near bottom of image. Flood fill with foreground color #ffffff. Deselect.

35. Effects/3D Effects/Inner Bevel.

36. Drop Opacity down to 41.
37. From tool bar select Text tool. Select Font Toots Extended, Size 128, color #626d7d, Stroke width 0.0, Kerning -25. Type out the words "Winter Fairie". Conver to Raster Layer.
38. Objects/Align/Horizontal Center. Adjust vertically on white background.
39. Highlight the text with Magic Wand. Use Inner Bevel settings as in Step #35. Deselect.
40. Effects/3D Effects/Drop Shadow. Vertical -21, Horizontal -26, Opacity 50, Blur 40, color #ffffff.
41. Image/Add Borders/Add 3px border, Symmetric checked, color #ffffff.
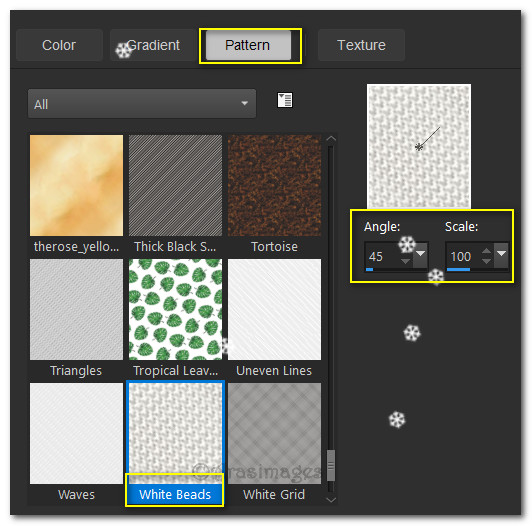
42. Highlight border with Magic Wand. Open the White Beads pattern. Flood fill border with pattern, Angle 45/Scale 100%.
43. Effects/Edge Effects/Enhance. Deselect.
44. Image/Add Borders/Add 10px border, Symmetric checked, color #626d7d.
45. Image/Add Borders/Add 3px border, Symmetric checked, color #ffffff.
46. Highlight 3px border with Magic Wand. Open the White Beads pattern. Flood fill border with pattern, Angle 45/Scale 100%.
47. Effects/Edge Effects/Enhance. Deselect.
48. Sign your name or leave watermark if you wish. Save as .jpg or .png named Winter Fairie.
49. Open Animation Shop. File/Open/Winter Fairie.jpg. Duplicate 17 times, having 18 frames in all. Highlight first frame. Edit/Select All.
50. Open SimoneAni514-MNG.mng. Highlight first frame. Edit/Select All. From top of animated image, right click/Copy.
51. Go back to the main image and within the first frame, right click/Paste/Into Selected Frame. Place the animation in the upper left corner by Fairie wings. Left click into place. Repeat in bottom left corner. Repeat in bottom right corner.
52. Open SimoneAni515-MNG.mng file. Highlight first frame. Edit/Select All. From top of animated image, right click/Copy.
53. Go back to the main image and within the first frame, right click/Paste Into Selected Frame. Place the animation in the upper left corner by Fairie wings. Left click into place. Repeat in bottom left corner. Repeat in bottom right corner.
54. Animation/Frame Properties. Change number from 10 to 14. The higher the number the slower the animation will work.
55. Click on View Animation to see if you are pleased with your animation. If all is working okay, then we will now save.
56. File/Save As. When the Save As box appears, fill in where you want to save in, Give the file a name (Winter Fairie) and leave Save as type in (*gif) form. Click Save. As the next boxes appear, continue to click on Next, Next, Next then Finish.
57. All done! I hope you enjoy the winter scene and I wish you all a Happy New Year 2019!
This tutorial was tested by PamelaD and Evatexas January 2019. Thanks ladies!
If you are going to use this tutorial for stationery, cards or place the tutorial/tag on another site, I would appreciate you contacting me for permission, giving Arasimages credit for the original tutorial and if possible, a link back to my site. Thank you.
Copyright © Arasimages All Rights Reserved