

Send Me Roses
For a Danish, Italian, Dutch, German and Spanish translation, click on the flags.


For this tutorial you will need the materials in the zip file below.

Thanks go to K@rine, Cibi and Silvie for the lovely tubes used.
Unzip the materials into a working folder you have created on your desktop named Send Me Roses. Place the Pattern Goldbeads in to your PSP/Patterns folder. Export the Sparkle.PspTube into the PSP/Picture Tubes folder. Please duplicate and close original tubes using the copies for your work so you will not lose the originals. I have used the plugins Neology/Transparent Pizza, AP 01 [Innovations]/Mirror-Reflections and Filters Unlimited 2.0/Buttons & Frames/3D Glass Frame 1 in this tutorial. It is assumed you have a working knowledge of PSP to follow these directions. I have used PSP2019 for this tutorial but other versions may be used.
Use the heart below to mark your place along the way.

1. In Materials Palette, set Foreground to #f69ac1, Background to #47252c.
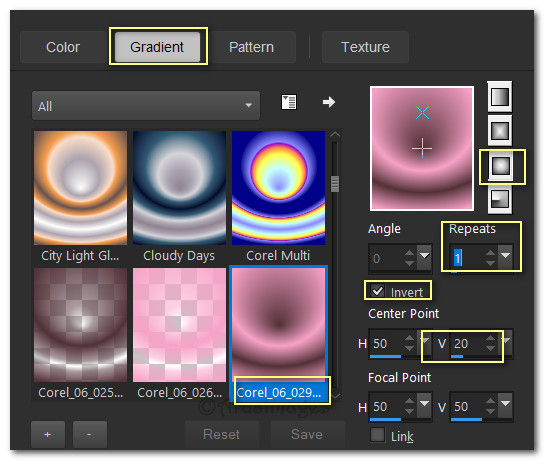
2. In Materials palette set to Gradient, Sunburst, Angle Null, Repeats 1, Invert checked, Center Point H50/V20, Focal Points H50/V50, Corel_06_029_foreground_background.
3. Open New Image 900px by 850px. Flood fill with Gradient.
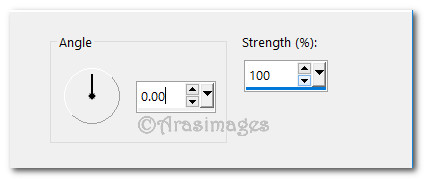
4. Adjust/Blur/Motion Blur.
5. Duplicate then close off bottom layer.
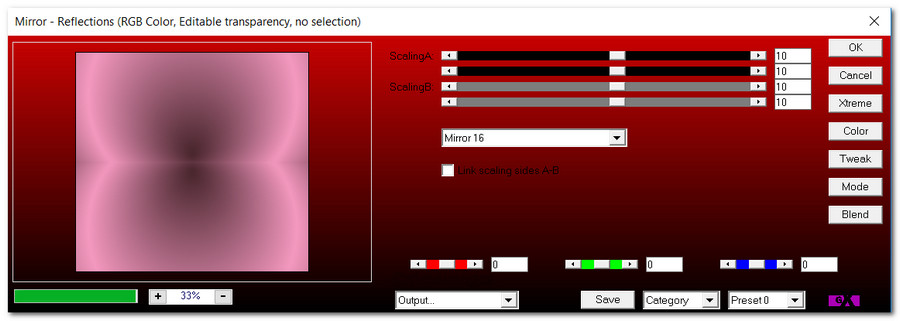
6. Effects/AP 01 [Innovations]/Mirror-Reflections on duplicated layer.
7. View/Rulers activated. Using the pick tool, pull layer down to 420px.
8. Effects/Neology/Transparent Pizza.
![]()
9. Open Raster 1 layer. Undo the Ruler and move the pick tool back to move tool.
10. Layers/New Raster Layer. Using the Selections tool set to Rectangle/Add Shift/Feather 0, select from the top down to the 420px.
11. In Materials Palette, change Foreground to Goldbeads Pattern.
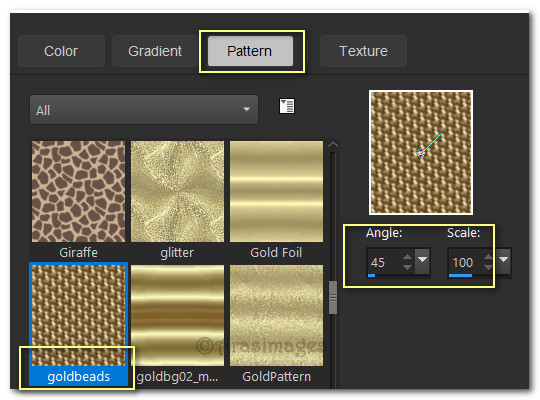
12. Flood fill the selection with the Goldbeads Pattern.
13. Selections/Modify/Contract by 5px. Press Delete key. Selections/Invert.
14. Effects/Edge Effects/Enhance. Deselect.
15. Open Magic_Dust_Heart_Rosa_31.12.2017.pspimage. Copy/Paste as New Layer. Move to right of image.
16. Open Pink_Rose_01.01.2018.pspimage. Copy/Paste as New Layer.
17. Image/Resize/Resize by 80%/Resize all layers unchecked.
18. Move roses into upper left corner.
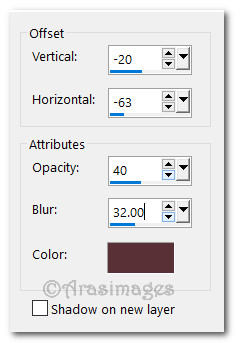
19. Effects/3D Effects/Drop Shadow. Vertical -20, Horizontal -63, Opacity 40, Blur 32, color #4f252c.
20. Adjust/Sharpness/Sharpen.
21. Copy/Paste the roses again. Image/Mirror/Mirror Horizontal.
22. Image/Resize/Resize by 80%/Resize all layers unchecked.
23. Repeat drop shadow and sharpen. Move into upper right corner.
24. Merge/Merge Down. Move to below Raster 2 Goldbeads border. Go back to top layer to continue.
25. Open Coeurs_guirlandes_CibiBijoux.pspimage. Change Foreground color in Materials Palette to #eb2e7e. Left click inside the red larger hearts to recolor using the Color Changer tool.
26. Copy/Paste as New Layer. Image/Resize/Resize by 112/Resize all layers unchecked.
27. Using the Magic Wand, click in the gold outer border of the hearts and lines to activate them. Use settings Mode(Shift)/Match mode: Color/Tolerance 20.

28. Change the Goldbeads Pattern to the Foreground color again. Left click within the activated borders flood filling them.
29. Effects/Edge Effects/Enhance. Selections/Select None.
30. Effects/3D Effects/Drop Shadow. Vertical -20, Horizontal -63, Opacity 40, Blur 32, color #4f252c.
31. Open Karine_dreams_Pink_Woman_3383_Avril_2016.pspimage. Image/Mirror/Mirror Horizontal.
32. Copy/Paste as New Layer.
33. Image/Resize/Resize by 130/Resize all layers unchecked.
34. Effects/3D Effects/Drop Shadow. Vertical -20, Horizontal -63, Opacity 40, Blur 32, color #4f252c.
35. Adjust/Sharpeness/Sharpen.
36. Image/Add Borders/Add 5px border, Symmetric checked, color #ffffff.
37. Using Magic Wand activate the 5px border. Left click to flood fill the 5px border with Goldbeads Pattern.
38. Effects/Edge Effects/Enhance. Deselect.
39. Image/Add Borders/Add 20px border, Symmetric checked, color #f69ac1.
40. Image/Add Borders/Add 5px border, Symmetric checked, color #ffffff.
41. Using Magic Wand activate the 5px border. Using the Goldbeads Pattern, flood fill the 5px border.
42. Effects/Edge Effects/Enhance. Deselect.
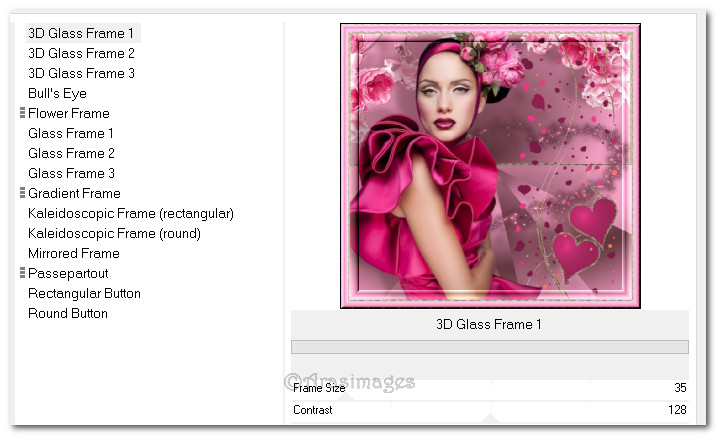
43. Effects/Filters Unlimited 2.0/Buttons&Frames/3D Glass Frame 1.
44. Place your watermark or name on a New Layer if you wish. Merge/Merge Visible.
45. Save your work as a .jpg file named Send Me Roses. Duplicate twice having 3 layers in all.
46. Close off middle and bottom layers.
47. From tool bar choose the Picture Tube tool. Select Sparkle.psp Tube using settings seen below.

48. Left click sparkles on the large heart in image in various spots. Close layer.
49. Move to middle layer. Open and left click several sparkles on this layer using the same settings as above. Close layer.
50. Move to bottom layer. Change Scale to 90. Open and left click several sparkles on this layer. Open middle and top layers.
51. File/Save As. Save as PSP Animation Shop (*psp) file.
52. Open Animation Shop. File/Open. Open the Send Me Roses.psp file.
53. Edit/Select All. Click on the View Animation button at the top to see if you are satisfied with your work. If you wish for the sparkles to go slower, click on Animation/Frame Properties. Set the speed from 10 to 15. Check again using View Animation button. If you are happy with your work then it is time to save.
54. File/Save As. When the Save As box appears, give your work a name (Send Me Roses), designate where to save it and leave the Save As as a .gif file. Click Save. As the boxes appear, click Next, Next, Next and Finish. Your animated tutorial is now finished.
This tutorial was tested by PamelaD and Evatexas February 2019. Thanks ladies!
If you are going to use this tutorial for stationery, cards or place the tutorial/tag on another site, I would appreciate you contacting me for permission, giving Arasimages credit for the original tutorial and if possible, a link back to my site. Thank you.
Copyright © Arasimages All Rights Reserved