
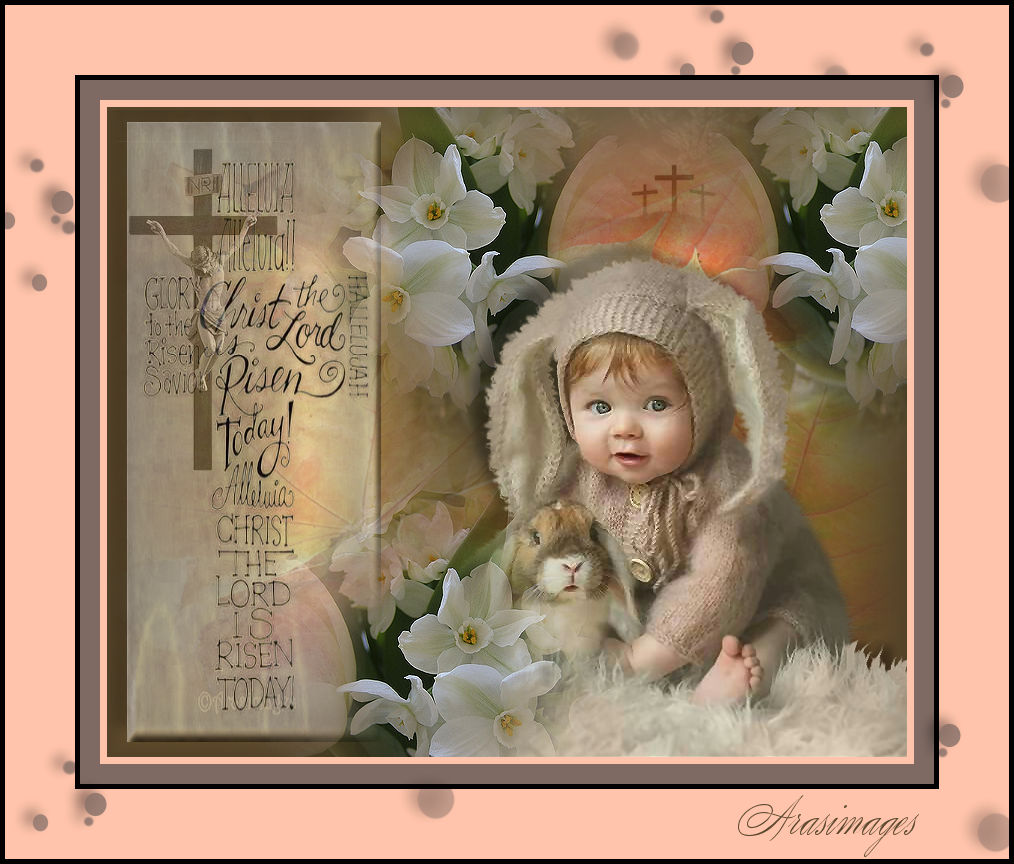
He is Risen
For Italian, Danish, Dutch, French, German and Spanish translations, click on the flags.


For this tutorial you will need the materials in the zip file below.

Thanks go to Nikita for the flowers; wieskes for the baby tube, owner of the text found on Pinterest and PamelaD of Arasimages for the lovely Jesus on the Cross tube I have used.
Unzip the materials into a working folder you have created on your desktop named He is Risen. Please duplicate and close original tubes using the copies for your work so you will not lose the originals. Export Brush Bokeh_37 into your PSP Brushes folder. I have used the plugins Creativity/Splatter and Transparency/Eliminate White in this tutorial. It is assumed you have a working knowledge of PSP to follow these directions. I have used PSP2019 for this tutorial but other versions may be used.
Use the bunny below to mark your place along the way.

1. In Materials Palette, set Foreground to #ffc4ab, Background to #4b3b24.
2. Open New Image 800px by 650px. Flood fill with Foreground color.
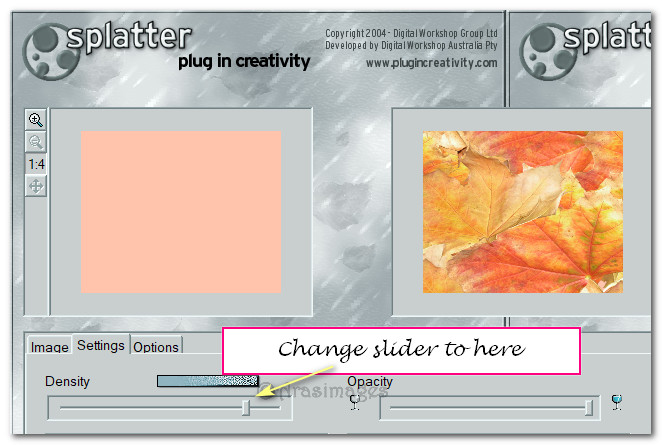
3. Effects/Creativity/Splatter. Under Image tab select leaves. Under Settings tab set as seen below.
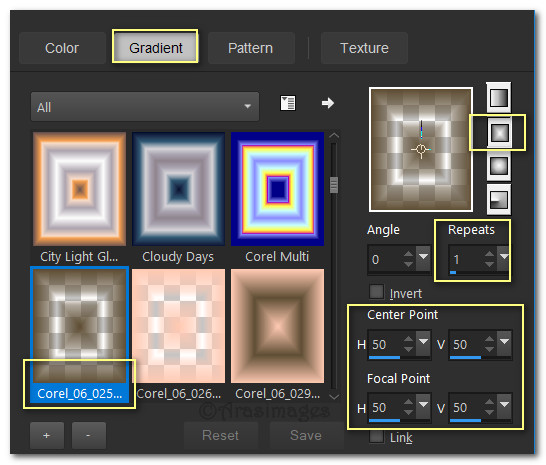
4. In Materials palette set to Gradient, Rectangular, Angle Null, Repeats 1, Invert unchecked, Center Point H50/V50, Focal Points H50/V50, Corel_06_025_fading background.
5. Layers/New Raster Layer.
6. Flood fill New Raster Layer with Fading Background.
7. Open PinterestFind.png of text. Promote Background layer.
8. Effects/Transparency/Eliminate White. Repeat.
9. Duplicate. Merge/Merge Down.
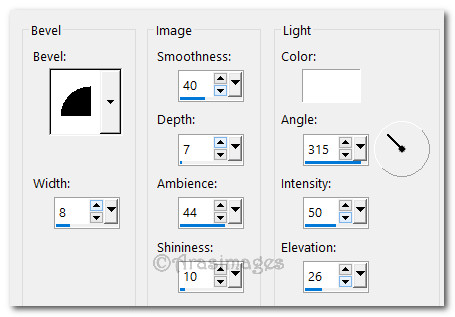
10. Effects/3D Effects/Inner Bevel.
11. Copy/Paste as New Layer.
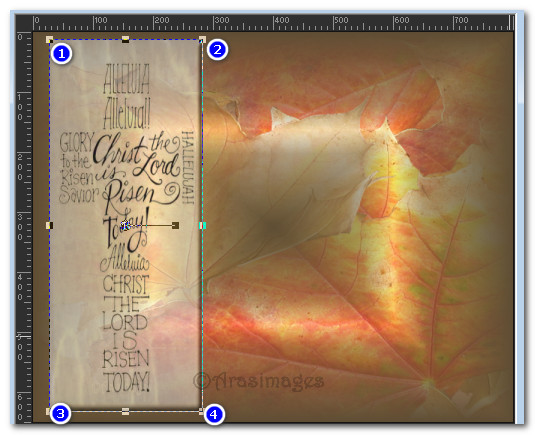
12. Using Move tool place text box on left side of image. Using Pick tool, pull node to make text box narrower (280px wide by 630px high). See image below for placement.
13. Adjust/Sharpness/Sharpen.
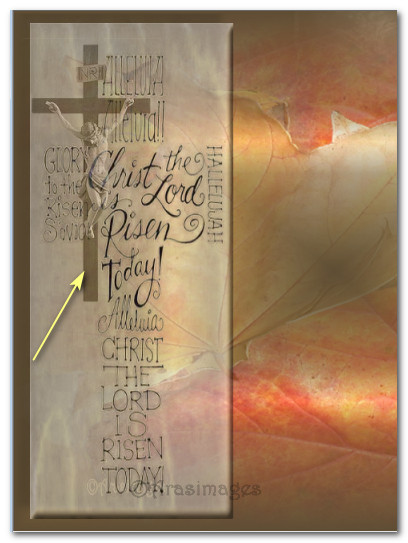
14. Open JesusOnCross.pspimage. Copy/Paste as New Layer.
15. Blend Mode set to Luminance (Legacy). Opacity at 53%.
16. Image/Resize/Resize by 75%/Resize all layers unchecked.
17. Place in upper words as seen below.
18. Open EasterPinterestPin.pspimage of crosses. Copy/Paste as New Layer.
19. Image/Resize/Resize by 60%/Resize all layers unchecked.
20. Blend Mode set to Luminance (Legacy). Opacity at 35%.
21. Place crosses in upper right corner.
22. Open 12206401576_fleurs.pspimage flowers. Copy/Paste as New Layer.
23. Image/Mirror/Mirror Horizontal. Place flowers in center top so they overlap the text a bit.
24. Adjust/Sharpness/Sharpen.
25. Paste once more and place in upper right corner.
26. Adjust/Sharpness/Sharpen.
27. Open wieskes tuber 774.png file of baby with bunny. Copy/Paste as New layer.
28. Place baby with bunny in right bottom corner so tube fits.
29. Adjust/Sharpness/Sharpen.
30. Effects/3D Effects/Drop Shadow. Vertical -15, Horizontal -15, Opacity 40, Blur 14, color #000000.
31. Open 12206401576_fleurs.pspimage flowers. Copy/Paste as New Layer.
32. Place over bunny and a bit on the bottom edge of text.
33. Adjust/Sharpness/Sharpen.
34. Image/Add Borders/Add 7px border, color #ffc4ab, symmetric checked.
35. Image/Add Borders/Add 20px border, color #7e6a63, symmetric checked.
36. Image/Add Borders/Add 5px border, color #000000, symmetric checked.
37. Image/Add Borders/Add 70px border, color #ffc4ab, symmetric checked.
38. Using Magic Wand, activate the 70px border.
39. Layers/New Raster Layer.
40. From the tool bar select the Paint brush tool. Select Brush Bokeh_37. Use brush settings as seen below using Background color #7e6a63.

41. Right click the mouse to stamp in various places as I have done. Follow the numbers and image below for placement help. You do not have to be exact.

42. Selections/Select None.
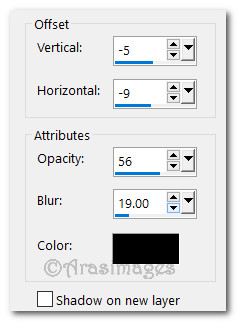
43. Effects/3D Effects/Drop Shadow. Vertical -5, Horizontal -9, Opacity 56, Blur 19, color #000000.
44. Image/Add Borders/Add 5px border, color #000000, symmetric checked.
45. Using the Selections tool set to Point to Point, Add(Shift), Feather 0, select around the little girl's face and the rabbit's face.
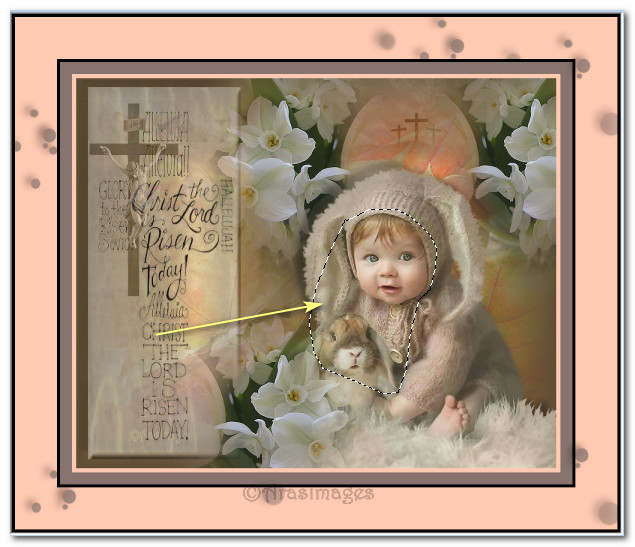
46. Adjust/Sharpness/Sharpen. Deselect.
47. Add your name or watermark if you wish. Save as a .png or .jpg file.
This tutorial was tested by PamelaD April 2019. Thanks dear friend!
If you are going to use this tutorial for stationery, cards or place the tutorial/tag on another site, I would appreciate you contacting me for permission, giving Arasimages credit for the original tutorial and if possible, a link back to my site. Thank you.
Copyright © Arasimages All Rights Reserved