
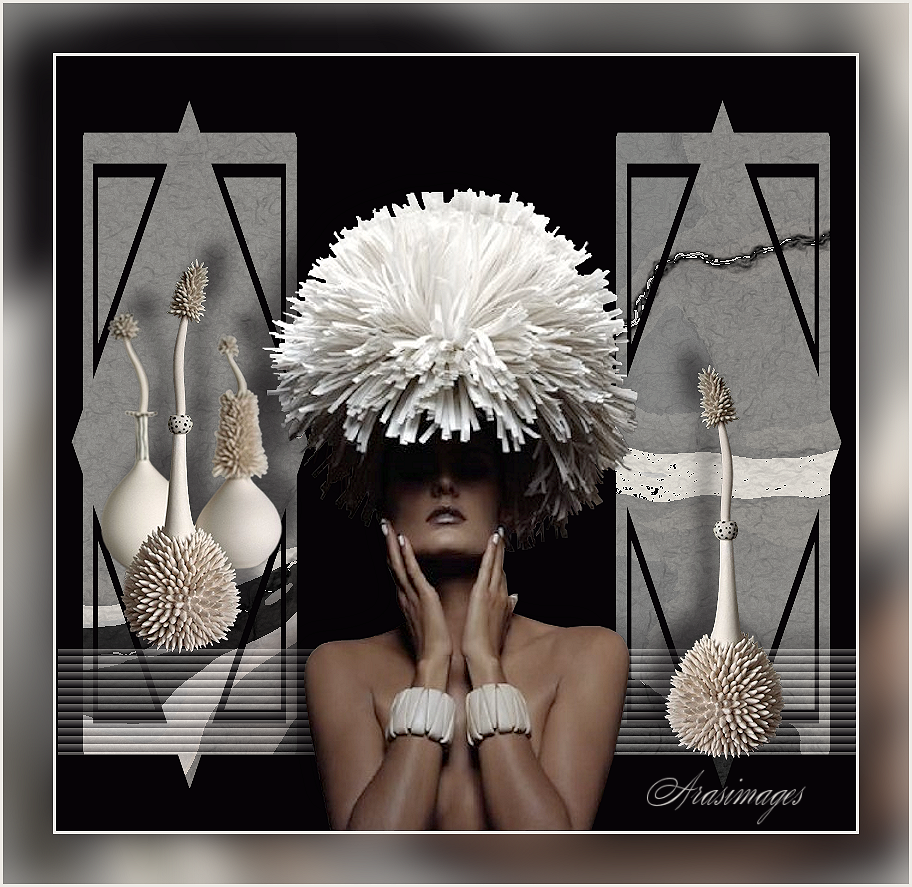
PomPom
For Dutch, Italian, Danish, Spanish and French translations, click on the flags.


For this tutorial you will need the materials in the zip file below.

Thanks go to PamelaD of Arasimages for her beautifully tubed lady and odd little vases used.
Unzip the materials into a working folder you have created on your desktop named Pom Pom. Please duplicate and close original tubes using the copies for your work so you will not lose the originals. Place Selection/ArasimagesPomPom in your PSP Selections folder. Place Mask fork in your PSP/Masks folder. It is assumed you have a working knowledge of PSP to follow these directions. The plugins FilterForge6/Stone/Marble Arabescato, Xero/Abstractor, Toadies/Metallic Onion, Filter Factory Gallery D/Diagonal Infini Tiles and VM Extravaganza/James Bondage, Graphics Plus/Cross Shadow and various PSP effects are used in this tutorial. I have used PSP2018 for this tutorial but other versions may be used.
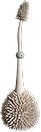
Use the little vase below to mark your place along the way.
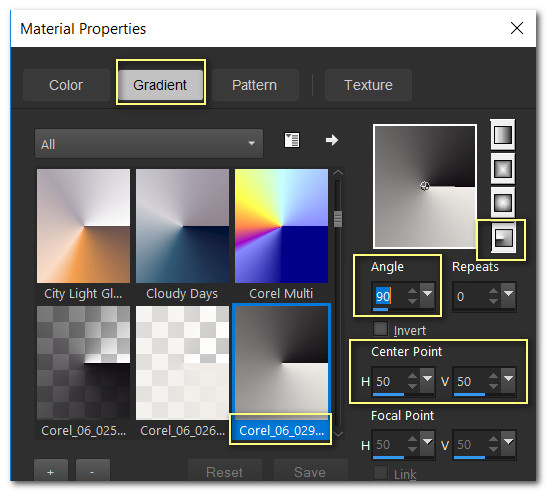
1. In Materials Palette, set Foreground to #eeebe6, Background to #060306. Create a Gradient using Corel_06_029_foreground/background, Radial, Angle 90/ Repeats 0, Invert unchecked, Center Point at 50/50 and Focal Point set to null.
2. New/New Image 800px by 775px. Flood fill with Gradient.
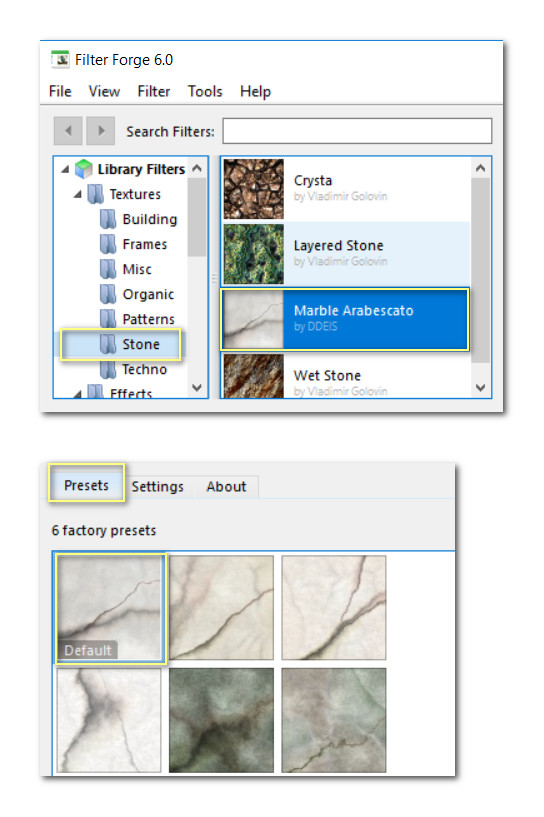
3. Effects/Filter Forge/Filter Forge 6/Stone/Marble Arabescato.
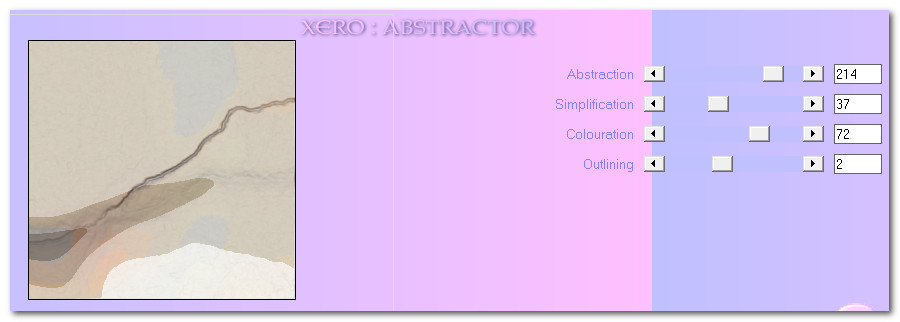
4. Effects/Xero/Abstractor.
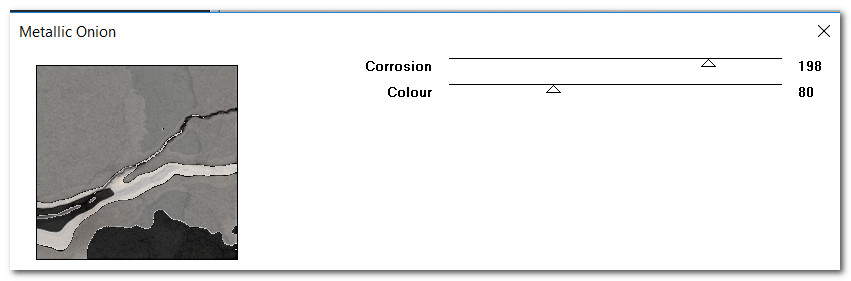
5. Effects/Toadies/Metallic Onion.
6. Layers/New Raster Layer. Flood fill with #060306.
7. Layers/Load/Save Mask/Load Mask from Disk. From drop down select Mask folk. Check Invert transparency. Load.

8. Merge/Merge Group.
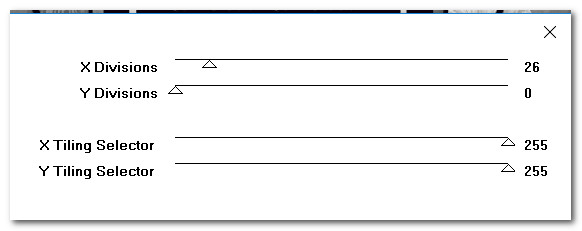
9. Effects/Filter Factory Gallery D/Diagonal Infini Tiles.
10. Using Selections tool set to Selection/Rectangle/Add (Shift)/Feather 0, select the center diamond. Press delete key once.

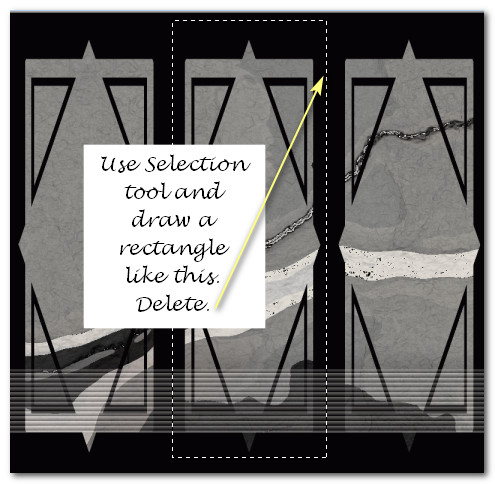
11. Flood fill with #060306. Selections/Select None.
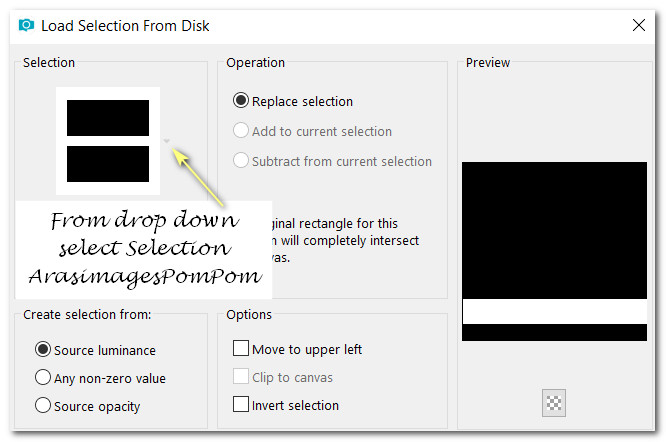
12. Layers/New Raster Layer. Selections/Load/Save Selection/Load Selection from Disk. Choose Selection/ArasimagesPomPom. Load.
13. Flood fill with #060306. Drop Opacity to 41.
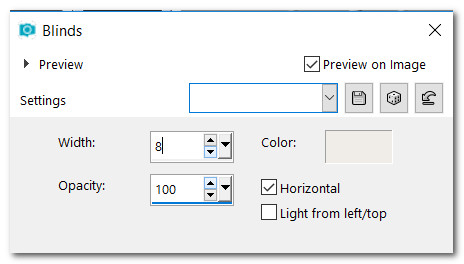
14. Effects/Texture Effects/Blinds/color #eeebe6.
15. Effects/3D Effects/Drop Shadow. Vertical -20, Horizontal 0, Opacity 50, Blur 35, color #060306.
16. Effects/3D Effects/Drop Shadow. Vertical 0, Horizontal -20, Opacity 50, Blur 35, color #060306.
17. Selections/Select None.
18. Open zoe-bradley-3.pspimage of woman. Copy/Paste as New Layer.
19. Image/Resize/Resize by 120%/Resize all layers unchecked.
20. Effects/3D Effects/Drop Shadow. Vertical -20, Horizontal -20, Opacity 50, Blur 35, color #060306.
21. Adjust/Sharpness/Sharpen. Pull down to bottom center.
22. Open LornaFraser.pspimage of odd little vases. Copy Tube_2/Paste as New Layer.
23. Image/Resize/Resize by 75%/Resize all layers unchecked.
24. Effects/3D Effects/Drop Shadow. Vertical -20, Horizontal -20, Opacity 50, Blur 25, color #060306.
25. Adjust/Sharpness/Sharpen.
26. Image/Mirror/MirrorHorizontal. Move to left side triangle to sit on blinds.
27. Open LornaFraser.pspimage tube. Copy Tube_1/Paste as New Layer.
28. Image/Resize/Resize by 75%/Resize all layers unchecked.
29. Effects/3D Effects/Drop Shadow. Vertical -20, Horizontal -20, Opacity 50, Blur 25, color #060306.
30. Adjust/Sharpness/Sharpen. Move to right side triangle so it rests on the bottom of the blinds.
31. Image/Add Borders/Add 3px border, Symmetric checked, color #eeebe6.
32. Image/Add Borders/Add 50Px border, Symmetric checked, color #060306.
33. Image/Add Borders/Add 3px border, Symmetric checked, color #eeebe6.
34. Using Magic Wand activate the 50px border.
35. Flood fill with Gradient.
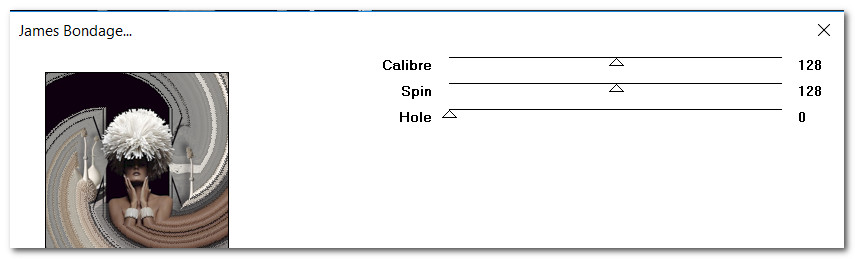
36. Effects/VM Extravaganza/James Bondage.
37. Adjust/Blur/Gaussian Blur/Radius 20.
38. Effects/Graphics Plus/Cross Shadow.

39. Adjust/Sharpness/Sharpen.
40. Stamp your name or watermark on tag if you wish.
If you are going to use this tutorial for stationery, cards or place the tutorial/tag on another site, I would appreciate you contacting me for permission, giving Arasimages credit for the original tutorial and if possible, a link back to my site. Thank you.
This tutorial was tested by PamelaD and Evatexas May 2019. Thanks ladies!
If you are going to use this tutorial for stationery, cards or place the tutorial/tag on another site, I would appreciate you contacting me for permission, giving Arasimages credit for the original tutorial and if possible, a link back to my site. Thank you.
Copyright © Arasimages All Rights Reserved