
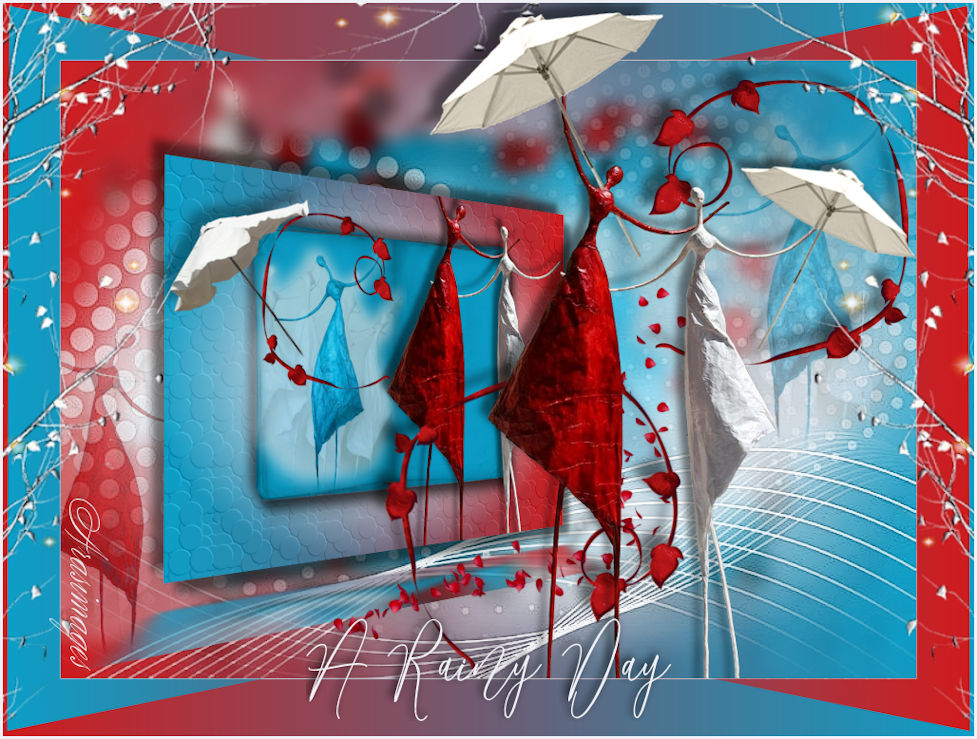
A Rainy Day
For Dutch, French, Italian, Danish, German and Spanish translation, click on the flags.
For this tutorial you will need the materials in the zip file below.
Thanks go to PamelaD of Arasimages for tubing the skinny ladies and to the owners of the other various original scraps I found on the net.
Use the umbrella below to mark your place along the way.
Unzip the materials into a working folder you have created on your desktop named A Rainy Day. Please duplicate and close original tubes using the copies for your work so you will not lose the originals. Place 20-20 Mask in your PSP Files/Masks folder. Click on the AlienSkin Dancers1.s file and it will automatically go into its proper folder. Place the 2202lt open.pfp file in your PSP Files/Plugins/Andromeda Perspective/Perspective-Presets/andromeda/02Full Canvas/22Side Walls folder if it is not already there. Or click on the yellow folder at the bottom of Andromeda/Presets and it shows up as 2202.lt open.pfp or ArasimagesWindyDay and use either of those. It is assumed you have a working knowledge of PSP to follow these directions. Plugins AlienSkin Eye Candy5/Perspective, Impressionist/PokerChips and PSP Effects are used in this tutorial. I have used PSP2019 for this tutorial but other versions may be used.
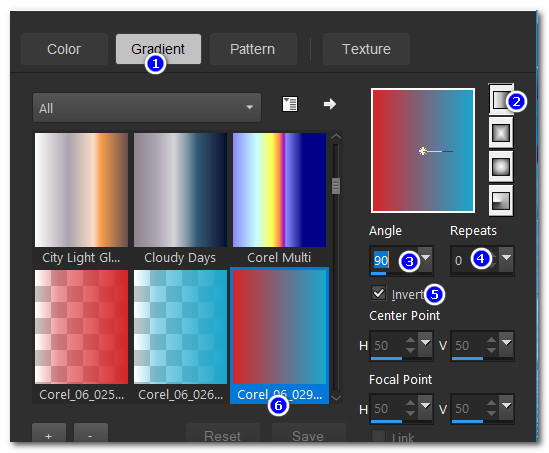
1. In Materials Palette, set Foreground to #0c9ec7, Background to #cf1b1e. Set style to Linear, Angle 90/Repeats 0/Invert unchecked. Gradient Corel_06_029-foreground-background. Center Point/Focal Points all Null.

2. New/New Image 900px by 650px. Flood fill with Gradient.
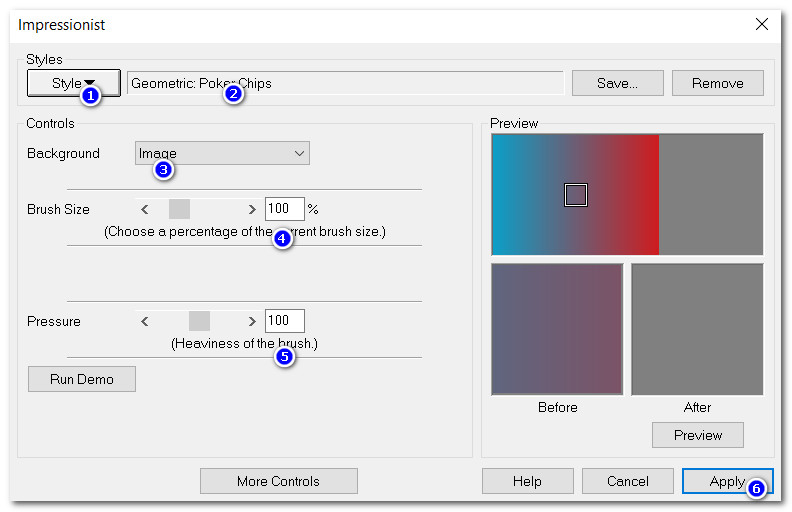
3. Effects/Impressionist/Impressionist/ Geometric/Geometric: Poker Chips.
4. Layers/New Raster Layer. Flood fill with #eff0f5.
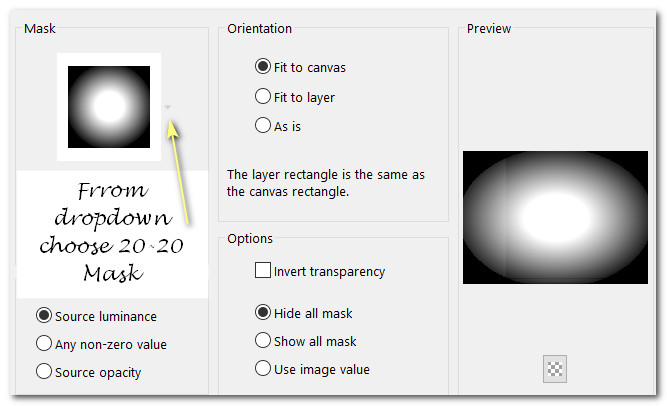
5. Layers/Load/Save Mask. Load Mask from Disk. Select 20-20 Mask from Dropdown arrow. Load.
6. Merge/Merge Group.
7. Open Book.pspimage. Copy/Paste as New Layer.
8. Image/Resize/Resize by 75%/Resize all layers unchecked.
9. Effects/3D Effects/Drop Shadow. Vertical -12, Horizontal -12, Opacity 50, Blur 23, color #000000.
10. Effects/3D Effects/Drop Shadow. Vertical 12, Horizontal 12, Opacity 50, Blur 23, color #000000.
11. Open BlueDollArt.pspimage. Copy Misted layer. Paste as New Layer. Lower Opacity down to 68.
12. Image/Resize/Resize by 60%/Resize all layers unchecked. Move to left side of book.
13. Open RED_WHITE_ART.pspimage. Copy/TUBE. Paste as New Layer.
14. Effects/3D Effects/Drop Shadow. Vertical -15, Horizontal -15, Opacity 50, Blur 15, color #000000.
15. Move ladies to right side of image.
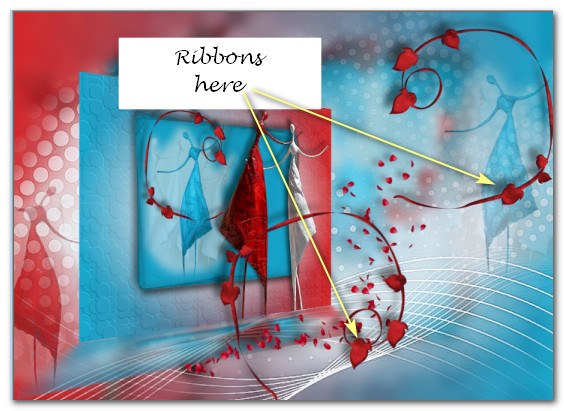
16. Open Ribbon.pspimage. Copy/Paste as New Layer.
17. Image/Mirror/Mirror Horizontal. Move over blue lady.
18. Merge/Merge Visible.
19. Duplicate. Close off top image. Move down to and hightlight Merged bottom layer. Image/Mirror/Mirror Horizontal.
20. Effects/Impressionist/Impressionist/ Geometric/Geometric: Poker Chips. (See #3 step).
21. Adjust/Blur/Gaussian Blur. Radius 9.
22. Layers/New Raster Layer. Flood fill with #eff0f5.
23. Open DottedMask.jpg. Leave open on workspace.
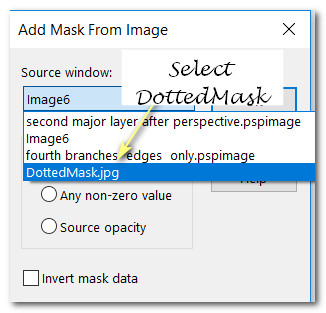
24. Working on main image, Layers/New Mask Layer/From Image. From Source window: Select DottedMask/Sourse Luminance selected.
25. Merge/Merge Group.
26. Effects/Edge Effects/Enhance.
27. Open RED_WHITE_ART.pspimage. Copy BLUE_MISTED layer. Paste as New Layer.
28. Image/Resize/Resize by 60%/Resize all layers unchecked.
29. Move to upper right side of image. Drop Opacity down to 38.
30. Duplicate blue lady. Using Color Changer, change to red #cf1b1e.
31. Image/Mirror/Mirror Horizontal.
32. Move to bottom left corner.
33. Go to top layer, open and highlight.
34. Image/Resize/Resize by 75%/Resize all layers unchecked.
35. Effects/3D Effects/Drop Shadow. Vertical -15, Horizontal -15, Opacity 50, Blur 15, color #000000. Repeat Drop Shadow changing Vertical and Horizontal to 15.
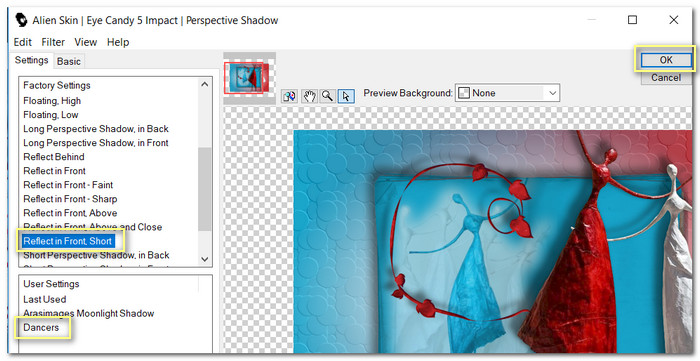
36. Effects/Alien Skin Eye Candy 5/Impact/Perspective/Dancers (for shadow).
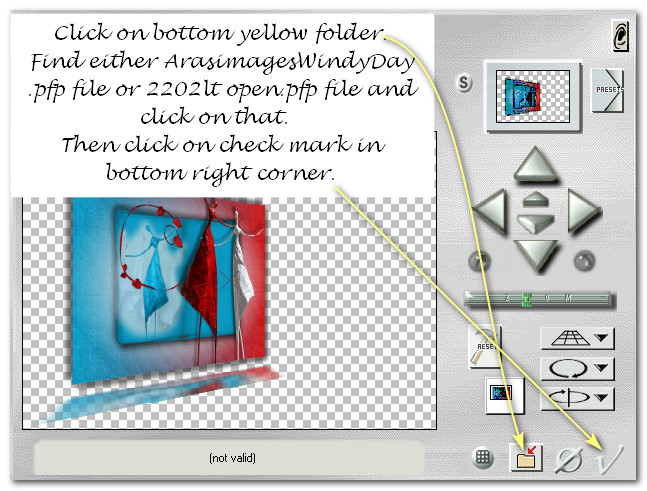
37. Effects/Andromeda/Perspective/. Click on Preset and open yellow folder. Choose 2202lt open.pfp or ArasimagesWindyDay.pfp file. Either will work.
38. Open RedPetals.pspimage. Copy/Paste as New Layer.
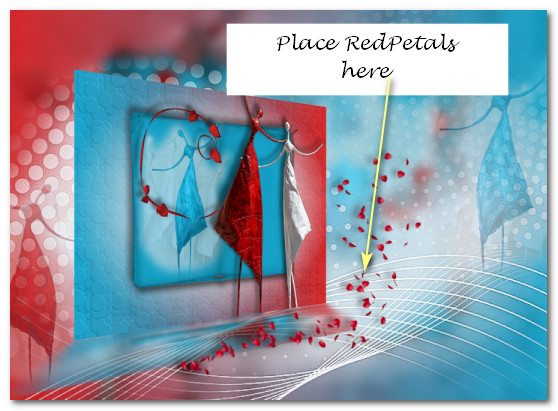
39. Place in center of image over bottom right corner of inner image.
40. Open Ribbon.pspimage. Copy/Paste as New Layer.
41. Effects/3D Effects/Drop Shadow. Vertical -12, Horizontal -12, Opacity 50, Blur 15, color #000000.
42. Move to top right corner over blue lady.
43. Paste as New Layer again. Image/Mirror/Mirror Horizontal.
44. Image/Free Rotate/Rotate Right by 65 degrees. Place over ladies in bottom right corner of inner image.
45. Effects/3D Effects/Drop Shadow. Vertical -12, Horizontal -12, Opacity 50, Blur 15, color #000000.
46. Open RED-WHITE-ART.pspimage. Copy TUBE layer. Paste as New Layer.
47. Effects/3D Effects/Drop Shadow. Vertical -12, Horizontal -12, Opacity 50, Blur 15, color #000000.
48. Image/Resize/Resize by 75%/Resize all layers unchecked. Place right of center.
49. Image/Add Borders/Add 1px border, Symmetric checked, color #eff0f5.
50. Image/Add Borders/Add 60px border, Symmetric checked, color #000000.
51. Activate 60px border with Magic Wand.
52. Layers/New Raster Layer.
53. Flood fill with Gradient/Invert checked.
54. Layers/New Raster Layer.
55. In Materials Palette change Invert to unchecked. Flood fill with Gradient.
56. Effects/Andromeda/Perspective. Use same Perspective setting as before.
57. In Materials Palette change Invert to checked.
58. Layers/New Raster Layer. Flood fill New Raster layer with Gradient.
59. Effects/Andromeda/Perspective. Use same Perspective setting as before.
60. Selections/Select None. Image/Mirror/Mirror Horizontal.
61. Open RuffledUmbrella.pspimage. Copy/Paste as New Layer.
62. Image/Resize/Resize by 55%/Resize all layers unchecked.
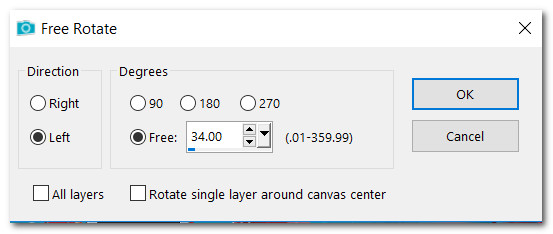
63. Image/Free Rotate. Rotate Left by 34 degrees.
64. Effects/3D Effects/Drop Shadow. Vertical -12, Horizontal -12, Opacity 35, Blur 15, color #000000.
65. Erase a little from the end of the umbrella handle. Then place umbrella handle on end of small blue lady's arm on left.
66. Open TiltedUmbrella.pspimage. Copy/Paste as New Layer.
67. Image/Resize/Resize by 75%/Resize all layers unchecked.
68. Image/Mirror/Mirror Horizontal.
69. Effects/3D Effects/Drop Shadow. Vertical -12, Horizontal -12, Opacity 50, Blur 15, color #000000.
70. Place umbrella at the end of white lady's arm on right side of image.
71. Copy umbrella again and Paste as New Layer.
72. Use same drop shadow as in step #69 and place it at the top of image at end of red lady's arm.
73. Using Eraser tool, erase part of umbrella that is over red lady.
74. Adjust/Sharpness/Sharpen.
75. Open Branches.pspimage. Copy/Paste as New Layer.
76. Change Background color in Materials Palette to #eff0f5. From Tool Bar, select Font Memories, Size 72, color #eff0f5, Stroke width: 0.0. Type out the words "A Rainy Day". Convert to Raster Layer.

77. Objects/Align/Horizontal Center. Adjust over white 1px border in center.
78. Effects/3D Effects/Drop Shadow. Vertical -3, Horizontal -3, Opacity 100, Blur 14, color #000000.
79. Image/Add Borders/Add 3px border, Symmetric checked, color #eff0f5.
80. Sign your name or leave your watermark if you wish. Save as .jpg or .png file.
This tutorial was tested by PamelaD and Evatexas July 2019. Thanks ladies!
If you are going to use this tutorial for stationery, cards or place the tutorial/tag on another site, I would appreciate you contacting me for permission, giving Arasimages credit for the original tutorial and if possible, a link back to my site. Thank you.
Copyright © Arasimages All Rights Reserved


