

The Christmas List
For this tutorial you will need the materials in the zip file below.

For an Italian, Danish, German, French, Spanish and Dutch translation click on the flags.


Unzip the materials into a working folder you have created on your desktop named The Christmas List. Please duplicate and close original tubes using the copies for your work so you will not lose the originals. Open the StarWhite.psp tube and Export it into your PSP Files/Picture Tubes folder. This tutorial was written using VM Extravaganza/Stay in Line, FiltersUnlimited/3D Glass Frame (rounded) and Distortion/Wave and Warp effects of PSP. To work this tutorial, it is assumed you have some working knowledge of Paint Shop Pro. I used PSP2020 for this tutorial.
Thanks go to Kara2601 to Maryse to SDT and to Nikita for their work used in this tutorial.
Use the ball below to mark your place along the way.

1. In Materials Palette, set Foreground to #970d19/Background to #ffffff.
2. New/New Image 1024px by 768px. Selections/Select All.
3. Open RedBG.png. Copy/Paste into Selection. Selections/Select None. Layers/Duplicate.
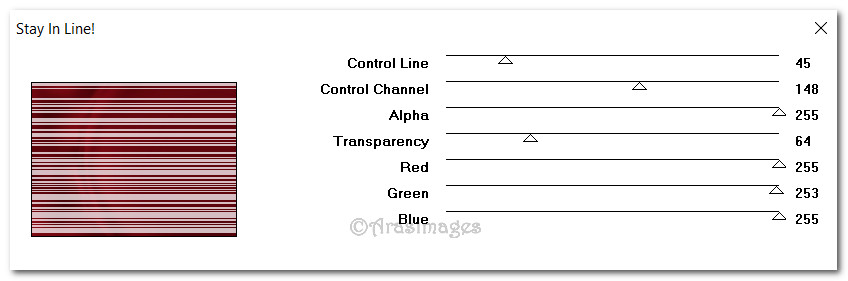
4. Effects/VM Extravaganza/StayInLine. Use settings below.
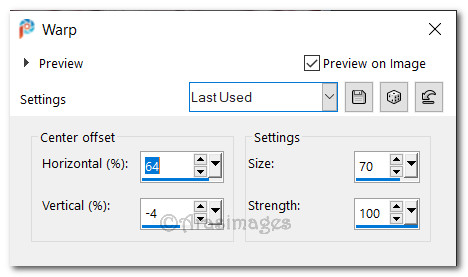
5. Effects/Distortion Effects/Warp.
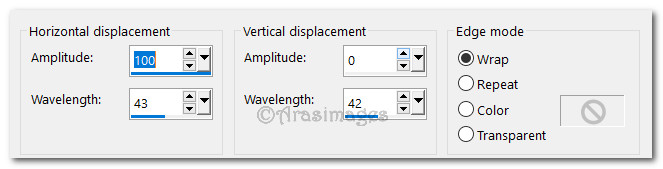
6. Effects/Distortion Effects/Wave.
7. With View/Rulers active, pull layer down to 510px.
8. Effects/3D Effects/Drop Shadow. Vertical -2, Horizontal -20, Opacity 50, Blur 30, Color #000000.
9. Layers/New Raster Layer. Selections/Select All.
10. Open KaraT712.psp. Copy Layer 1/Paste into Selection. Selections/Select None.
11. Lower Opacity to 82. Move trees to the left a little.
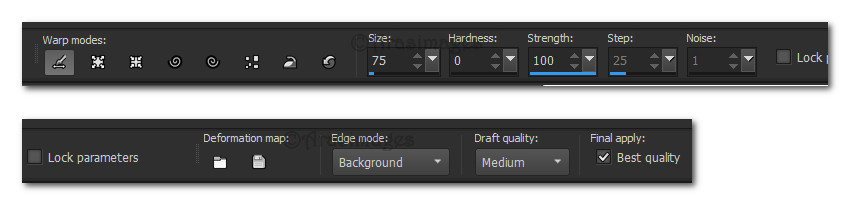
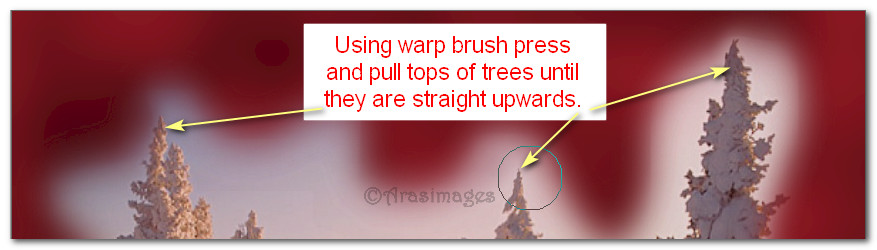
12. From the tool bar, select the Warp Brush. Using the brush push and pull the tops of the trees so they are straighter and not bent. Click on check mark to finish the warp.
13. Open MR_Merveilleux%20Noel.png. Select Maryse watermark/Delete. Deselect.
14. Copy/Paste as New Layer.
15. Image/Resize/Resize by 75%/Resize all layers unchecked.
16. Effects/3D Effects/Drop Shadow. Vertical -2, Horizontal -20, Opacity 50, Blur 30, Color #000000.
17. Using the Color Changer tool and the Foreground color #970e19, left click in a red stripe of the big ornament to change its red color.
18. Move the little girl and ornament to the left side of image.
19. Adjust/Sharpness/Sharpen.
20. Open 13206013504_noel_nikita.png of sparkling tree. Copy/Paste as New Layer.
21. Select Nikita's watermark/Delete. Deselect.
22. Place over tall tree on right side of image having the top star at the top of the tree.
23. Duplicate. Image/Resize/Resize by 80%/Resize all layers unchecked.
24. Move duplicated sparkling tree to set over tree on left side of image.
25. Using eraser tool set to Size 34, erase the sparklies off the big ornament.
26. Open Tube1998_christmas_time_misted_0_.psp of ornaments. Copy/Paste as New Layer.
27. Image/Resize/Resize by 74%/Resize all layers unchecked.
28. Effects/3D Effects/Drop Shadow. Vertical -2, Horizontal -20, Opacity 50, Blur 30, Color #000000.
29. Using the Color Changer tool and the Foreground color #970e19, left click in a red stripe of the ornaments to change its red color.
30. Move ornaments into bottom right corner.
31. Open Skystars.png. Copy/Paste as New Layer.
32. Place in the top red area of the image.
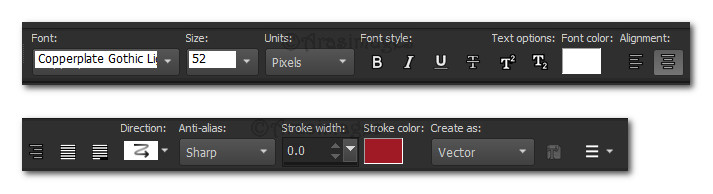
33. From the tool bar select the Text tool. Select the Font Copper Alt Caps Expert, Size 52, Font color #ffffff (background color in Materials palette), type out the words "Merry Christmas". Convert to Raster Layer.
34. Objects/Align/Horizontal Center. Adjust so it sets as I have it.
35. Erase the loop of the M from the little girl's hair.
36. Image/Add Border/Add 3px border, Symmetric checked, color #ffffff.
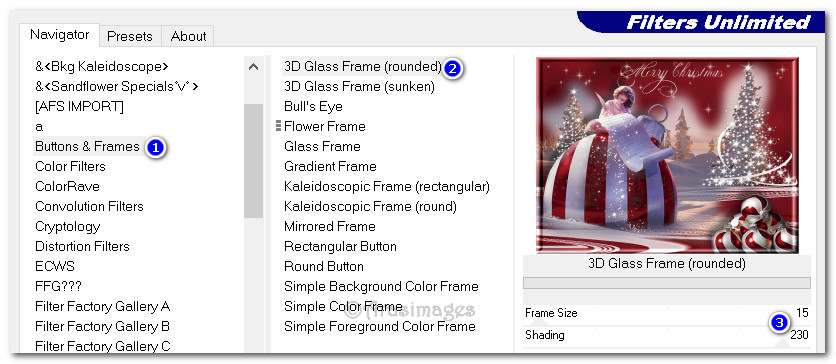
37. Effects/FiltersUnlimited/Buttons & Frames/3D Glass Frame (rounded). Frame size 15/Shading 230.
38. Sign your name if you wish and save as .jpg or .png file named The Christmas List.
39. ANIMATION:
40. Duplicate the image 4 times having 5 layers in all. Close off all layers except the top layer.
41. Make sure top layer is open and highlighted.
42. From tool bar select the Picture Tube tool/StarWhite, size 50. Right click on several of the larger stars. Close off top layer. Move down one layer/open and highlight.
43. Set the size of the star to 40, leave all other setting the same. Right click on several of the medium large stars. Close off layer. Move down one layer/open and highlight.
44. Set the size of the star to 30, leave all other setting the same. Right click on several of the medium stars. Close off layer. Move down one layer/open and highlight.
45. Set the size of the star to 15, leave all other setting the same. Right click on several of the smaller stars. Close off layer. Move down to last layer/open and highlight.
46. Set the size of the star to 10, leave all other setting the same. Right click on several of the smaller stars. Open all layers.
47. File/Save As/Save as PSP Animation Shop (*.psp) file named The Christmas List.
48. Open Animation Shop program. File/Open The Christmas List file.
49. Click in first frame. Edit/Select All. Go to the top Tool Bar and click on View Animation. View your animation and if it is how you like it, then we will save it now.

50. File/Save As. When the Save As box appears, save in: Working file names The Christmas List. Give your file a name (The Christmas List). Leave the Save as type: set as a (*.gif) and click on Save. As the frames continue to come up, click on Next, Next, Next and Finish. All done!
Thanks EvaTexas and PamelaD for testing my tutorial. November 30, 2019.
If you are going to use this tutorial for stationery, cards or place the tutorial/tag on another site, I would appreciate you contacting me for permission, giving Arasimages credit for the original tutorial and if possible, a link back to my site. Thank you.
Copyright © Arasimages All Rights Reserved