

Eyes on You, Valentine
For this tutorial you will need the materials in the zip file below.

For an Italian, Danish, Spanish, Dutch, French and German translation click on the flags.


Unzip the materials into a working folder you have created on your desktop named Eyes on You Valentine. Please duplicate and close original tubes using the copies for your work so you will not lose the originals. This tutorial was written using Almathera/A Warp, FiltersUnlimited/AFS/MirrorBevel and effects of PSP. To work this tutorial, it is assumed you have some working knowledge of Paint Shop Pro. I used PSP2020 for this tutorial.
Thanks go to Cibi to Maryse and to Silvie for their work used in this tutorial.
Use the heart below to mark your place along the way.

1. In your Materials Palette, set Foreground color to #e9d795 and Background color to #400013. Set to Gradient using Sunburst, Angle Null/Repeats 3. Foreground/Background Corel_06_029, Center Point H84/V15. Focal Points both at 50.

2. New/New Image 900X650. Flood fill with Gradient.
3. Using Magic Wand, click on all of the dark places on image to activate them.

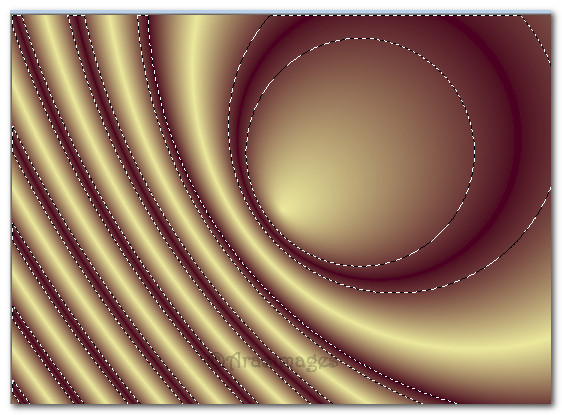
4. In Materials Palette, change Background color to #b40036. Flood fill in each activated space. Deselect.
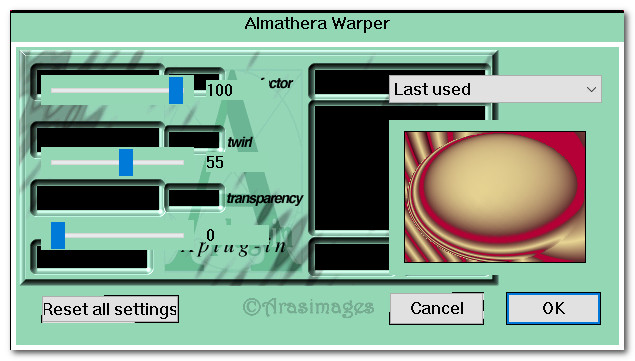
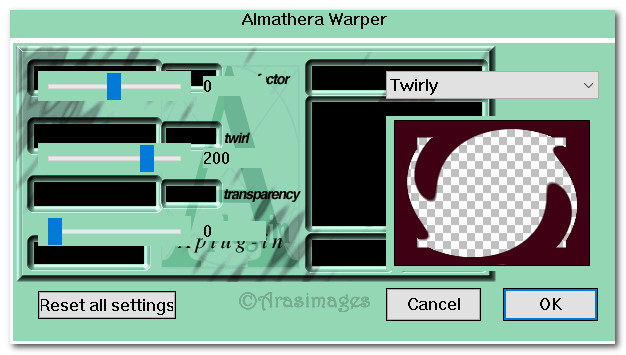
5. Effects/Almathera/A Warper.
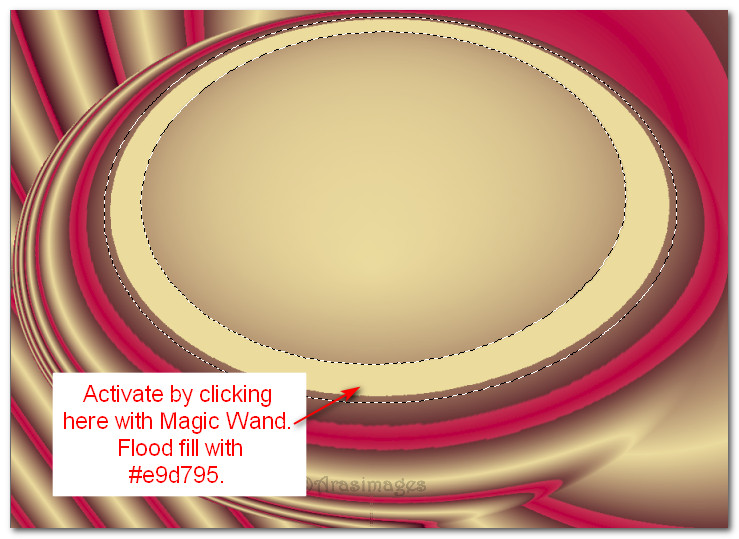
6. Click within center oval to activate an oval. Flood fill it with Foreground color #e9d795. Deselect.
7. In Materials Palette change Foreground to #400013. Create a Gradient using same settings as original gradient.
8. Click between the yellow oval and pink oval with Magic Wand to activate it. Flood fill with new Gradient. Deselect.
9. Image/Add Borders/Add 35px border, Symmetric checked. Color #ffffff.
10. Activate border with Magic Wand. Layers/New Raster Layer. Flood fill with #e9d795.
11. Selections/Invert.
12. Effects/3D Effects/Drop Shadow. Vertical 0, Horizontal 14, Opacity 45, Blur 22, color #000000.
13. Effects/3D Effects/Drop Shadow. Vertical 0, Horizontal -14, Opacity 45, Blur 22, color #000000.
14. Selections/Select None.
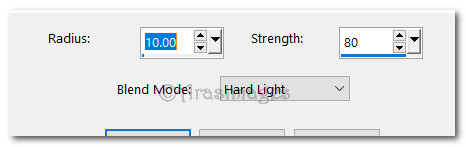
15. From Tool bar select the Preset Shape tool. Choose the heart 3 shape. Use Line style that appears, Width null. Use settings as seen below.
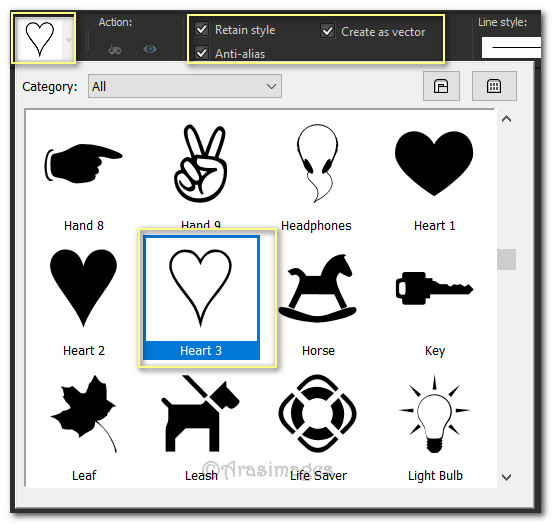
16. Draw out a heart in the center of the oval. Start in upper left corner and draw downward and toward the right to get a proper heart.
17. Objects/Align/Center in Canvas. Convert Vector 1 to Raster Layer.
18. Activate heart with Magic Wand. Flood fill with new Gradient as at Step#7. Deselect.
19. Activate heart center with Magic Wand.
20. Select the recolored Rosa Poppy10.pspimage from materials I have supplied. (Original is in a folder). Apply a Drop Shadow of Vertical -15, Horizontal -15, Opacity 40, Blur 19, Color #000000.
21. Copy Poppy/Paste into Selection in center of heart.
22. Blend Mode Darken. Adjust/Sharpness/High Pass Sharpen. Deselect.
23. Merge/Merge Visible.
24. Image/Resize/Resize by 77, Resize all layers unchecked. Select transparent area with Magic Wand.
25. Layers/New Raster Layer. Flood fill with #400013.
26. Effects/Almathera/AWarper.
27. Deselect. Merge/Merge Visible. Select with Magic Wand the transparent sections on all four sides. Flood fill with #b40036. Deselect.
28. Activate the outer layer (#400013) with Magic Wand. Raster/New Raster Layer. Flood fill with color #e9d795.
29. Selections/Modify/Contract. Contract by 3. Delete. Deselect.
30. Merge/Merge Visible.
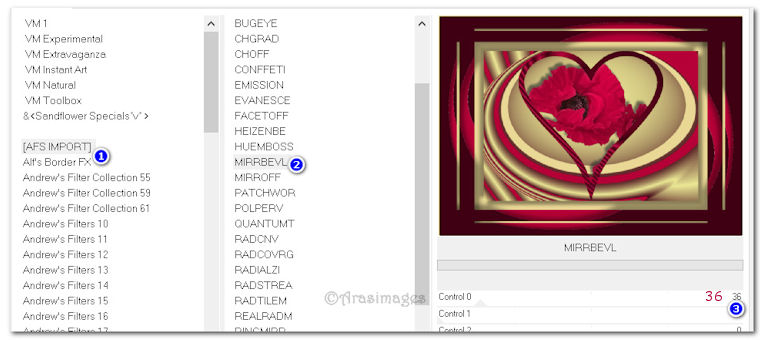
31. Effects/FiltersUnlimited2.0/AFS IMPORT/Mirror Bevel.
32. Open Coeurs_guirlandes_CibiBijous.pspimage recolored image. Copy/Paste as New Layer.
33. Move to left side of image.
34. Open MR_Robe%20de%20Soiree%20rouge.png.
35. Image/Mirror/Mirror Horizontal.
36. Image/Resize/Resize by 77%/Resize all layers unchecked.
37. Effects/3D Effects/Drop Shadow. Vertical 0, Horizontal 15, Opacity 45, Blur 25, color #000000.
38. Effects/3D Effects/Drop Shadow. Vertical 0, Horizontal -15, Opacity 45, Blur 25, color #000000.
39. Copy/Paste as New Layer.
40. Adjust/Sharpness/Sharpen. Move lady towards right side of image.
41. Image/Add Borders/Add 3px border, Symmetric checked, color #e9d795.
42. Add your name or watermark if you wish. Save as .jpg or .png.
Thanks to PamelaD and EvaTexas for checking this tutorial for me. January 2020.
If you are going to use this tutorial for stationery, cards or place the tutorial/tag on another site, I would appreciate you contacting me for permission, giving Arasimages credit for the original tutorial and if possible, a link back to my site. Thank you.
Copyright © Arasimages All Rights Reserved