
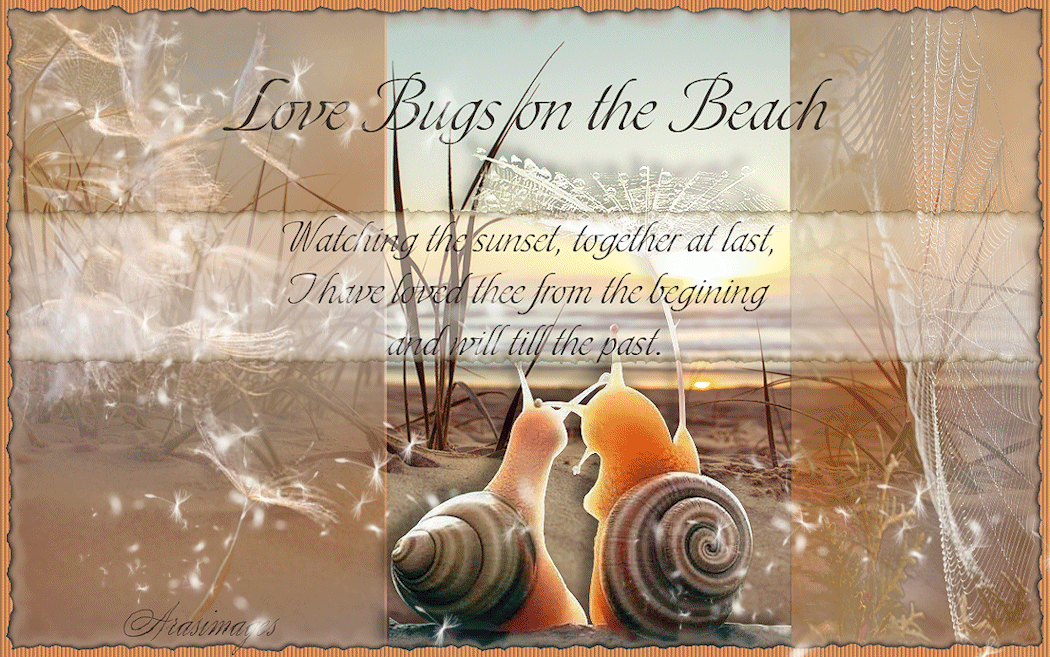
Love Bugs
For this tutorial you will need the materials in the zip file below.

For a Danish, Italian, German, French, Dutch and Spanish translation click on the flags.


Create a folder on your desktop named Love Bugs and unzip the materials in it. When using tubes leave the watermark on originals, duplicate and close out original keeping as is using duplicates for the tutorial. Place Selection into PSP/Selections folder. This tutorial was written using Alien Skin Xenofex 2/Burnt Edges, Transparency/Eliminate Black and effects of PSP2020. To work this tutorial, it is assumed you have some working knowledge of Paint Shop Pro.
Thanks go to SimoneAni300-Pollen-Preview.psp for the dandelion gif and to PamelaD for her tubing of the Love Bugs and unknown owners of the other images for their work used in this tutorial.
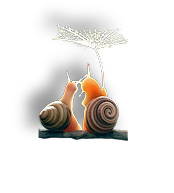
Use the Love Bugs below to mark your place along the way.
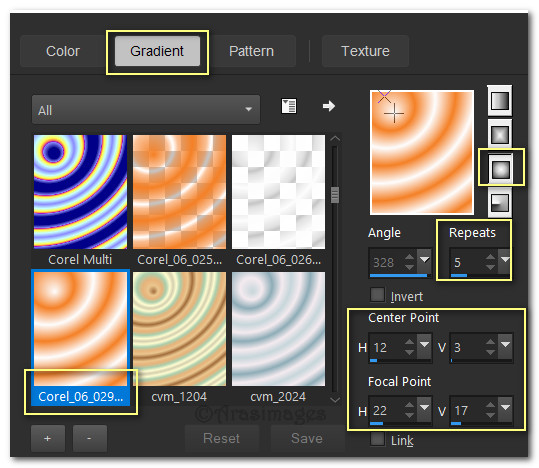
1. In Materials Palette, set Foreground to #fcfcfc, Background to #f3761a. Create a Gradient using Sunburst, set to Angle Null/Repeats 5, Center Points H12/V3, Focal Points to H22/V17, Invert unchecked and Foreground-Background Corel_06_29.
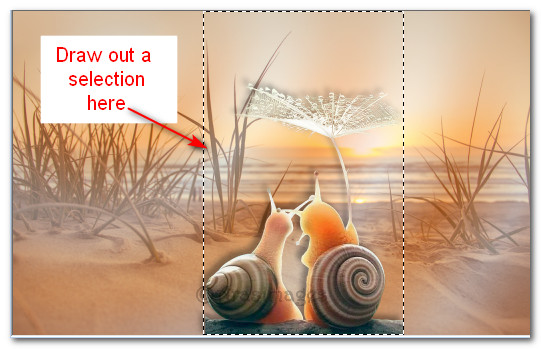
2. New/New Image. Width 1296px/Height810px. Select/Select All.
3. Open Weed plant closeup on beach Stock Photo.jpg. Copy/Paste into Selection. Deselect.
4. Layers/New Raster Layer. Flood fill with Gradient. Lower Opacity to 48.
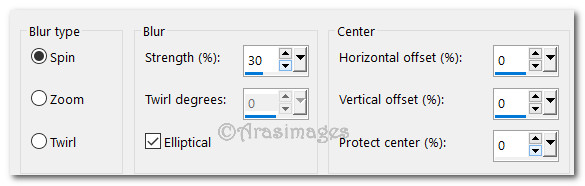
5. Adjust/Blur/Radial Blur.
6. Open TwoSnails.pspimage. Copy/Paste as New Layer.
7. Place them right of center so the "umbrella" stem is just left of sun.
8. Effects/3D Effects/Drop Shadow. Vertical -12, Horizontal -12, Opacity 40, Blur 20, Color #000000.
9. Adjust/Sharpness/Sharpen.
10. Drop down one layer to gradient.
11. Using Selections tool set to Rectangle/Add(Shift), Feather 0, Anti-alias checked. Draw a rectangle on each side of snails so it encompasses them.

12. Delete. Deselect.
13. Open SpiderWeb1.jpg. Promote Background layer.
14. Effects/Transparency/Eliminate Black. Copy/Paste as New Layer on working image.
15. Pull spider web to right side of image. Activate the Move tool/Pick tool. Pull down on the bottom node so web goes from top to bottom so layer covers the gradient on right side. Set Pick tool back to Move Tool.
16. Adjust/Sharpness/Sharpen.
17. Open 54b176702be67b8a04aee4bbd66fdad3.psp image of dandelions. Apply the Transparency/Eliminate Black as you did in Step #14. Copy/Paste as New Layer.
18. Move the copied image to the left side and use the Pick tool nodes to stretch it to fit.

19. Adjust/Sharpness/Sharpen.
20. Move to top layer to continue.
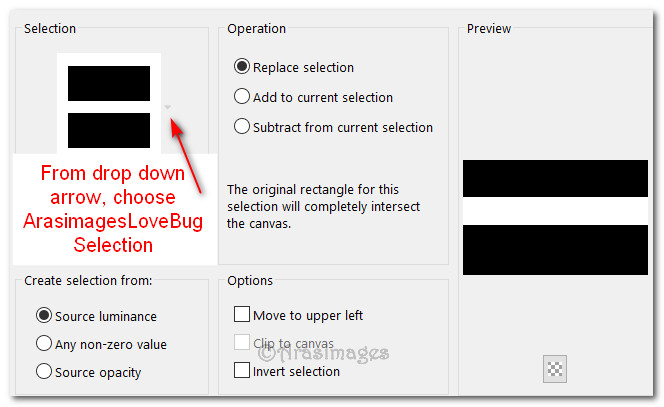
21. Selections/Load/Save Selection/Load Selection from Disk. Choose ArasimagesLoveBugSelection from Drop Down arrow. Load.
22. Layers/New Raster Layer. Flood fill with Foreground color #fcfcfc. Lower Opacity down to 45.
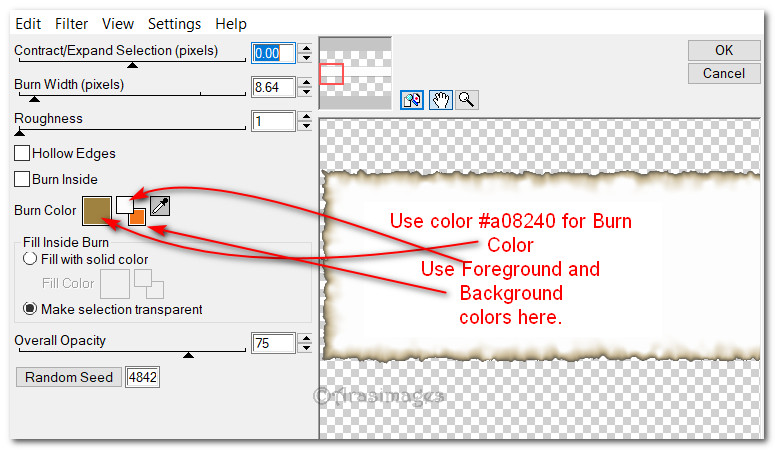
23. Effects/Alien Skin Xenofex 2/Burnt Edges.
24. Selections/Select None.
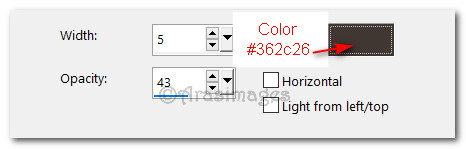
25. Image/Add Borders/Add Border 2px, color #362c26, Symmetric checked.
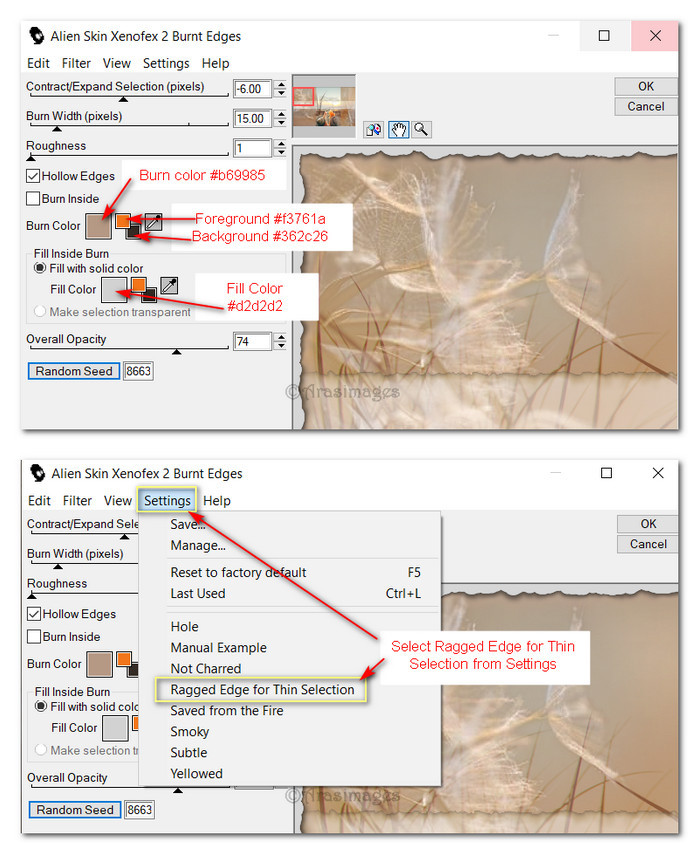
26. Effects/Alien Skin Xenofex 2/Burnt Edges.
27. Click Magic Wand on outer layer to activate it. Layers/New Raster Layer. Flood fill with #f7a263.
28. Effects/Texture Effects/Blinds. Deselect.
29. Using Background color #362c26, Text tool set to Toots Extended, Size 80, Stroke width 0.0. type out the words "Love Bugs on the Beach".

30. Convert to Raster Layer. Move to top. Objects/Align/Horizontal Center.
31. Using same settings except change Size to 48, type out the words "Watching the sunset, together at last, I have loved thee from the begining and will till the past."
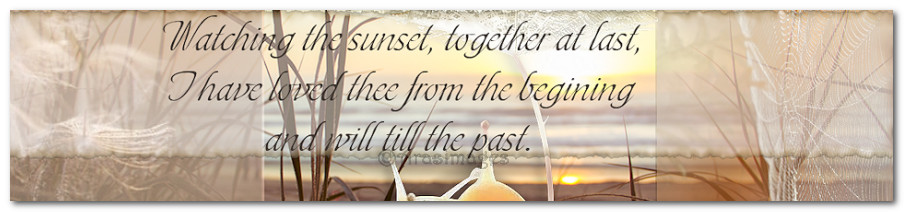
32. Move to the light horizontal strip in center of page, Objects/Align/Horizontal Center. Convert to Raster Layer.
33. Sign your name or leave your watermark if you wish. Merge/Merge Visible.
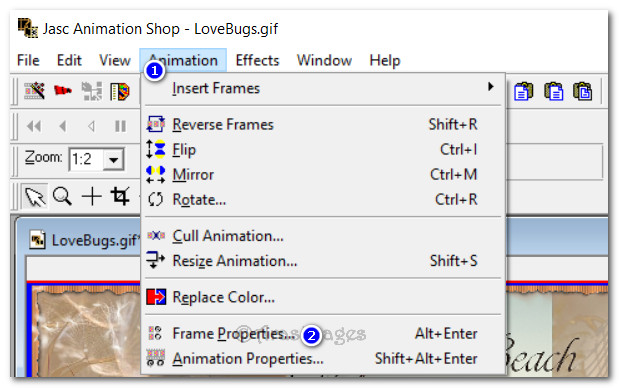
34. Image/Resize/Resize by 85%/Resize all layers checked.
35. Adjust/Sharpness/Sharpen. Save as LoveBugs.png file. Copy.
36. Open Animation Shop. Paste as New Animation. Duplicate image 23 times having 24 frames in all. Highlight first frame. Edit/Select All.

37. File/Open floaties.psp file. Highlight first frame. Edit/Select All. Copy.
38. Go to main image. Right click into first frame/Paste/Into Selected Frame. Left click to set floaties in place. Paste once in top left corner, again in center a little to the right and bottom left corner toward snails. Paste/Into Selected Frame once again on right bottom corner.
39. To slow down animation click on Animation/Frame Properties. Set to 14. The higher the number, the slower the animation.
40. Click on View Animation icon at top tool bar to check your animation. If you are not satisfied with it, use the Undo Arrow at the top tool bar to undo and try again. When you are satisfied, click on File/Save As. When the Save As box comes up, give your work the name Love Bugs on the Beach, name where to save it and leave it to save as a .gif file. Click Save.
41. As the boxes continue to come on your AS workspace, keep clicking on Next, Next, Next and lastly Finish. You are now done!
Thank you PamelaD and EvaTexas for your checking my tutorial. January 19, 2020.
If you are going to use this tutorial for stationery, cards or place the tutorial/tag on another site, I would appreciate you contacting me for permission, giving Arasimages credit for the original tutorial and if possible, a link back to my site. Thank you.
Copyright © Arasimages All Rights Reserved